GLAZE-BASE (g) Applying by dipping plates, jar and lids
ca: ESMALT-BASE (g) Preparació dels plats, gerres i tapes
es: ESMALTE-BASE (g) Preparación de los platos, jarras y tapas
Note: Glaze colors and slips can be applied in exactly the same way.
Preparing the glaze-base.
a) Prepare the glaze-base in the same way as for tiles.
b) Make sure you have enough glaze-base. It has to be deep enough to completely cover what you are preparing and the density and viscosity must be correct for your work.
c) If you are using the same glaze-base that you use for your tiles, you might need to change its density. When the products are handmade, both brown and white bisque, the base needs less water, and it must be thicker for brown than for white bisque. To thicken it, before mixing, remove the excess water. Using a very slightly curved plate, skim off the water and keep it.
d) Remember, keep the water, as it can always be re-added and when you finish it can be put back, it has glaze-base in it so do not waste it.
e) Before starting to use the glaze-base, stir and mix it well.
f) Have wooden boards next to the container to stand them on after being dipped.
Applying the glaze-base, by dipping.
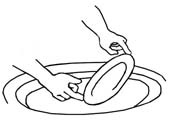 PLATE: Using your index fingers, hold the plate on opposite sides and dip it into the glaze-base at an angle of 45º. Your right hand goes into it but only the index finger of your left hand. When the plate is completely covered, move it from left to right two or three times. Take the plate out, still using one finger of each hand, and hold it at an angle of 75º over the glaze. The base dries in seconds and any excess glaze drips off
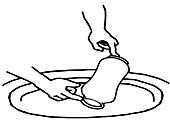 JAR: Hold it at the footing with your left index finger and the neck edge of the jar with the right index finger. Slowly put the jar into the glaze-base, lower the part of the neck first, so the glaze-base flows inside it. When covered, turn it backwards and forwards so as to move the base inside the pot, so it goes round and covers it all. Be careful when doing this, there is often an air-block, which stops the base entering and covering the inside. When you remove the jar from the glaze-base, tilt it so the excess glaze-base runs out.
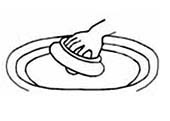 LID: Put your finger inside the lid and against the flange with enough pressure to hold it upside down. Dip it into the glaze-base, completely covering and moving it gently so the glaze gets right into the inner edges of the lid. Still holding it with your fingers, take the lid out and turn your hand, so it is the right way up, let the excess glaze-base drip off and hold it until it has lost its shine. Then take it by the knob, move it onto a bar of wood and leave to dry.
Note. With everything you have prepared, dip a brush or your finger into the glaze-base and hold it over the spaces that your fingers have left on the edges to fill them up with base. Apply more than is necessary as it shrinks and this can be corrected when being cleaned! Leave the work to dry and after about ten minutes you can start cleaning it.
BISQUE: Two sections on preparing the plates, pots and lids: : Bisque (c) Sounding
Click on the image to enlarge it
 With a finger of each hand hold the edge of the plate it at 45º.")
 Dip the plate into the glaze so it is completely covered.")
 Lift out the plate, hold it at 75º, so the excess glaze drips off, it dries in seconds.")
 Hold the pot by the footing and the neck, lower neck so the glaze-base goes inside.")
 When covered, turn it so the glaze cover all the inside of the pot.")
 Remove it and tilt it so the excess glaze-base runs out.")
 To hold the lid put your fingers inside it and press them against the edge.")
 Dip the lid into the glaze and completely cover it inside and out.")
 Lift it out and turn it the right way up so the excessive glaze fall out.")
