Ceramic - Pottery Dictionary

by Susan Mussi

ca: ESCALA

es: ESCALERA

Click on the title to see more images

Ladder A structure of wood, metal, or rope, consisting of two sidepieces with a series of bars or rungs with bars connecting both sides, at suitable distances, to climb up or down.

Note: Shorter ladders, which are the height that can be used to sit on, are called Step Ladders and very short ones are called Step Stools. In the dictionary they are shown here and under their name.

ca: LAMBETH

es: LAMBETH

Lambeth was a town outside London and now is a district of London itself. It became famous in the late 17th century for its Majolica method of decorating ceramics and at that time this method was known as Lambeth. In England it is now known under two other names; Delftware, as it was believed it came to England from the town of Delft in the Netherlands and Majolica, its original Spanish name and the name it is known by in the United States.
Read more about: Majolica: 2b – History in Spain

ca: MALLA

es: MALLA

Lawn is the name of the material that is connected to the walls of a frame to form a sieve or screen. Liquids and powders are passed through the lawn for mixing and cleaning. It was originally made of silk or linen, but now it is usually metal for sieves and nylon for screens. It has a mesh, which are the tiny holes left between the woven threads. The lawns are made with different sizes of mesh, from 40 for a very coarse material, to 200 for a very fine one and they are graded by threads per inch.
Read more about: Sieves / Screen Printing

ca: ESCÓRRER

es: ESCURRIR

Leaching occurs when glazes being fired react incorrectly. A glaze can turn into a liquid, run and adhere to everything it comes into contact with, other colors, kiln furniture and walls. The word leaching comes from the name of a worm “leech” which reacts in the same way; it adheres to another living body. If you have seen that great film African Queen you will understand the meaning very well.

ca: PLOM

es: PLOMO

Lead is dangerous to touch or inhale and has, by law, been banned for use in the ceramic and other industries. It was mainly used in glazes and colors; if using old glazes, check to make sure they are lead free.

ca: FRITA DE PLOM

es: FRITA DE PLOMO

Lead frits (Plumbic frits) are used in the preparation of glaze bases, as a replacement for crude lead so as to avoid toxicity. They dissolve easily with colors and with oxides and give good results. They can be glossy, matte, transparent, opaque or crackle.

ca: DURESA DE CUIR

es: DUREZA DE CUERO

Leather hard or leather dry is a stage in the drying of clay, when it is stiff enough to be moved without damaging, but soft enough for engraving, scratching and other techniques,fettled and is flexible enough for the shape to be corrected.

ca: POTES

es: PATA –PIERNA

Click on the title to see more images

1) Leg is the lower part of a human body, made up of two separate sections that go from hip to the ankle.
2) Legs in furniture such as chairs, sofas, etc., are poles that can be any size or shape between the main body and the floor and for low furniture the space helps to avoid the absorption of dirt and damp.
3) Legs on bowls. Bpwls can have legs and they are explained under foot. The photo shows cups and a bowl with legs. These are Spanish and made for Cremat which is explained in two sections: Read more about: Bowl turning / Footings attached separately

ca: RETOLACIÓ Decorativa

es: ROTULACIÓN Decorativa

Click on the title to see more images

Lettering is to decorate letters on to pottery; they can be formed in clay, slip and with in-glazes or on-glazes. There are different styles of letters and different methods of decorating.

This section has photos with lettering done using the Majolica method to show some of the many possibilities and styles there are. The tiles are prepared with a white, crude glaze-base and the designs have been prepared, drawn onto transparent paper, pounced and marked on with vegetable ash.

Note: The descriptions of the illustrations go from left to right.

Classical letters, without profile: the photo on the left shows a poem in Catalan, which has several words incorrectly spelt; we keep it to show clients how nice letters can be. They are painted with one color, accentuating the characteristics of the letters, which change from a thick to a thin line. Tiles 15 × 15 cm. total size 30 × 45 cm

Sala de Cata: classical letters, without profile and on the right of each one the outer line is repeated and the space it forms is covered by a light coat of the same color, this gives it a three dimensional affect. The tiles say “Room for Food.” The tiles are 15 × 20 cm and are used horizontally, it measures 15 × 120 cm. in total and the border is part of the tile.

El Asturiano: the figure is in the local dress and pouring cider, which their local custom and drink. The letters are painted in dark blue and classical but arranged to fit in to the 3 tiles vertically

Terracuita: is the name of a ceramic shop in Barcelona. The tiles 20×20cm and had to be cut to fit into the architectural setting. The name is done in the Dry-Cord method with dark blue, the tile on the right is a copy of an antique design and the word “ceràmiques” and the letter T are painted directly on to the opaque glaze-base with the color ochre.

Three designs all with very different letters: the first has strong gothic letters in dark brown, the next is Modernistic in dark blue and the last is a clients’ design, where the cat and the letters are in black and the number in ochre.

Three tiles of 20 × 20 cm: in the first and the last the letters are painted in dark brown and in the middle one the outline and the bottom part of the letters are painted in dark brown with the top part in ochre and the letters shaded on the right with an off cream color.

ca: LLETRES - Fetes a raig

es: PALABRAS- Reguero

TRAILING WORDS; trailing can be done on dry clay, bisque or a glaze-base. Work out carefully the layout of your words. You can draw with a lead pencil on to clay or bisque or, as with a glaze-base, you can mark on your design with vegetable ash as it will all burn away when fired. It is very important to know what you are doing. Work on a flat surface and, if small enough, work on a wheel and use a banding bridge or bar to steady your hand. Knowing how to control the amount of slip that dispenses from the trailer is very important. When finished, it is covered with a layer of glaze.

ca: TAPAS (a) En ceràmica,

es: TAPAS (a) En cerámica.

LIDS can be made by slip casting or throwing, throwing is explained here.

LID is the top part of a jar, basin, jug, box, etc. that is separate and is used for different purposes, visual, hygienic and to help keep contents at a required temperature. It should be thought of as part of the shape and design as a whole, the two parts, lid and body, should complement each other. Both should be made at the same time, so that the shrinking of the clay proceeds at the same rate, thus helping to ensure they fit together correctly.
LID - Shapes 
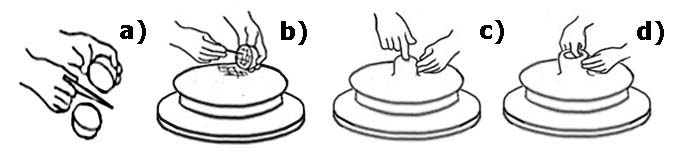
The drawings above illustrate the many possible shapes of lid.

The diagram above shows the different sections of the lid.

Flange of the jar: A ridge on the lid and neck of a jar formed to control the movement of the lid and stop it slipping off.
Knob: A small protruding, round piece of clay on the top of a lid, side of a bowl or jar, used as a decoration and to hold when picking the lid up.
Shoulder: The turning point where the shoulder joins the neck.
Neck: The part that narrows before joining the flange of the jar.
Gallery: The part of the shoulder or neck that supports the lid.
Flange of the lid: The part the lid stands on when taken off the jar and which holds it in place.
Lip of lid: Can overlap the flange of the jar or be inside it and rest on the gallery. It is designed to fit exactly so it cannot slip off and it keeps the ingredients it is carrying hot. This is shown in the first two of the eight drawings at the top.

LIDS IN RELATION TO JARS

The drawings show three types of lid and all have many variants. The first lid rests on the flange, the second rests on a gallery inside the neck and in the last drawing the lid of the lip rests directly on top of the flange.

Lids are always used as part of other utensils such as jars, pots and casseroles. The main body is made first so the lid can be made to fit. There are two ways of turning a lid, the first is by working directly on top of the wheel and the other using a cone. A cone is usually used when a longer shape is needed or a knob has to form an integral part of the lid. Lids that are made using a wheel are always formed upside-down and have to be turned. The two methods are explained in the following sections.

ca: TAPAS (b) Selecció de tapadores en ceràmica.

es: TAPAS (b) Selección de tapaderas en cerámica.

Click on the title to see more images

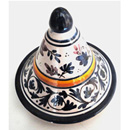
There are 12 photos and they are to show a selection of lids, the relation between the lid and the jar and to show a few designs, there are hundreds. They are to give an idea of how important the relation between the lid and the main body is. The lid fits correctly and together they form an overall design.

Read more about: Majolica: 5i – Painting lids

ca: TAPAS (c) Tornejades en ceràmica.

es: TAPAS (c) Torneadas en cerámica.

This section explains how to make a lid directly on the wheel.

a) The sections of the lip in relation to the lid and jar. Make the jar first so you have the inside and outside measurements of its flange, this allows you to measure it and make the lid to fit it exactly. In the following instruction the flange of the lid fits inside the circumference of the flange of the jar and the lid overlaps it.
b) Centering the clay.
c) Measuring the flange. A lid is always formed upside down. Make the shape letting the sides curve inwards at the bottom, which when turned will be the top of the lid. With calipers measure the outside diameter which has to overlap the flange of the jar.

d) Opening the center; the outside is kept level with pressure from the fingers of the left hand while the right hand is supporting the outside with the thumb and the first two fingers are making a space in the center and leaving enough clay round the edge for the lip and flange.

e) Forming the flange; with the first finger of the left hand inside and the first finger of the right outside, the clay is pushed up to form a wall at 90º which is known as the flange of the lid. The diameter of the outside of the flange should be measured with calipers to make sure it fits correctly inside the neck of the jar.

f) The lid is separated from the wheel by pulling wire cutters between them. It is then turned the right way up. This can be done by putting a tile on top, turning it and continuing to use it as a tray to move and work on the lid.

g) Level and smooth off the surface and add a knob if required.

Note: These are links to all the sections on throwing in alphabetical order.
Bowl Throwing / Cylinder Throwing / Jars Throwing / Lids (c)Throwing / Lids (d) Throwing Cones / Lids Knobs (f) Attached / Plate Throwing / Stack – Throwing / Teapot (a) Body / Throwing – with a tube

ca: TAPES (d) Tornejades amb un con en ceràmica.

es: TAPAS (d) Torneadas con un cono en cerámica.

LIDS: Using a cone the lid and the knob can be made in one piece or separately.

LID CONE - shaping and forming

a) Center the clay and make a cone to the size you need.
b) Support and squeeze in the clay with the left hand to make a neck between the cone and lid and at the same time with the thumb of the right hand indent the center.

c) With the left hand, support the outside and gradually put pressure on the inside with the thumb to form a space in the centre. Press outwards to make the space bigger, leaving enough clay round the edge to make the lip and flange. At the same time shape the underneath part of the lid, narrowing it but leaving enough clay to support it while the lid lip and flange are made.
d) With the first finger of the left hand inside and the first finger of the right outside, the clay is pushed up to form a wall at 90º which is known as the flange of the lid. The diameter of the outside of the flange should be measured with calipers to make sure it fits correctly inside the neck of the jar.

LID - Turning

e) Shows the cone with the lid formed.
f) A small, flat tile is placed on top.
g) Start to separate the lid from the cone, leaving enough clay for the knob, by squeezing it on each side with the thumb and index finger of both hands.
h) With one hand put pressure on the tile and with the other separate it from the cone and turn it the right way up, the tile acts as a tray.

LID CONE - Separated from the cone - knob turning

i) Make a bat to hold the lid. Center a small piece of clay; make it low, so it is not higher than the lip of the lid that it is being made to hold. With calipers measure the diameter of the inside of the lid and lock them. Then with a pointed steel turning tool go round the outer edge of the bat taking off all the excess clay until it is the right size to fit into the lid and check the size with the calipers. Round and smooth off the top part.
j) Put the lid on top and for safety, connect the lid with a coil of clay to the wheel so it does not move when being turned. Turning the wheel, the surplus clay is formed into a knob.
k) The lid finished.

Note: These are links to all the sections on throwing in alphabetical order.
Bowl Throwing / Cylinder Throwing / Jars Throwing / Lids (c) Throwing / Lids (d) Throwing Cones / Lids Knobs (f) Attached / Plate Throwing / Stack – Throwing / Teapot (a) Body / Throwing – with a tube

ca: TIRADORS TAPAS (e) Tornejades amb un con en ceràmica.

es: TIRADORES TAPAS (e) Torneadas con un cono en cerámica.

LID KNOB Knob implies a small, round solid, protruding shape. It is attached to an object to hold when picking it up with your fingers. In pottery they are made in two ways, separately then attached or part of the clay when left after being turned.

KNOBSFORMED ON A CONE
KNOB FORMED ON A CONE
a) Make a small cone and with the clay at the top and the wheel turning, form a knob.
b) When finished they have to be separated and to do this push a long strong needle in to the neck and slowly turn the wheel until the needle has gone right round.
c) Then carefully pick up the knob, move it to one side on to dry.

Note: The parts that are going to be attached should be turned at the same time, such as lids and knobs. Have a large tile to use as a tray, big enough to hold and move all the knobs that have been prepared. They are left until they become leather hard and the two parts that have to be joined are dry enough to be attached.

ca: TAPES TIRADORS (f) Afegides a les tapes ceràmiques.

es: TAPAS TIRADORES (f) Añadidas a los potes de cerámica.

KNOBS -ATTACHED
The following section explains different ways of attaching knobs to lids. First the lid has been prepared, as explained in the previous section, turned on the wheel, separated it with a wire cutter, turned the right way up and then the surface cleaned and smoothed.

KNOBSWITH A BALL OF CLAY
KONB ATTACHED – Attaching the knob

a) Make a ball of clay to the size needed for the knob you are making.
b) Dampen the part where the lid is going to be attached.
c) Attach the ball of clay firmly on to its place.

Note: The knob after being attached firmly to the lid can be left round or shaped.

KNOB ATTACHED – Forming the knob on the wheel.

d) With the wheel turning, form the basic shape using your fingers.
e) With the first finger of the right hand push the outer edge down and support underneath with the fingers of the lefthand.
f) The lid with the knob finished.

Note: A knob which is not round cannot be shaped turning the wheel, it has to be formed by hand. It can be shaped then attached or the opposite, attached and then shaped.

Note: These are links to all the sections on throwing in alphabetical order.
Bowl Throwing / Cylinder Throwing / Jars Throwing / Lids (c) Throwing / Lids (d) Throwing Cones / Lids Knobs (f) Attached / Plate Throwing / Stack – Throwing / Teapot (a) Body / Throwing – with a tube

ca: TAPAS TIRADORS (g) Afegides en ceràmica.

es: TAPAS TIRADORES (g) Añadidas en cerámica.

KNOB – Attaching and opening.
The lid has been thrown on the wheel, separated and turned so it is the right way up and put on a bat. Leave it to become leather hard, dry enough to attach a knob without damaging the shape. Put it back, with the bat, on to the wheel, attach the knob and open it.

The Stages of working.
a) Make a ball of clay the size needed for the knob and slice off a piece, the part that is flat will be attached to the lid.
b) Scratch the part on the lid and knob that are going to be joined, cover them with slip, push them together, then smooth off and seal up the joint.
c) Turn the wheel and with your finger start making an open space in the center.
d) Making the space in the center bigger and the outer walls thinner.
e) Put a large needle through the wall, at the height you want the wall to be. Holding it very steadily, turn the wheel until the two ends meet and the piece is completely separated
f) With the needle in your right hand supporting the top edge with the first finger of your left hand remove the surplus piece of clay.
g) Give the final shape to the knob, pulling the edge out and leaving a narrower neck.
h) The last drawing is the casserole finished.

ca: RECOLLIT O RETIRAT

es: RECOGIDO

Click on the title to see more images

Lifting refers to slip or glazes lifting up off the work and is usually caused during the first hours of firing. When slip or glaze flakes off work, it could be caused by grease or dust on the fired body, by the clay being too damp or by too much difference in drying speeds between the body and the decoration when being fired. There are other words used to describe this reaction, flaking and peeling being two of them.
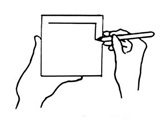
ca: LLUM

es: LUZ

a) Light in weight implies not heavy, less than the usual or average weight.
b) Light in color means a soft not strong color.

ca: LÍNIES – Dibuix

es: LINEAS - Dibujo

Lines on tiles.
Lines can be continuous, straight and of different widths and colors. Lines are usually the same distance from and parallel to the edge of the tile and can go round one tile or many so that when put together, the line is all the way round. The lines at the corner connect and form an angle of 90º. You can start with any line, put in as many as you want, of any width, of any color, and with or without areas of the glaze-base between them.
When a line is put round a circular object like a plate it is called banding.
Read more about: Borders (6) On tiles

Marking the border lines by hand
A border line circumscribes the outside edge of a tile or a picture of many tiles. Mark the lines on with a pencil as a guide for painting. Use a very soft lead pencil, a 3B is good; this marks without damaging the glaze-base. Sharpen it and then rub one side of the lead on paper, so it flattens. Hold this part against the tile, at the distance you want the line to be drawn; with your thumb and first finger holding the pencil, use your second finger against the edge of the tile to control the distance: move your hand along the edge of the tile drawing the line. For a single tile design, rotate the tile and do all four sides. Put the tile on the stand and paint the lines, following the pencil lines. This can be used for designs of all sizes, just marking the side of the tile, which is on the outer edge of the design.

Painting horizontal and vertical lines

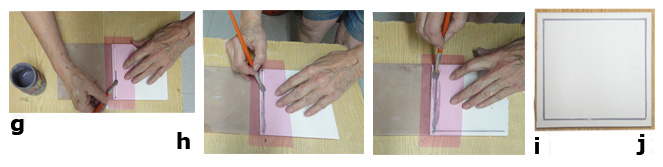
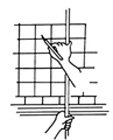
Painting horizontal lines. Put the tiles that are going to be decorated on a stand and use the pole to steady the movements of your hand. Hold the pole with your left hand, resting it against the small shelf that supports the tiles. With your right hand hold the brush with your thumb and first finger and with the little finger hold the pole. With your left hand move the pole smoothly to the left or right, balancing it against the small shelf so your hand holding the brush is being moved and draws the line.

Painting vertical lines
Hold the pole in the same way as previously described. Then move your right hand up and down the bar to paint a vertical line. If you find vertical lines are more difficult, just turn the tiles round and paint horizontally. They can be painted directly or by following lines that have first been marked with a pencil.

ca: LÍNIES – Plantilles

es: LÍNEAS – PLANTILLAS

Under stenciling how to prepare the paper and to cut out designs is explained.
The following explains how to stencil a line round a tile

Working method
1) Plastic paper or paper prepared with a varnish can be used. Plastic paper is better because you can see through it and it can be quickly cleaned and dried.
2) Cut the paper to the size needed and make it big enough to overlap the tile and to hold it down while painting.
3) Affix it onto a cutting pad and with a labeller with a fine point and permanent ink draw the guide lines, which are the three sides of the tile and the outline of what has to be cutout. The space between the edge of the tile and the line is 1cm and the width of the line 2mm. The length of the line has to be 13cm.
Note: If using a strong color these measurement are correct, but if you are using a light one the lines should be made 2mm shorter, so they don’t overlap and become darker.
4) Use adhesive tape to join the plastic paper to the cutting pad.

a) Use a ruler as your guide and with a very sharp, strong razor-knife, cut the plastic by pulling it along both lines.
b) Lift it up and cut the center.
c) Bend the each part where it is still joined, flatten the joint and slice them off with the razor-knife.

d) Lay two tiles together, one prepared to paint and the other one bisque, this stops the paper from bending with the pressure of the brush stroke.
e) The stencil line cut out.
f) Lay the stencil on the tile so it is correctly aligned and hold it in place.

Note: Paint with a stiff, large paintbrush, stir the paint and remove the excess paint from your brush by pressing it against the edge of the paint pot.
g) Paint the lines, it is better to make a brush stroke from the center to one end.
h) Then from the center to the other end.
i) Turn the tile and repeat the line, do the same on each side.
j) All the lines painted.

Read more about: Stencil: (1)

ca: BOCA D'UNA GERRA

es: BOCA DE UNA JARRA

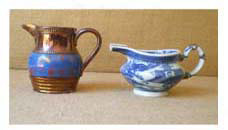
Lip is the indented part at the edge of the neck of a jug, from where the liquid when poured, runs out. Made when clay is soft by pulling the part down and outwards with your finger, giving it the size and shape required. The center of the lip is usually designed to be directly in line with the center of the handle but it can be at 90º to it. This invisible line cuts the circle of the neck in half.
a) Side view of a jug.
b) Supported by your left hand fingers and the thumb of your right one, it pulls the clay down to start to form the lip.
c) The clay is shaped underneath the lip.

ca: VORELL DE LA TAPA

es: BORDE DE LA TAPA

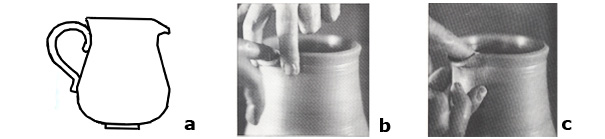
Lip is the outer circumference of the lid that can be inside, outside or on top of the flange.

ca: PELL DE LLANGARDAIX

es: PIEL DE LAGARTO

Lizard skin is the name given to effects in the glaze that resembles scales. It is done by putting two different glazes on top of each other and firing them together. The top glaze has more clay in it which causes it to shrink during drying and this separates it into small sections. When being fired, the underneath glaze melts and these sections sink into it and form the lizard surface.

ca: CARREGAR

es: CARGAR

To load is to fill up a space.
A load is a large amount; He had a load of worries; the load was too heavy to carry.
Overloaded when something is too filled up to function properly. The kiln was so overloaded it took double the time to fire ; he was so overloaded with worries he could not work.

ca: ENTRELLAÇAR

es: ENTRELAZAR

Loop is a portion of a thin, pliable material such as string, cord, metal, etc., twisted to make a circumference where the two ends join or overlap, and can be any shape or size and with or without a handle.
Read more about: Loop tools

ca: NANSA - BUCLE

es: ASA - Bucle

A loop handle is made with a separate piece of clay which is added to the side or lid of an object and always has a big enough space between it and the main body for it to be held by hand while being moved.
Read more about: Handle / Handles – Loops

ca: BUIDADORS – EINES

es: VACIADORES – HERRAMIENTAS

Loop tools. The photo shows four. The first is also known as a coiler.This name is used because the metal is round and it is used for coiling. There are many different ones with wooden or plastic handles, thin metal wire loops at one or both ends, loops of different shapes and the metal can be flat or round. They are used for slicing off strips of clay to make a shape or pattern. The drawing shows a jar being fluted.
Scooper is also a loop. There are large ones for getting clay out of containers and small sizes which are very easy to make. This is explained under making a scooper.
Read more about: Coiler / Coiling – Coil Building / Coiling – With a slab roller

ca: COCCIÓ A BAIXA TEMPERATURA

es: COCCION A BAJA TEMPERATURA

Low temperature glazes are ones which mature up to 1050º C.

ca: NANSA - Anella

es: ASA - de anilla

A lug handle has little or no space between it and the main body. It can be made in two ways, either by making the lug separately and attaching it or by joining the clay to the main body and pulling it.
Read more about: Handle / Handles – Lug attached / Handles – Lug pulled

ca: LLUSTRE

es: LUSTRE

Click on the title to see more images

Lustre: the word literally translated means a state or quality that reflects light, glitter, sparkle or gloss. The name is given to an on-glaze method of decorating that started in the Middle East, moved into Spain and then on to other European countries. The colors are made up from expensive metals, copper, gold, tin, silver etc and painted on to a fired glaze surface which when fired leave bright, metal colors. Superb work was made in the 15th and the 16th century in Valencia, Spain and there is a very good collection in the Victorian & Albert Museum in London.

Note: Lustre Pottery is a very good book written by Alan Caiger-Smith which explains the evolution of lustre through the centuries and the methods of working.

a) Large jar, Copper Lustre. 30 cm high. Alan Caiger-Smith.
b) Jar. Lustre mixture of copper and silver. 26 cm. Alan Caiger-Smith.
c) Bowl copper and silver lustres 26 cm wide. Alan Caiger-Smith.
d) A bowl by Alan Caiger-Smith.
Decorating with lusters copper and reduction. A terracotta pieces made in the year l990 in Barcelona. On the bottom of the bow is the reference number of the enamel base used, number 88
Fired at 1080 ° C in oxidizing heat and the 2ª a luster red reduction firing at 750 ºC in a gas kiln
e) A bowl by Núria Pié.
Piece of porcelain decorated with gold lustre in a reduction firing, made in 1988. A white opaque base fired at 1250º C in an oxidizing heat and the second firing was a reduction firing at 750º C in a gas kiln. A line of gold lustre was applied over a fired white base and a wooden pincher was passed over it to form the pattern of the lines.
f) A bowl by Joan Carrillo.
Decorated with reflective metals. Enamel bismuth. Decorated with red copper on gold background and made with terracotta clay.
First firing in an oxidizing heat of 1050° C and the second firing at 750° C a reduction, maintaining the heat for 20 minutes in a gas oven.
g) Bowl by Núria Pié.
Decorated with gold lustre over a glazed white clay. Made in 1988.
Fired with a white glaze at l080° C, the second application was of golden lustre, then a series of lines was added with thin reddish brush strokes, it was then Lustre fired at 750° C in a gas kiln.
The white porcelain glaze in the low lustre firing made a spectacular cracked surface. She has never been able to do it again.
Photos lent by: Alan Caiger-Smith, Nuria Pié, Joan Carrillo.

ca: LLUSTRE - Colors

es: LUSTRE - Colores

Lustre colors are very thin coatings of metallic substances fired at comparatively low temperatures onto an unfired glaze surface. Common materials used in luster are stannous chloride, barium chloride, sodium chloride, bismuth, silver and gold.

ca: SEGELLAT

es: SELLADO

Lute: to join two bits of leather-hard clay. Score the edges that have to be joined so that you get a rough surface, then wet them, add slurry on each side, hold them together for a short while, fill up any spaces round the outside where the parts join, and leave to dry. Then sandpaper down any rough parts, and finally the piece can be fired.