SADDLE
ca: FALCA
es: CUÑA
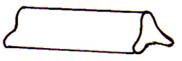 Saddle is a bar of refractory kiln furniture in the form of a concave triangle and is made in different sizes.
Read more about: Furniture
ca: SEGURETAT
es: SEGURIDAD
Safety: Many products used in ceramics contain toxins, which are poisonous. Read all instructions carefully; mark them clearly so everyone using them is aware of their dangers and wear gloves and a mask while working, particularly spraying, cleaning and working with the slip and glazes.
Read more about: Gloves / Goggles – Respirator / Mask – Respirator
ca: GASETA
es: GACETA
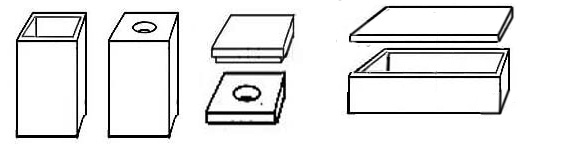
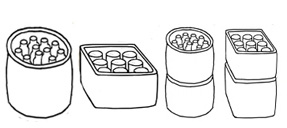 Saggars are strong boxes made of refractory clay to hold ware prepared with a glaze. They were originally made for large industries when kilns were fired with wood, to protect pieces from an open flame, smoke, gases and flying ash. As the main method of firing is now electric they are used less, but can still be found in large industrial ceramic firms to shield ware from variations in heat and kiln debris. Designed to fit vertically one on top of the other, a pile of saggars is known as a bung.
ca: ENCIAMERA
es: ENSALADERA
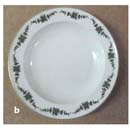
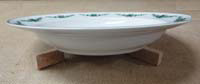
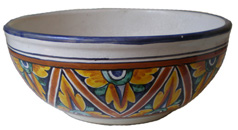 Salad bowl: is a large deep dish of any size that is used to hold many different foods such as fruit, salads, etc. They are all the same but with their own name, salad bowl, fruit bowl, soup bowl, etc.
Read more about: Bowl
ca: SAL I PEBRE - Perforadors.
es: SAL Y PIMIENTA - Perforadores.
![]() Salt and pepper piercers were originally designed to make holes in salt and pepper pots. They have a wooden handle a strong steel piercer of a different thickness at each end. They are used when many small holes of the same size are needed in a specialty such as piercing.
Read more about: Pierced – Decoration
Salt and pepper piercers were originally designed to make holes in salt and pepper pots. They have a wooden handle a strong steel piercer of a different thickness at each end. They are used when many small holes of the same size are needed in a specialty such as piercing.
Read more about: Pierced – Decoration
ca: ESMALT SALÍ
es: ESMALTE SALINO
Salt glaze. Pottery referred to as salt glazed or salted is created by adding common salt, sodium chloride, into the chamber of a hot kiln. Sodium chloride acts as a flux and reacts with the silica and clay in the clay body. A typical salt glazed piece has a glassine finish, usually with a glossy and slightly orange-peel texture, enhancing the natural color of the body beneath it.
Technical process
Salt fumes have a dramatic effect on clay under heat. When kiln temperatures reach the melting point of common salt, approximately 900° C (1660 degrees° F), granulated or rock salt can be introduced into a kiln through peepholes or other openings. This resulting in a surface blush of color forming on the ware body. At higher temperatures, over 1280° C (2350° F), the traditional temperature of high fired salt ware, salt becomes an active vapor throughout the kiln interior. A dilute form of hydrochloric acid is given off as a vaporous by-product.
First introduced in the 14th century, the process was initially used on earthenware which was fired from green (unfired) to finished ware in a long, slow cycle. However, the process was soon adapted to stoneware which can either be fired in a one fire cycle or in two stages, a “bisque” fire and a final “high” fire. This two stage process results in a semi-vitreous state at a lower bisque temperature. Ware is then allowed to cool to room temperature for decoration before a further firing.
Salt can also be used as a decorative element on selected individual pots. Bisque ware can be soaked in a brine solution to create salted patterns. Rope and other textiles can also be soaked in brine and wrapped around bisque ware. Salt can also be added, in solution, to colored clay slips and can be sprinkled onto bisque ware in pottery containers called saggers.
A related method, called soda firing, substitutes soda ash sodium carbonate ( Na2CO3 ) and/or sodium bicarbonate (NaHCO3) for salt and is an increasingly common alternative. Unlike salt, which will fume throughout the kiln, soda must be introduced in a manner that spreads it around the ceramic ware, such as by spraying. Soda glaze produces results similar to salt glaze, with subtle variations in texture and color.
Salt glaze; The data on the first known production was around the fifteenth century, it was an anonymous source in Germany. A potter threw salt in a kiln, while it was firing and when he opened it he found it had a crystal clear finish. It was a reaction between the salt and the silica of the clay. During the seventeenth century English potters imported the technique from Germany and made it thrive. In the same century some German potters immigrated to the United States and applied their knowledge on it on earthenware rivaling the production produced in England. The salt glaze, became known in Japan through the collaboration of the potters Shoji Hamada and Bernard Leach Britain.
ca: SORRA de quars
es: ARENA de cuarzo
Sand with clay: There are many different types and colors used in pottery to give texture and colors to clays.
Sand with firing: When firing large heavy objects, like tiles, they should be laid out separately with a thin layer of sand between the shelf and the tiles, this is to help their movements as they shrink during firing.
Salt is a sedimentary material consisting of small, often rounded grains or particles of disintegrated rock, smaller than granules and larger than silt. The diameter of the particles ranges from 0.0625 to 2 mm. Although sand often consists of quartz, it can consist of any other mineral or rock fragment as well. Coral sand, for example, consists of limestone fragments.
ca: TAC D'ESCATA
es: TACO DE LIJA
Sandpaper block holds the sandpaper ready to use. It can be renewed and changed to the strength needed. Good for making a smooth surface on green ware. It is sold in sheets with different textures and they measure 23×28 cm. To use cut it widthwise into 4 pieces 7× 23 cm, when put together the size should be comfortable to hold.

You can buy or make a block.
To make a block.
a) Small block; b) Thick block; c) Sandpaper; d) Screw; e) Sandpaper new and cut to size.
It is made up of two small blocks of wood, the top one 2cm thick and the bottom one 7cm, which are the correct length and width to hold the sandpaper. When put together the size should be comfortable to hold. It has two screws to hold the two pieces of wood together and if you put in screws with a head, this makes it easier to change the sandpaper but make sure that betweenthe screws you have enough room to hold it.
To buy.
They are made in plastic in two parts, one side flat for the sandpaper and one curved for your hand. Inside each one there is a rectangular wall, each part fits inside the other to hold both parts together. The sandpaper is wrapped round the flat part, which has 4 metal pins inside to hold it in place. When both parts are clipped together, you have your sandpaper block.
ca: ESCATA
es: PAPEL DE LIJA
Sandpaper is a strong paper coated on one side with a rough surface made with sand and is used to rub, even out and smooth surfaces. Different textures of sandpaper are available from very fine to rough.
ca: PLAT DE CAFÈ
es: PLATO DE CAFÉ
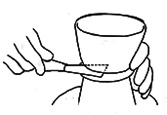
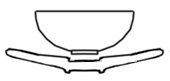 Saucer is the plate that goes beneath a cup. It has two purposes, one to hold the cup in place and the other to catch the liquid spilt from the cup. It can be thrown and made on a wheel or with a mold. The outer edges should slant slightly upwards to hold in the spilt liquid and the center should be lower than the wall and wide enough to take the foot of the cup, to prevent the cup from slipping. A saucer also has a foot to strengthen and steady it.
Read more about: Cup
ca: FULLES DE SERRES
es: HOJAS DE SIERRA
Click on the title to see more images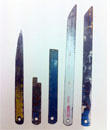 The saw blade is a cutting tool, it is an accessory of the bow saw and is made with teeth of different shapes and sizes. It is used a lot by ceramists to cut edges, scrape and level, etc. The potter cuts one end of the blade to the shape he needs for his method of working, the photo shows several types.
There are different sizes of teeth and the size used depends on the material being cut. In general for clay the finer ones are used.
Sawdust firing: It is an easy way to fire clay, the pieces are smoked with sawdust.
Using bricks, build up a shaped cube with a removable lid. A clay pot or a metal bucket can also be used, the hole at the top serves for the circulation of smoke, which rises above the clay. Fill it with the pieces which have to be fired and add sawdust. Each piece must be surrounded by sawdust and they must not touch each other. The number of pieces depends on the size of the container. Put a few sheets of newspaper and bits of wood at the top and set light to them, so the sawdust starts burning at the top and the fire moves downwards. Cover it with the lid and leave it firing until the sawdust is consumed, this may take up to 24 hours. Allow it to cool slowly; the clay has been converted into smoked bisque.
Click to see a very good video Sawdust Fired Ceramics
ca: GRATADOR
es: RASPADOR
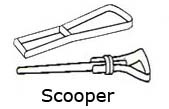 A clay scooper is a metal triangle for moving and modeling clay and removing small bits of clay until your work is the required size. The first one is big and is used for moving large quantities of clay and the small one is for turning and modeling and also for scraping off glaze and colors. This tool is made in many shape and sizes. Read more about: Dry cord / Loop Tools / Coiler
 To make a scooper: Use a small pole, the one in the picture is a pencil, using plastic packing tape which you do not have to buy, as parcels usually come tied up with it, keep a length. Bend it to the size and shape you want, leaving enough at each end so it can be attached on the opposite sides, at one end of the pole. Then bind it, round and round, with electrical insulation tap, very tightly until the part the tape touching the pencil is covered. You can make them to the shape and size you need.
ca: RASPAR
es: RASCAR
Scratching is to scrape outlines, shapes and textures into dry or soft clay. When finished, sweep it with a large soft brush and clean and level it off with a flexible kidney. It can be decorated in two ways, covered with a colored slip or transparent glaze. The shadows, caused by the indents, will bring out the pattern or the indents can be filled up with a colored slip. When dry they are leveled out and the clay round them cleaned of any slip. It is then all painted with transparent glaze.
Read more about: Incising
ca: SERIGRAFIA
es: SERIGRAFÍA
Screen printing is a method of printing through a mesh stretched onto a frame called a screen, which carries theemulsified color using a squeegee. The printing system can be repeated as many times as you want without losing definition.
It fits perfectly onto a flat surface, so it is basically used on tiles.
Screen printing is a printing system which has lasted for centuries.
ca: SERIGRAFIA - En Ceràmica (0) Tècniques d'impressió.
es: SERIGRAFIA - En cerámica (0) Técnicas de impresión.
To print with a screen is to transfer a color through a stretched material on a frame, screen printing is always done onto flat surfaces. The colors pass through the screen by dragging them with a squeegee across what is being decorated, leaving a flat printed pattern. You can print on different materials: cloth, plastic, silk, etc. Here we cover the methods used in ceramics.
Direct printing:
Over clay. Printing onto clay is only necessary if you have to shape the piece, or to reduce the process to a single firing, especially at high temperatures. The surfaces must be flat in both cases.
Over bisque: To print on to bisque it is easy because the surface is very absorbent, so the color when it passes through the mesh dries almost instantly.
Over a crude glaze: Work that has been bisque fired is applied with an opaque glaze by dipping or throwing. It is then decorated with colors prepared with a transparent glaze the two are fired together at 980º C.
Over a fired glaze: Silkscreen printing is commonly used on glazed pieces which are non-absorbent. It is usually done at a low temperature and is particularly suitable for the third firing with pigments that vitrify between 750 and 800° C. The pieces for screen printing in this case must dry quickly.
Note: To screen print with the Majolica method, only the outlines should be printed. The colors are painted by hand, which is very important for the end result. Two colors which overlap create a different one and the brush strokes give shape and volume and can be used with different intensities, all of which is impossible in screen printing.
Indirect printing: printing a transfer
With this system, you can print ceramic transfers. The image is printed on emulsified paper which is soaked in water before being applied to a piece of pottery. The working method of preparation comes from the graphic arts. The colors used are called enamels and the temperature is controlled by the amount of flux in the composition of the color, the more flux the lower the temperature. The fusion is between 750 and 1250° C.
Read more about: Transfer
Notes: These descriptions are for small and medium silkscreen workshops and flat objects. The large ceramic industry, especially tableware companies have other, more automatic screen printing applied to parts: cylindrical objects, borders, backgrounds of plates, cups, curved objects, etc.
ca: SERIGRAFIA - En ceràmica (1) Fent un disseny.
es: SERIGRAFÍA - En cerámica (1) Haciendo un diseño.
Click on the title to see more images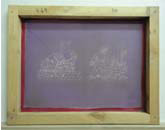 The following is an explanation of how to use these methods in addition to your ceramic work. As you are not going to have time to learn to make your frames, stretch and mount the mesh and make the stencils needed for your designs, you should have it professionally done, which will be quicker, cheaper and better.
The difficulty is that to photograph stencils directly onto a screen, the lines of the design should be completely opaque. If not when being exposed to the light for stenciling, the parts the light passes through harden, becoming impervious to ink. In other words, the parts of the design where the ink is not strong enough will not be visible.
DIFFERENT WAYS OF PREPARING A DESIGN
The following shows two ways to prepare the design.
1) Make a design on your computer to the size needed. Enlarge it so you can see it clearly, to be sure that the black is solid and the white very clean. Then the firm that makes your screens will prepare it, so it can be used.
2) A design prepared in the following way can be put directly onto the screen. Make a drawing of the design so it can be traced onto paper called “Drafting film double-matt polyester” which is transparent, use paint known as “photo-negative,” which is opaque, black and made for retouching negatives. With the same type of brush you use to decorate, and with the ink mentioned, trace the design onto the polyester paper. The paint can be mixed with water but be careful as it must be completely opaque. If you are copying from a drawing and the paper you are working on is not very transparent, work on a designer’s table which has a glass top and is lit up from underneath. The problem with this method is that if you make a mistake it is very difficult to correct and the advantage is are that the movements of the paintbrush can be seen in the outlines.
ca: SERIGRAFIA - En ceràmica 2) Preparació de pantalla.
es: SERIGRAFÍA - En cerámica (2) Preparando la pantalla
Click on the title to see more images The following is an explanation of how to use this method as an addition to your ceramic work. Only the outlines are printed because in the Majolica method the use of the brush strokes for shape and density and the overlapping of colors is very important and this cannot be done with screen printing as the colors are always flat. Screen printing is much quicker and cleaner, it saves pouncing, marking with charcoal and painting the outlines.
PREPARING A DESIGN
The frame for two tiles measures 30×40 cm, the measurements are always the ones inside the frame. The designs and screen used through the following sections will be the same. Two separate tile designs, each measuring 15×15 cm. fit into one screen. The first is a chiropodist and the second a builder. Make the drawings as explained to the size needed for the tiles. The border lines of the tiles are not in the stencil, so make guide lines in relation to the size of the two tiles being used; this is so you can place the screen correctly when printing. The guide lines are outside the tile so when printing, if paint goes through, it does not dirty the tile.
CODING THE SCREENS
Mark the frames on the outside with their code number and name which must be readable and understandable. Always mark on the same side, with the mesh upwards. When kept, they should be placed upright on shelves so that what is written can be read with one’s head in the same direction and it makes taking out and putting them back in the right place easier.
ca: SERIGRAFIA - En ceràmica (3) Materials de treball..
es: SERIGRAFÍA - En cerámica (3) Material de trabajo
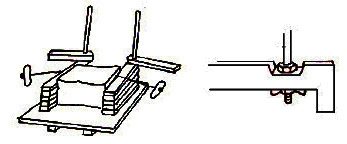
Click on the title to see more images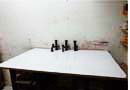 a) Hinge clamps; are the two supports put on the edge of a table to hold the screen placed correctly.
b) The side view of a clamps; to shows that the back edge of the table has been cut out, one for each clamp. This allows the edge of the table to be flat against the wall, which helps to steady it.
c) Table for working: This table has three clamps spaced so as to work with screens of different sizes.
Read more about: Hinge clamps
ca: SERIGRAFIA - En ceràmica (4) Preparant una pantalla.
es: SERIGRAFÍA - En cerámica (4) Preparando una pantalla.
Click on the title to see more images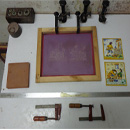 1) Lay the screen on the table and attach the two arms so that they are at an equal distance between the two sides of the frame and tighten them.
2) Put the same two tiles, already decorated and fired on the table and on the left of them put two bisque tiles and in front a metal bar, longer than the width of the table. Move the screen right down; through the mesh you can see the white tiles, move them until they are correctly placed in relation to the designs on the screen.
Note: If none are printed, use tiles fired with a white glazs-base, this allows the outlines to be seen more clearly.
3) Lift up the screen and move the bisque tiles next to the decorated ones, then put something heavy on them so they cannot move.
4) Put the metal bar next to the tiles and at each side of the table, fix it tightly with clamps.
5) Pull down the screen again to check, make sure nothing has moved.
ca: SERIGRAFIA - En ceràmica (5) Instal•lar una taula de treball.
es: SERIGRAFÍA - En cerámica (5) Instalar una mesa de trabajo.
Click on the title to see more images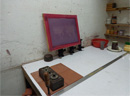 Table layout: On the right is the basin of clean water, a roli of paper toweling, a pot with the prepared paint on a plate, two brushes one big and soft to clean the tiles, the other to put the paint on the screen, a pole for mixing the color and a squeegee for pulling the paint over the screen.
A list of what is needed to work with
Basin: Plastic and full of water to clean the screen if needed.
Bits: There are two small tiles with old playing cards at each front corner to build up the height of the screen.
Brush (f); A large one to move paint from the pot to the screen.
Clamps: Two, to hold the metal bar to the table.
Cloth: To clean the screen with.
Dusting brushes (b); are large, soft paint brushes with straight hair for dusting unfired glazes or enamel colors.
Heavy objects: To put on top of the bisque tiles to hold them in place.
Hinge clamps: Two are attached to the table to hold the screen.
Kitchen Paper; is a large roll of hand paper used to clean the screen.
Medium; is a liquid added to colors to help them run well, it makes them more pliable.
Metal bars: A flat bar of metal, longer than the width of the table and about 2cm wide, this is to hold the tiles correctly and stop them from moving.
Outlines: Mix 50% dark brown and 50% brown red, then one part of the mixed colors to three parts transparent glaze. Add water and a little medium, stir it well, and pass it through the sieve, it should be a thickish liquid for printing outlines.
Squeegee; is a tool used to pull the paint over the screen.
Tiles: Bisque tiles for spacing and holding in place the tiles that are going to be marked.
ca: SERIGRAFIA - En ceràmica (6) Impressió.
es: SERIGRAFÍA - En cerámica (6) Impresión.
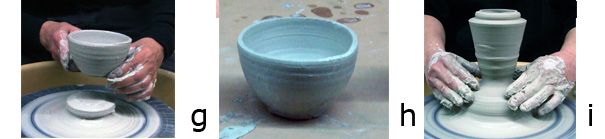
Click on the title to see more images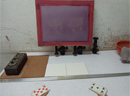 Screen Printing
a) The tiles have been placed in relation to the screen. You must check that the space between the screen and the tiles is correct when it is pulled down.
b) Put bits on the table to support the front two corners of the screen so it rests on them when pulled down. Pull it down and hold it so it touches the bits on both sides, look between the screen and the tiles, there should be a parallel space of about ½cm between them. Adjust this by turning the knobs until it is correct.
c) Side view, to show that the mesh only touches the tile while the squeegee is being used.
Note: This can become complicated if the wood of the frames warp with age or the business that makes the screen has not placed the design parallel to the frame.
d) Slightly lift the frame, dip the big paint brush into the paint and put a line of it along the back, without touching the design.
e) Lower it without touching the tiles, move the squeegee pulling the paint over the screen from the far side to the near side.
f) Move the excessive paint at the top to the right and then to the bottom.
g) Pull down the frame and hold it down with your left hand and with your right pull the squeegee over the screen, keeping it at 45º. Do it several times until the outlines are completely covered. Lift up the screen and move the excess paint to the right and then down to the bottom placing it for the next printing.
h) The printing finished.
i) Lift them up the tiles, on the back paint the number and code and then put them separately on the shelves to dry.
Chiropodist and builder
The first tile shows the outlines and the next is painted and fired.
Note: There is another way to print the tiles; the screen is laid and held down, the paint is added in the same way and then pulled directly over the screen.
SCREEN PRINTNG – USEFUL TIPS
1) It can be done in two or three movements either length or width wise.
2) The paint being used must have the right density and be well mixed.
3) If you are printing designs of more than one tile, as the edges are slightly curved pull the squeegee over the part where they connect without adding any more paint.
4) The screen can get blocked while working for various reasons, the glaze base can be too damp or too dry or the screen too close to the tiles.
5) When the screen is blocked, do not dismount it. Have a basin with clean water, a cloth and a roll of hand paper. Clean it on both sides and the front that touches the tiles must be dry it can be used.
ca: SERIGRAFIA - En ceràmica (7) Pantalles grans.
es: SERIGRAFÍA - En cerámica (7) Pantallas grandes.
Click on the title to see more images Screens can be any size height wise or lengthwise but you must take into account the distance you can stretch your arm to work comfortably and the size of the table you are working on, as to keep the paint running smoothly, the bigger the distance the more difficult it is. When using the screens place them horizontally, so when printing and moving the squeegee downwards, this is the shortest distance. The biggest screens we use are for 6 tiles (2×3) and 8 (2×4).
The design above has been shown right through the Majolica method. There are 30 tiles, 6 lengthwise and 5 height wise and it is separated into five sections of six tiles, so there are the five screens for this design. When printing they are used horizontally. The screen shown was incorrectly mounted. Look at it and you can see the larger spaces are at the top and bottom; these should have been on the long sides as we work with the screen horizontally, not vertically.
When you take the design to be mounted as well as “F” for front in the top right hand corner write “T” for top. Then the firm that mounts them knows which way it has to be printed and on which sides the extra space should be left.
Read more about: Majolica: 5c – The stages of painting tiles. It explains the whole process of using the colors with this picture.
ca: ESCULTURA
es: ESCULTURA
Sculpture is three-dimensional artwork created by shaping or combining hard and/or plastic material, sound, and/or text and or light, commonly stone (either rock or marble), metal, glass, or wood. Some sculptures are created directly by finding or carving; others are assembled, built together and fired, welded, molded, or cast. Sculptures are often painted.
Because sculpture involves the use of materials that can be molded or modulated, it is considered one of the plastic arts. See: The Free Dictionary
ca: SALNITRE
es: SALITRE
Scum is efflorescence in clay: When red clay is fired and becomes bisque, sometimes bits of white scum can form in the surface that cannot be seen in the clay. They are very difficult to remove and if removed will leave an indent in the surface of the bisque. If not removed, scum will damage the glaze and leave a round depression when the clay is fired.
es: SELLO AL CUÑO
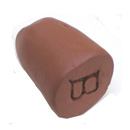 Seal in the past was used for registering property, letters, etc. Hot wax was put over the small space where the two parts of paper join and stamped with the owner’s trademark; this sealed the letter and proved it had not been opened.
A seal is now used by potters as a trademark. It can be made in clay or any other material, have any shape, round, square, etc. and should be long enough to hold comfortably. At one end the trademark is modeled in relief or recessed and if made in clay it should be fired. This method is only needed if you want a special design, such as your initials. If not, you can find a small object with a shape you like and indent it into the clay.
Sedimentary clays are also known as secondary clays. They are clays that have been displaced and eroded by earth movements throughout thousands of years.
Read more about: Clay Types
ca: SEGER CONS
es: SEGER CONOS
Seger cones are for measuring heat in kilns and were invented and made in Germany in 1886 by Dr. Hermann Seger. Their shape is an elongated triangle and they are coded by numbers and colors. The color is to help distinguish the different degrees, as there are many and so small that it is difficult to read the indented stamp. There are two types; Mini Cones which are placed in the sensing rod and which bend and cut off the electricity when the kiln arrives at correct heat and Standard Cones which are for testing the heat in different parts of the kiln.
“Cone” has 4 sections to read more about them: Cone – Grading. / Cone – Pyrometric. / Cone – Sockets. / Cone – Witness.
ca: ESGRAFIAT
es: ESGRAFIADO
Click on the title to see more images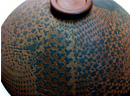 Sgraffito is basically a simple decorative technique but can reach very elaborate standards in designs and craftsmanship. The method is to put slip over clay then scratch the slip off and make a design by revealing the clay body underneath. The color of the slip against the color of the clay accentuates the design. The slip should be made up with the same clay as the body so the shrinking is compatible.
Many of the clay fragments found in archaeological sites are sgraffito and they show either a representation of what was in the jars or served as decorative elements with style and originality, sometimes they had pictorial motifs.
Photos lent by Anna G. Capell
 Sgraffito tools: are designed for this specialty, which is to remove a color in order to see the one underneath, either the glaze base or the clay. They are double ended in steel and have wooden handles.
ca: TALLADOR DE FORMES - Per argila.
es: CORTADORES DE FORMA - Para arcilla.
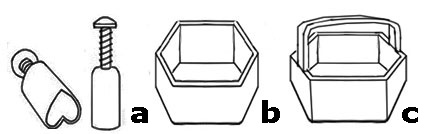 Shape cutters are metal walls made to form different shapes. a) Has an arm that pushes the clay down, through the tube, forming the shape of the cutter. b) Is a metal wall, it has to higher than the clay you want to cut, so there is enough room to hold it. c) This is the same as the one before but with a handle.
They are used when a shape has to be repeated many times and different shapes can be made to together and form a pattern.
Read more about: Tile – Clay cutter / Mold: 8 Clay Cutting
ca: ESCUT
es: ESCUDO
Click on the title to see more images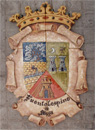 Shield is a piece of armor designed to be carried on the left arm and in front of the body as a defense against swords, lances, arrows, etc. and can be made in many different shapes and sizes. It is mostly shaped like a “U” but with a broad top and pointed bottom and often decorated with heraldic bearings.
The photos show a cross section of ways to make shields in ceramics.
(a) It was formed in refractory clay and all of it is flat except the outer edges of the shield. It is in nine pieces, The clay was fired at 1280º C, then decorated with colors that vitrify at 980º C.
(b, c, d) These are different shields done on different sized tiles using the Majolica method of decorating.
(e, f, g) The last three are designs of six tiles, which we used to put round a shield oredered by a customer.
Other words with a very similar meaning; heraldry, coat of arms, arms, crest and emblems.
ca: ESCANTELL
es: DESCONCHADO
Shivering and peeling are defects in glazes; it shrinks too much for the clay when fired, causing it to peel.
ca: ENCONGIMENT
es: ENCOGIMIENTO
Shrinking is an unwanted reduction in the size of products like wool or cotton, caused in by overheating while being washed, In pottery clay shrinks with the heat of firing, this is accepted by all potters and taken into account when producing work that has to be an exact size. The higher the temperature, the more the clay shrinks, so all pieces that have to fit together must be fired to the same temperature.
Read more about: Clay Shrinking
ca: TAMISOS
es: TAMICES
Sieves can be square or sound, with wooden or metal frames, of different measurements and made up with mesh of different sizes. Powders and liquids are passed through to clean and separate any lumps or foreign bodies that might exist, which also help to integrate the different products being mixed.
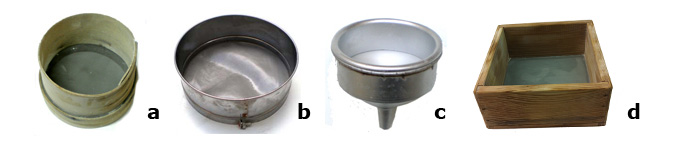
Sieves
a) Made of wood, in different sizes with different grades of mesh which cannot be changed.
b) Made of metal in different sizes with different grades of mesh and some can be changed.
c) Sieve – funnel consists of two pieces; a sieve that fits into the top of the funnel that is narrow enough to fit into the neck of a jar or bottle. They are small and used for preparing colors, which can then be passed straight through the sieve into the jars where they will be kept. It is known under the name cup lawn and in this section there is more information and illustrations
d) Made in wood and square, to required measurements and mesh.
 e) Sieve – rotary Made in plastic or metal and all the parts are dismountable. It has a cross bar that supports the handle, which when turned rotates a brush over the mesh and pushes the substances, liquid or powders through. It is known under the name rotary sieve and in this section there is more information and illustrations also.
e) Sieve – vibrator are made for sieving liquid slips and glazes and are electrically controlled. They are buckets made in different sizes and materials; rubber and plastic. Have a lid that holds a changeable diameter sieve, there are three, each with a mesh of a different sizes: 60’s, 80´s or 100´s. It is a bucket with a motor attached to the lid, which vibrates so the liquid goes through the sieve and is cleaned and mixed.
ca: SÍLICE
es: SILICE
Silica is the chemical compound silicon dioxide, also known as silica (from the Latin silex). It is an oxide of silicon with a chemical formula of SiO2 and has been known for its hardness since antiquity. Silica is most commonly found in nature as sand or quartz, as well as in the cell walls of diatoms. It is a principal component of most types of glass and substances such as concrete. Silica is the most abundant mineral in the Earth’s crust. It is a raw material for many white ware ceramics such as earthenware, stoneware and porcelain.
From: Wikipedia
ca: PANTALLA DE SEDA
es: PANTALLA DE SEDA
Silk screen is known under this name as the original screens were made of silk. This method is now known as screen printing and is used on many different materials using slightly differing methods.
Screen printing has 9 sections, this is the first. Screen printing
ca: SITGES
es: SILOS
Click on the title to see more images Silo: It’s a word that comes from Greek and means pit or hole to keep or store “grain” or other bulk materials such as clay. Initially, it was a dark and large space with a roof so the weather could not spoil the clay. There are many different types of buildings designed for storing materials. Three types of silos are in widespread use today: bunker silos, bag silos and tower silos, which is the most common and can be square or cylindrical. They are made of different materials such as wood, concrete or metal (aluminum or steel).
ca: SÒCOL RAJOLES
es: ZÓCALO AZULEJOS
Skirting tiles are made to go round the edge of the wall that joins the floor and are of the same, strong materials as floor tiles. Some firms make skirting tiles and external and internal corners to match with a floor tile.

Skirting Tiles; a) Straight b) Curved c) Corner outwards d) Corner inwards
ca: PLACA
es: PLACA
Slab is a flat and solid block which can be of clay, chocolate, butter etc. In ceramics they are made in clay for boxes, tubes, tiles, press molds, and coils. Read more about: Slab – Roller / Slab – Roller slabbing / Slab – Slabbing with a rolling-pin
Slabs are clay rolled out into flat, even pieces that can be any shape or size, usually square or rectangular. They are draped over or into plate molds, rolled around cylinders to make tubes or built up into geometric forms like boxes and cut to make tiles.
ca: PLAQUES - Construcció de caixes
es: PLACAS - Construcción de cajas
 Square shapes for boxes and pots built up with slabs of clay.
Method of working – making a slab pot
1) Roll out the clay to the required height.
2) Leave until it is leather hard.
3) Using a very fine, sharp, pointed knife, cut the clay into the sizes needed.
4) All the parts to be joined must be scored and covered with slurry.
5) Make slurry from the clay being used.
6) Join two walls at a right angle.
7) Add a very thin cord of clay to the inside joint.
8) With a tool push it into the joint, round it and level it out.
9) See that the outside joints are well closed, add a little clay if needed to seal and smooth them so they cannot be seen
10) Join the 4 sides and the base.
The top can be left open, can have a lid or have a slab joined to it with an opening to hold flowers and the corners on the outside can be left as they are with the sharp angle rounded or flattened.
 Slab cutters are instruments to cut clay into slices of different heights. Home-made ones are good for working with small quantities. Each side is built up with pairs of narrow planks of wood that can be the same or of different heights. Each has a hole at one end and is slipped over the metal pole, this allows them to be turned outwards so the walls are at the height you need. Clay is put between the two walls; it must be higher than they are. To cut a wire cutter is held at the back firmly on top of the wood and is pulled through the clay. Then the bars at the side are turned outwards to the height you want to cut the slab. You cut again in the same way and you have your slab.
The first drawing shows a handmade slab cutter and the second is a close up of how the metal bar is attached under the floor. For large quantities, industrially made ones should be used.
ca: PLAQUES - Làmines per a tubs
es: PLACAS - Láminas para tubos
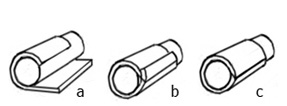
Rolled clay – clay tubes. You can make a clay tube by rolling clay round cylinders that can be made of cardboard, wood, metal, etc. You must wrap the cylinder with several layers of wet paper, doing this makes it easy to separate them when the tube is finished.
Working sequence
a) Put the cylinder on top of the clay and lift up one side.
b) Lift up the other edge until the edges overlap.
c) Cut through both at 45º and remove the unwanted bits on both ends. Lute and paint the edges with thick slurry, join them firmly and level out till the joint cannot be seen.
 Note: (d – e) The place where the two sides join can be made to protrude or overlap as decoration.
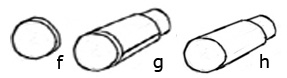
f) Cut out the floor, a circle of clay the same diameter as the outer edge of the clay tube.
g) Attach the floor to the tube.
h) Fill up and level off all the joins so they cannot be seen.
Leave it lying on its side to dry until the clay is strong enough not to bend then pull out the cylinder leaving the paper inside. This must be done at this point, as the clay shrinks while drying and would break if left against the solid cylinder. When dry enough, stand it up and take out the paper.
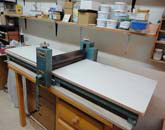 Slab roller: is a very useful tool in a workshop to make flat blocks of clay, in various sizes height wise, they are manually controlled. On each side is a handle to vary the height which the clay can be rolled out to. They are made with two rotating rollers mounted on a rigid, metallic surface. You can roll out sheets of clay between 0.2 mm up to 5 cm high. The thickness is obtained by millimeter rules placed on both sides.
Industrial electrical rollers are made for manufacturing tiles, mosaics, tiles, bricks, etc.The photos show a slab roller on a table to work by hand.
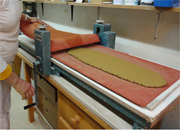 Slab rolling: To prepare a slab of clay with a roller you need a piece of wood of the correct length and the width for it to pass under the roller. It is covered with a cloth; the clay is put on top and flattened out with your fist, giving it the shape of a rectangle. It is then covered by another cloth, the roller is set to the height required, the handle is turned and moves the wood with the clay forward and under the roller which flattens it out.
Note: The cloths must be used, if not the clay that is damp will stick to the roller. Slabs can be used for many things boxes, tubes, tiles, press molds, and coils, etc. Photos taken in the studio of Nuria Pié
ca: PLAQUES - Amb un corró de cuina
es: PLACAS - Con un rodillo de cocina
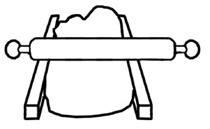 Slab rolling with a rolling pin. On a sheet of canvas put the clay already prepared, press it out to form roughly the shape you want, circular, square or rectangular. Take a pair of bars that are the same size, put one on each side, then with a rolling pin that is long enough to rest on both bars, roll backwards and forwards over the clay to flatten it out. Reverse it several times to make sure both sides are without faults and continue until the rolling pin rests on the bars and cannot flatten the clay any more. Then you will have your slab.
ca: BARBOTINA - Decoració amb engalba
es: BARBOTINA - Decoración con engobe
Click on the title to see more images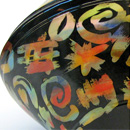 Slip decorating A slip for colors is a fluid mixture with colors. It’s prepared by starting with liquidized white clay, then adding oxides or colors in the required proportions. The clay is decorated when in the leather-hard state, by immersion, trailing, feathering, sgraffito, brush work, wax resist, etc. One color can be put on top of another, when dry the pieces are bisque fired, then covered with a transparent glaze and fired again.
The following photos illustrate the different techniques of less traditional ways of using slips. These methods involve putting layers of different colors one on top of the other and for this reason the slip must be thin, because the final density is the sum of all the layers put together.
a) Background is decorated with slips of different colors, then on top the graphic patterns parts were covered with the wax (Wax resistant method) It was then cover with black slip and fired after which it was covered by a transparent glaze and fired again. Note: Parts covered by a wax are resistant to glazes, so the parts without wax are completely lost under the color put on top, in this case black.
b) Background is decorated with a white slip and on top various colors are applied by stenciling in the following order, first green, then orange and finally yellow. The white spaces can be retouched by scraping them with a molding tool it is then bisque fired at 980º C. It is finished by covering the with transparent glaze and firing it again to the same temperature
c) The clay is covered with a blue slip and bisque fired at 980° C. When fired apply two or three layers of very thin different colored slips. In this example they were applied in the following order, green, brown and white. Then, using scraping tools, remove the layers of the three slips until the light blue glazed base can be seen again. The outcome depends on the creativity of the potter. With this technique it is impossible for two parts to be the same. The colors have to be fired again for the second time and then finished by covering them with a transparent glaze and firing the pieces again at the same heat. This technique has three firings all at the same temperature.
a) Detail of a piece of pottery made by ANNA G. CAPELL
b & c) Samples of decorating with slips from the studio of NÚRIA PIÉ
Slip is clay mixed with water to become a thick, smooth liquid that has the consistency required for your work; this varies in relation to what you are using for. It must be very clean and should be sieved, using a mesh. Meshes are made in different sizes, between can be 40 and 200.
SLIP; 3 ways of using it.
a) Slip casting, is slip used to fill up molds to cast in clay a shape required. When the slip is dry enough it is separated from the mold and becomes clay again. It can be decorated in different ways; the clay is covered with slips prepared with colors and textures and the two are fired together or the clay is fired, to become bisque; then decorated and fired again. In the following two section two different ways of casting are very well explained; Read more about: Casting –A Fish / Casting – Dragon
b) Slip decorating. As there are different colored clays, the main ones used are red and white and slip colors are watered down clay, mixed with products to form the colors and textures you require. When the clay you are using is dry, it is decorated with slips colors which should be prepared with the same type of clay as the piece being decorated. Different method can be used spraying, pouring, brushing, spotting, trailing, dipping and sgraffito. Work formed in clay and decorated with slips, are always fired together. Read more about: Slip decorating
c) Slip-slurry, This is used as a glue to join pieces of dry clay that are broken and to attach parts such as handles and knobs that have to be leather hard before being joined. Read more about: Clam
Slip casting is a method for the mass-production of pottery. Its greatest advantage is that an exact shape can be repeated hundreds of times. It is especially good for shapes not easily made on a wheel, like plates with very low borders. Most of the pottery figures found in the shops are cast.

Slip or liquid clay is poured into a plaster mold, plaster absorbs water so as it reduces, layers of clay build up against the inside walls of the mold. When most of the liquid has been absorbed what remains is poured off. It is left to dry and when drying it shrinks, so that when opened it is easy to remove. Where the parts of the mold join an uneven surface will have been left which will have to be trimmed. The product is left to dry and when dry it becomes what is known as green ware. It can then be decorated with a transparent glaze or colored slips, the two can be fired together or it can be fired and then decorated and fired again.
Link to Slip Casting in Basic-Stuff.
To see how a mold is used. Casting dragons
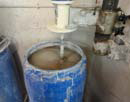 Slip preparing. You can buy machines known as slip re-users or vibrating sieves. There are many different types, makes and sizes but they are all basically the same and what you use depends on the quantity of slip you need. They are electrically run, with large beaters designed to break down new and used dry clay with water to form a slip pliable for making molds and have a motor that turns the beater on for several hours every day to keep the slip in the correct condition so it can be used straight away.
For small amounts, there is an explanation in beater electric as to how small amounts can be prepared using a bucket, electric drill and a long armed beater.
The following photographs were taken in a studio that specializes in casting.
a) The three containers used for preparing the slip, each one is on a plank of wood with wheels so it can be moved individually and easily. These containers are moved round, the one on the left contains the slip that has been tipped out of the casts and the used clay, the center one contains the beater which mixes used and new clay with water continuously so they are completely integrated and smooth and are of the correct density required for slip. On the right is the slip that is being used, when this one is finished they are moved round and the process continues.
b) The boxes where the used clay is kept which will be added to the first container.
c) The beater out of the container, to show the size and how it is connected to a metal pole that is attached to the wall. It is electrically controlled to be moved up and down to mix the slip
e) The slip being tested for its density and thickness before using.
Note: Slip is used for casting molds and is the base for slip colors. For slips the methods of applying are the same as glaze-bases.
Read more about Glaze-Base applying it to plates, jar and lids / Glaze-Bases applying it to tiles / Dipping
ca: PERES
es: PERAS
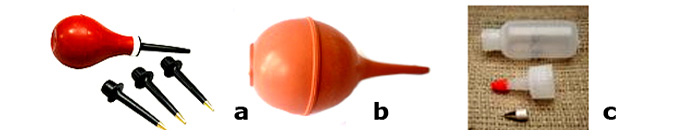 Slip trailers are manufactured in different sizes in plastic or rubber and are shaped like a light bulb, with a thin nozzle about 3 cm long. They are filled with slip and by applying pressure with the hand on the bulb, the slip comes out in a long line. They are used to decorate and write directly on to ceramic objects.
a) A trailer with a set of nozzles of different thicknesses.
b) This is a simple trailer made for medical purposes, are commonly used in ceramics; to remove fluid buildups and to decorate. They are filled with a liquid by suction.
c) This is a trailer with a cylindrical shape, which can be pressed to expel the slip and has changeable noz zles.
ca: BEURADA
es: LECHADA
Slurry is slip it is a ruff, thick mixture of water and clay, usually prepaid in small quantizes and applied with a paint brush to pieces of clay that have to be joined, they should be scored first. It is used when joining parts that are broken or have to be attached separately, such as handles, spouts, etc. Make the slurry with the same type of clay as the piece being made.
Soaking, is to sustain the retention of the temperature in the kiln for a short time at the end of the firing, which matures the clay and glazes.
Soaking is to leave a product covered by a liquid so it absorbs it. This can have different effects on different products. It can make a hard product pliable, separate dirt from a cloth, soften glue to take pieces apart. This is explained in sections (f) and (g) of framing tiles and mounting tiles.
ca: SABÓ SEC
es: JABÓN SECO
Soap dry is used for softening paper. If a design is on a stiff paper, rub it with a block of dry soap, this makes it more flexible.
ca: FELDSPAT SODIC
Soda feldspars are a group of minerals which can be found in any kind of rock, they correspond to the silicates of aluminum and calcium, sodium and potassium. They are all hard and white minerals.
In ceramics they act as flux, as the part of the material which develops during the vitrifying process. They are also an important ingredient in the composition of some glazes.
ca: SILICAT SÒDIC
es: SILICATO SÓDICO
Sodium silicate is the common name for a compound sodium metasilicate, Na2SiO3, also known as water glass or liquid glass. It is available in aqueous solution and in solid form and is used in cements, passive fire protection, refractories, textile and lumber processing, and automobiles. Sodium carbonate and silicon dioxide react when molten to form sodium silicate and carbon dioxide. Na2CO3+SiO2→Na2SiO3+CO2
In ceramics it is a powerful alkaline flux. See: Wikipedia
ca: PROVA DE SO
es: PRUEBA DE SONIDO
Sounding is to hold a piece of pottery and tap it with the knuckle of your right hand. A high note means it is not broken and a flat one that it is cracked. It can be done with all work in ceramics once it has been fired.
Read more about: Sounding Plates / Sounding Tiles
ca: BOL DE SOPA
es: BOL DE SOPA
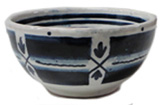
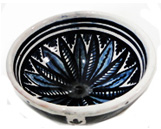 Soup bowl is a small high-sided basin with no border.
Read more about: Bowl / Bowl – Turning
es: PLATO SOPERO
 Soup plate is usually as large as the dining plate of the same set and has the same border. The part between the borders, the center, is about 2 cm lower to hold soup which is a liquid.
ca: ESQUITXAR
es: SALPICAR
Click on the title to see more images Spattering is to shake substances like slips, glaze-bases and glaze colors onto your work, leaving an uneven spotted texture. They can be spattered onto clay or bisque surfaces and also onto those already prepared with slip, glaze-base or a glaze-color. Different instruments are useful to create the texture; electric sprays, mouth sprays, toothbrushes, etc. To prepare big uneven surfaces, a brush made up of palm leaves is very good. Spattering can be combined with other methods and gives textures to large spaces of one color. Read more about: Glaze-Base Tectures
ca: ESPÀTULA
es: ESPÁTULA
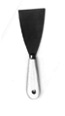
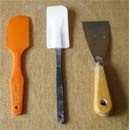 Spatula is an ordinary tool used to scrape off wallpaper and used in ceramics to clean up after working wet or dry materials, clays, powders and liquids. The two main types are metal and plastic; the metal ones have sharp corners and are slightly pliable and the plastic ones are used in the kitchen for cleaning out bowls. Both types are very useful.
Specific gravity is the ratio of the mass of a solid or liquid to the mass of an equal volume of distilled water at 4° C (39° F) or of a gas to an equal volume of air or hydrogen under prescribed conditions of temperature and pressure.
Spirit level or bubble level is an instrument designed to indicate whether a surface is level. Different types of spirit levels are used by carpenters, stone masons, bricklayers, etc. A traditional carpenter’s spirit level looks like a short plank of wood and often has a wide body to ensure both stability, and that the surface is being measured correctly. Embedded in the middle of the spirit level is a small window where the bubble and the tube are mounted. Two notches (or rings) designate where the bubble should be if the surface is level.
ca: ESPONJA
es: ESPONJA
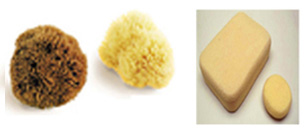 a) Natural Sponges are light, flexible, soft, absorbent and there are many different types, in size, color texture and shape and are used for washing and cleaning.
b) Foam Rubber is an absorbent, porous material, such as plastic or rubber, used especially for washing, cleaning and as a stuffing for pillows, etc. Also known as Synthetic Sponges.
ca: ESPONJA - PAL
es: ESPONJA - PALO
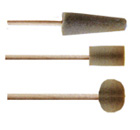 Sponge-sticks can be bought or made, they have small handles with a piece of synthetic sponge attached to one end and are made in two or three different shapes. In ceramics, they are used to smooth clay and they make it easier to reach small awkward places.
ca: ESPONJAT
es: ESPONJADO
Sponging is to dampen a sponge or foam rubber with a liquid and use it in different ways, to form textures, to clean, put on colors and smooth off surfaces.
Ways to use sponges in pottery.
a) It can be cut into shapes that protrude or extrude forming patterns or textures. A sponge cut with protruding parts can be pressed into laid out slip or a color to remove it or dipped into a color and marked onto a piece of pottery.
b) When plates have to be painted they are stood up, rested against a strong object and balanced on top of a slice of synthetic sponge, between the plate and table. This is to prevent the plate from slipping and the glaze-base from being damaged. Read more about: Majolica: 5e – Preparing to paint plates
c) Good for cleaning and smoothing out clay.
ca: CULLERA
es: CUCHARA
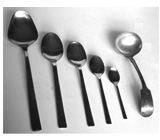 Spoon is a utensil consisting of a small, shallow bowl at the end of a handle, used for serving solid food and eating liquid or semi-liquid food. They are also used to measure and mix ingredients.
They are made in many different sizes for many different purposes.
From left to right;
Serving spoon, Desert spoon, Soup spoon, Teaspoon, Coffee spoon, Gravy spoon.
ca: BROC
es: PITORRO
 The word spouting applies to a strong, narrow flow of liquid that comes out very quickly through a narrow tube and is controlled by tipping by hand, battery, electricity, etc.
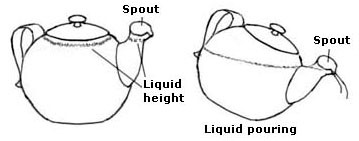
Spout is the name given to small pipes on the side of containers that you pour liquid through such as teapots, coffee pots, watering cans for gardens and plants, sprays and air guns.
When made in pottery, the spout is always a part added to the main body and when tipped it allows the liquid it carries to flow out smoothly. The flow is controlled by the size of the spout’s mouth and the degree to which it is tipped, the higher the more the liquid comes out. When designed, the mouth of the spout must always be higher than the level of the liquid when the teapot is full and standing.
Read more about: Teapot: (d) Spout
ca: ESPRAI
es: ESPRAY
To spray is to pass a liquid on to an object using a spray. A spray with pressure expels a thin mist of liquid that breaks up into particles passed through the air onto a surface and covers an object with an even coating of fine spots. There are many types of sprays, oral and spray guns that can be controlled by the pressure of the hand or electricity. The spray is secured on to a jar filled with a liquid and when the trigger is closed it pushes compressed air and this pushes the liquid up through the spray and out. With a good electrical spray the density and the area can be controlled.
Great care must be taken when using sprays, always use a mask.
Read more about: Glaze-base Textures
,
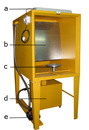 Spray-booth;
a) The interior lighting. b) Galvanized steel plate with water spray. c) Mobile, rotating banding wheel. d) Independent water tank with filter. e) The motor for the suction of water.
In the past most potters made their own, but now the laws to protect the environment and the people who work with sprays are very strict. It is a big box that is open on one side and when you buy one you must calculate the size you need in relation to your work.
It is designed to stop the spray spreading, for health reasons, cleanliness and to prevent the wasting of the glazes being used. They are electrically controlled and designed, so when functioning there is a curtain of non-stop running water inside, down the back wall. What is being sprayed is in front of it and the glaze is aimed towards the curtain. The extraction fan creates a strong stream of air that pulls the water down into a tank, where the glaze and the water are filtered and separated. The glaze, depending on the products it is made with, can be recovered and the water is drained and cleaned and automatically reused.
The web given below explains very well how to make a spray-booth not designed for pottery, so you would have to make one or two changes.
Link to Paint Booth
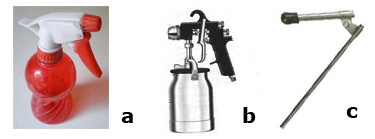 a) Hand spray that is plastic and controlled by hand, useful for dampening clay and a glaze-base with water clay and a glaze-base when it is too dry to decorate.
b) Suction Spray Gun. The paint is applied by the air compressed in the gun, so you get a perfect application. The container below is for storage of a liquid.
c) Mouth spray has limited applications, it is only for small details or to fix colors prior to firing. It is controlled by breathing an some have a removable plastic mouthpiece to make cleaning easier.
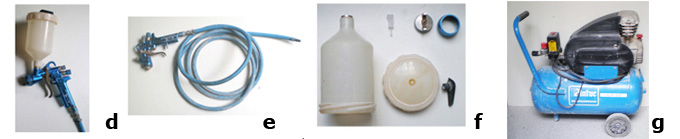
d) Spray gun with set up so you can controll it by hand and adjust the pressure.
e) A tube, one end has a gun hose and the other must be connected to the compressor.
f) Parts of the spray container, tank, cap and nozzle.
g) An electrical compact compressor of 25 liters with a regulator for pressure and air.
ca: POLVORITZAR – Esmalt de ceràmica
es: PULVERIZAR – esmalte de cerámica
Spraying. Spray decorating in pottery can be used to decorate clay or bisque, to apply colors, form textures, slips and glazes transparent or with colors. Great care must be taken; you must use a spray booth,, where goggles, a mask and gloves, because of the toxic and poisonous fumes that can come out.
The glaze has to be finely sieved so it can pass through the nozzle of the air gun, use a 120 mesh. The pieces being decorated must be well inside the spray box and places on a hand wheel, so they can be turned and sprayed all the way round. The air gun must be held, steadily, at the right distance, so the lair of paint sprayed has an even texture all the way round.
Note: It is important to clean the airbrush after each use. Follow the instructions that come with it to clean them properly, otherwise the nozzles get clogged.
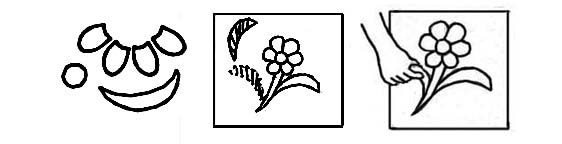
ca: RAMELLS
es: RAMILLETEADO
Sprigging is adding small shapes in clay to decorate another clay article, they can be flat or with a molded form. The decoration can be done with different colored clays, but it is better if all the clays are the same make. When both parts are semi-dry they must be luted and attached with slurry which works as an adhesive. Make the slurry with the clay the article is made of.
ca: BALANÇA DE MOLLA
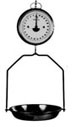 Spring scales operate on the premise of Hooke’s law, which states that springs stretch as a result of a specific force. The heavier the load placed on it, the more the spring stretches. The force exerted on the spring helps determine the weight of the item. These scales range in capacity from a few pounds to tons.
Read more about: Balance scale / Balance scale – Digital / Bean scales
ca: PUNTA
es: PUNTA
 Spur: is a piece of kiln furniture made to support plates and other pieces, so they do not touch the floor while being glaze-fired. Spurs are made in clay with very fine points and bisque-fired. The fine point is necessary because they have to touch a part that is decorated during firing which may adhere to it. When taken out of the kiln the spur has to be twisted very sharply to separate it from the main piece, as the point is so fine. This is easy but it always leaves a small mark in the glaze.
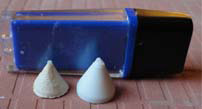 This photo shows two spurs, the one on the right is industrially made and used as a model for making a mold. The one on the left was casted from the mold. They are in front of a pen-drive that is 1,5 cm wide and 5,5 cm long. This is to show how small they are and how much the one on the left has shrunk after being fired.
Spurs are very easy to make using a mold; how to make one is explained in the section: Read more about: Mold: 2 Spurs / Kiln – Furniture
ca: RASCLETA
es: RACLETA
 Squeegees: have a synthetic polyurethane blade set into a wooden handle and are used for pulling the colors over the screen on to the tile. You need several of different sizes. The blade wears down, gets rounded off and this hinders and can spoil your work and your screen. You can file them down yourself, or ask the firm where you usually have your screens made to have the courtesy to do this. If they don’t, look for another firm. Read more about: Screen printing (5) Setting up a table
es: RACLETA – AFILAR
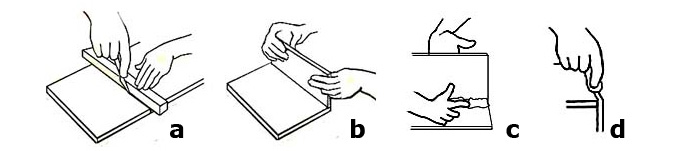
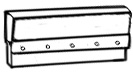
 Squeegee file is made with two bit of wood joined together at 90º. It should be wide enough on one side to hold the sandpaper and on the other the edge of a table with wedges. The center bar should be lower than the squeegee, so there is enough space at the top to hold it while filing. This can also be used for filing down tiles.
ca: TORNEJAR - Cap de pastó en ceràmica.
es: TORNEAR - A la pella en cerámica.
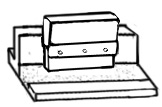
 The illustrations; on the left you can see how to separate the bowl from the cone, in the center a lid is being made using a cone and on the right is a metal scraper.
Stack throwing; is the way small pieces are turned on a wheel, pieces such as lids, egg cups and small bowls.
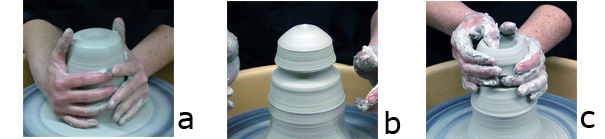
a) The clay is centered and shaped into a tall cone.
b) Turning the cone, the clay is pressed in leaving enough clay at the top to form the piece that is going to be made.
c) The basic shape of what you are working on is created, here it is a bowl.
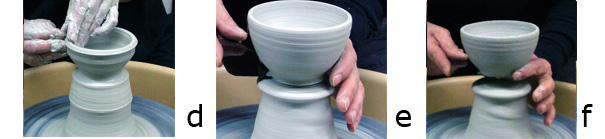
d) The bowl is being shaped.
e) To separate the bowl from the cone; use a metal scraper. Put it on top of the cone, pushed into the center, so it takes up 45% of the neck. Hold it and turn the wheel right round, it cuts and separates the bowl from the cone.
f) Lift up the scraper using it as a tray and move it on to a wheel bat and leave it to dry. When it is leather hard, it can be turned and the footing finished.
Note: A normal cutting wire should not be used as the two parts being separated are soft clay, which could make the cutting incorrect.
Note: These are links to all the sections on throwing in alphabetical order.
Bowl Throwing / Cylinder Throwing / Jars Throwing / Lids (c) Throwing / Lids (d) Throwing Cones / Lids Knobs (f) Attached / Plate Throwing / Stack – Throwing / Teapot (a) Body / Throwing – with a tube
ca: TAQUES
es: MANCHAS
Stain is a word in ceramics that has a completely different meaning from that used outside the ceramic language.
Stain as used in ceramics: stains are inorganic colors purchased as powder that are added to different types of bodies, slips, glazes and enamels and used for in-glaze and under-glaze decorating, Stains are prepared to use at different temperatures, but the same colors when fired at different temperatures are never exactly the same.
Stain usually describes foreign matter that has penetrated into a material chemically and damaged it. It can be another color or damage to the original color resulting in a stain that is not easy to remove.
ca: SEGELL- Per treballar amb l'argila
es: SELLO - Para trabajar con la arcilla.
Stamp: If you are going to use a design continuously, make a stamp in wood or bisque. There are two types, which are explained below, both are tubes that can have designs indented or protruding.
 1) This is a tube of clay that has the design of the stamping at one end, it must be long enough to hold comfortably while pressing it face downwards into the clay, if large and wide, make a handle like a “T” upside down. Read more about: Impressing stamp
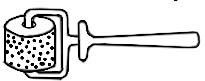 2) It is a tube of clay with the design round the outside and a hole through the middle, so a handle can be attached to it. These are rolled over clay to repeat a pattern by indenting. If you have many, take into account they should be hung up, so you know where they are. These are known as roulette wheels.
Read more about: Impressing
ca: PRESTATGES
es: ESTANTES
Stand is a piece of furniture in an upright or vertical position used to hold, rest or display work on. There are different stands used for different specialties. You will find stands in the following sections
Read more about: Plate stand / Tile stand
es: TORNEADOR – Herramientas de corte
 Stem tool: has a wooden handle and steel head that is at an angle of 90º to the handle and joined to it by a long, rigid stem. They are made with different shaped heads and used in turning and many other ways of manipulating clay.
ca: PLANTILLA: (1)
es: PLANTILLA: (1)
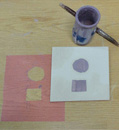
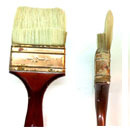 A stencil is a template cut out of paper that has to be waterproof, it can be waxed or on a sheet of plastic. The outlines of the drawings and colors are printed and then cut out. This procedure is used to paint many tiles with the same pattern.
The template is placed onto a tile that has been prepared with an opaque white glaze-base; the colors are watered down and applied using a large flat brush, sponge, etc. The colors pass through the sections that have been cut out, marking them onto the tile.
Each tile has the number of templates it needs to reproduce the design and colors, which can be intricate and various. This method makes it easy to repeat a design, tiles can have any amount of templates and each one must have the outlines of the tile drawn on it so the spaces that have been cut out can be placed correctly; each one has to be painted separately but one color can be put on top of another. The watered down colors are applied with large flat brushes, if a brush is too thick, reduce the size by cutting it in half, as shown in the first illustration. When painted, the brush with the color is pulled over the space leaving a flat color that has slightly different intensities due to the hairs of the brush which allows the movement of the brush and which allows the movement of the brush to be seen. This method is known as stenciling
The design can be cut out in the following two ways; both are painted onto a tile prepared with an opaque white glaze-base.
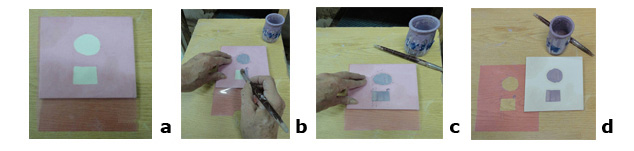
a) Plastic paper with two spaces cut out, on top of a prepared tile. b) The tile being painted. c) The tile painted. d) The plastic taken off to show the painted parts against the white background.
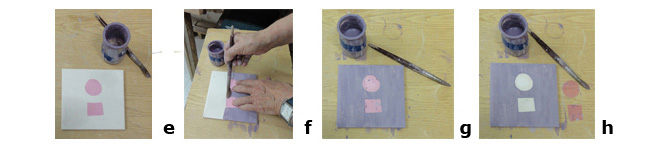 e) Plastic paper cut out to form a shape, on top of the tile that is going to be painted. f) Holding the two parts in place the rest of the tile is painted. g) The spaces painted. h) The plastic taken off leaving the two shapes showing the white of the base.
Note: Stencil has 6 sections, to go to the next click on Stencil: (2) Filing and if you go to the letter “S” you can see them all together.
Stencil filing is important, because you get such a large quantity that they become very difficult to recognize. Keep a photo of the finished design, give it a name, then mark the stencils for the design with name and number as shown in Stenciling – with many colors. In this design there are four tile designs, A1 has 7 stencils, B1 has 4, C1 has 2 and D1 has 3, so in all there are 16 stencils. They must be kept flat; the best way is between the pages of old magazines, putting a stencil between each page and a photo of the finished design at the front. Then put them together in a plastic file, so the photo can be seen and keep all the different files flat in a box.
Note: Stencil has 6 sections, to go to the next click on Stencil (3) and if you go to the letter “S” you can see them all together.
ca: PLANTILLA: (3) Preparació del paper
es: PLANTILLA: (3) Preparación del papel
Preparing paper: Ifyou are going to make a lot of stencils, specially prepared paper can be purchased.
Three ways to prepare paper to make it less absorbent;
 1) With wax: This is the classic method, dipping the paper into wax. Fill up a rectangular shaped tin, big enough to hang a whole piece of paper horizontally, with liquid wax. Hold the paper at both top corners with a pair of tweezers or clothes pegs. Put it straight down into the tin until covered by the liquid wax. Take it out and hang it up to dry. If this is done two or three times it will give the paper a stronger resistance. Once dried the pieces of paper can be piled on top of each other, but on a flat surface and weighed down.
a) Dipping paper into wax. b) Paper prepared with wax.
2) With varnish: Buy a strong, good quality paper and with a big brush paint it on both sides with an ordinary colorless furniture varnish, then hang it up to dry, this should be done two or three times.
3) Plastic pages used in files, buy them in a light color so you can see what you are doing.
With the first two method the problem is that although they have been prepared with wax or varnish if used many times they get damp and have to be left to dry, so to continue working you must have two or three of each one. Plastic, however, is easy to clean and dry, just wipe it with a cloth and go on working.
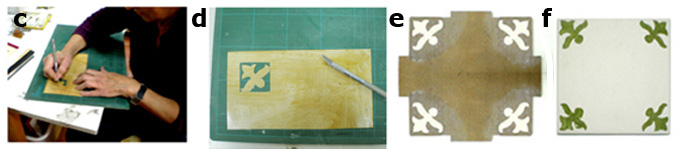
Method of working with modern equipment:
Photo or scan the tile you have to use and make it the exact size. Draw the outlines of the tile. Work out how many you will need, these design needs seven, one for every color and two for light blue. Copy it seven times, one for each stencil, decide on the color you want to use and remove all the others, then mark it with its name, number and color. Print each one onto a page of clear plastic file paper. Using a cutting pad and a very sharp, fine, razor knife cut out the parts to be stenciled.
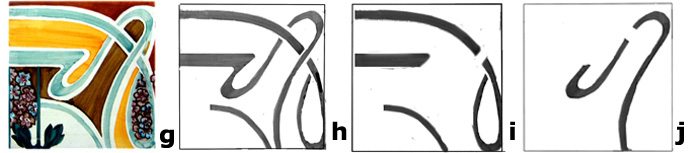
g) The tile stenciled and fired
h) All the colors except the light blue removed. The blue has to be separated into two stencils (i & j)
i) Blue stencil 1
j) Blue stencil 2
Remember:
1) The ink printed on plastic paper does not dry but as this part has to be cut out it does not matter.
2) If a part cut out is large or if it is shaped like half a circle, in order to hold it in place bridge, that is a small piece of the paper, is left connecting the opposite sides. The space will have to be painted by hand after the stenciling of the color is finished.
3) Paint on plastic paper dries very quickly, remove it with a dry cloth and continue your work.
Note: Stencil has 6 sections, to go to the next click on Stencil: (3a) Preparing the paper and if you go to the letter “S” you can see them all together.
ca: PLANTILLES- TREPES: (3a) Preparant el paper
es: PLANTILLAS - TREPAS: (3a) Preparación del papel
Click on the title to see more images Stencils are made with paper that has been prepares by covering it with wax. The number of paper pages needed for each tile depends on the design. Each one has different parts cut out and they are placed one by one on top of the tile and painted. The colors go through the cut out parts and mark-on the design. Normally deckle-edge paper is used.
(a) Work out how many pages are needed to reproduce the design you want, when prepared they can be used as many time as required.
(b) Now-days you can use your computer to copy, scan, remove all the colors so only the outlines are kept and make it to the correct size, this tile is 20×20cm and it has to be printed six times.
(c, d, e) It has been printed six times onto deckle-edged papers. Put each one on top of a cutting board and with a cutter with a very sharp, pointed blade, cut out the parts in relation to the colors they have to be printed with. It is important to mark exactly the outlines of the corners of the tiles so the different stencils can be placed correctly.
(f, g) Have a metal pan just for the wax, that can be heated up; here we use bits of paraffin candles that dissolve quickly.
(h) To know when the wax is at the correct heat, paint a corner of the deckle-edged paper, if it becomes transparent the fusion of the wax is correct.
Note: if the wax is too cold the part will not be transparent and if is too hot you will notice the brush does not run well.
(I, j, k, l) On top of a piece of newspaper put a stencil and with a brush that is flat and smooth, paint it with wax, including the cut out parts. The photo shows how the deckle-edge paper becomes transparent on contacting the wax. It dries quickly and then it can be separated from the newspaper.
Note: Do not leave the brush to dry with the wax, it will become very hard. Put it into a special dissolvent known as Perchlorethylene and leave it to soak.
(m, n, o, p) The cut out spaces have been blocked with wax, remove it all with great care using the cutter and a dry brush. The spaces must be perfectly cleaned as the colors have to be applied over them.
(q, r, s, t) The stencil on the right shows the outlines of the tile traced, so it coincides exactly with the size of the tile on the left. Place the stencil on top of the tile and start to paint, the colors are applied so they are smooth.
(u, v) The flowering colors are applied using the different stencils already prepared.
(w, x) When all the colors have been applied, to finish the tile the outlines must be painted. Mark them on with carbon powder using the pounced design and then paint it in black with a fine pointed brush.
Note: Stencil has 6 sections, to go to the next click on Stencil (4) and if you go to the letter “S” you can see them all together.
ca: PLANTILLA: (4) Amb un color.
es: PLANTILLA: (4) Con un color.
Click on the title to see more images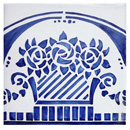 The photos show nine stages of stenciling one tile, 20×20cm with one only color.
The design is cut out in transparent filing paper. It is laid on top of a gray material so the design can be seen, as in the photo. The tile that has been prepared with opaque glaze-base is laid down and on each side of it a bisque tile is laid. These are to help to keep the plastic paper at the same level as the prepared tile to stop it from bending, which would distort the design.
The paper is laid onto the tile and weighed down with bits. Mix the paint you are going to use so it all has the same thickness you require. Use a large brush to paint, dip it into the color and move it so the paint is well absorbed into the hair, as you take it out press it against the inside neck of the pot to take off the excess color and to flatten out the brush hair. Pull the brush over the stencil, painting the spaces that have been cut out,, holding it in place with you left hand if needed. Lift up the stencil and you have your decorated tile. The paint on the plastic dries very quickly, it can be brushed off and you can start again straight away.
Note: Stencil has 6 sections, to go to the next click on Stencil (5) and if you go to the letter “S” you can see them all together.
ca: PLANTILLA: (5) Amb diversos colors
es: PLANTILLA: (5) Con varios colores
Click on the title to see more images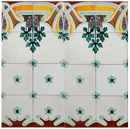 Stenciling with many colors. The following tiles were made in about 1910; they are the bottom half of a wall in a long passage. To repair it many tiles had to be reproduced, the first photo shows the work finished.
These tiles were reproduced about 20 years ago and the methods have changed slightly and in the section Stenciling 3a explains how we now prepare the paper and the design. a) Shows 16 tiles, 20 × 20 cm, there are 4 different designs. The top one and the second down, A1 and B1, are the same as the ones next to them, but in reverse, and C1 and D1 are repeated. Stenciling can always be recognized as the colors are flat and show the strokes left by the brush.
Correctly placing several stencils for one design: When working with a complicated design that has many different stencils, it is very important to place the stencils correctly, one on top of the other. With tiles the corners can be used as a guide.
This tile was made before scanners were invented. Photos and photocopies were used to reproduce them. The following is to give you an idea of how it was done and the work involved.
1) This is to show how the design is repeated; there are 4 tiles laid out 4 times, in all 16 tiles.
2) The tracing of the original tile is on transparent paper and pounced; enlarge it to see how closely it is pounced.
3) In this design the colors are stenciled and the outlines are the white of the glaze-based. Work out how many stencils are needed; each color has to have one or more, this tile needs seven.
4) The paper has been prepared with wax and cut to cover the tile with two corners that fit exactly; this is for placing it correctly, the other sides can overlap.
5) The tile has seven colors; the red of the flowers is painted by hand. Seven stencils are needed, the light blue needs two.
6) The pounced outlines of each stencil were marked on to the prepared paper with carbon powder, these were then drawn with a pencil and when finished the powder was brushed off.
7) To cut out the shapes, two or three layers of newspaper were laid out as flat as possible, a section of the design was laid on top and with a very sharp and fine cutting knife the spaces for each color were cut out. The layers of newspapers allowed the knife to sink right through and move so the cutting was smooth.
8) Prepare enough of each color to paint all the tiles. Keep them in basins wide enough for the large brush that is used.
9) Lay out four or five tiles and place the first stencil correctly. Dip the paint brush into the color, on the side of the basin push the brush to remove excess color. Pull the brush over the space, always moving it in the same direction so the lines are continuous and are straight.
10) Remove the stencil and paint the other tiles. As soon as the paper gets too damp to use put it between pages of newpaper and leave it to dry then dust off the color and use it again. While drying mark on the next color and continue doing this until all the colors in the five tiles are finished. Put them in a crank and start on the next five, the paper should be dry.
There are 7 stencils
a) Green, b) Dark green, c) Light green d) Light green e) Red-brown f) Yellow g) brown (The red and light blue of the flowers is painted by hand.) Read more about: Repeated tiles
Note: Stencil has 6 sections, this is the last, to go to the first click on Stencil (1) and if you go to the letter “S” you can see them all together.
ca: PUNTES - Ceràmica i metall
Stilts are functional furniture to support work such as plates and jars decorated with slip or glaze while they are being fired.
 There are several types of stilts industrially made with a ceramic or metal product. There are two types one is shaped like a “Y” and the other is circular, both have three vertical legs which overlap the main part underneath and above and both ends of each one are finely pointed. They are placed between the floor and the object, so that if the glaze runs it cannot make the stick them together. If the object is slightly stuck to the stilt, separate them by holding the work in one hand the stilt in the other and twist them in opposite directions.
ca: GRES
es: GRES
Stoneware is clay that is very hard and smooth. It can be fired up to 1280 ºC, at which point it vitrifies, making it suitable for the production of very strong objects like garden products. It is a very good clay to use with molds and it can also be turned on a wheel. Stoneware pieces, if glazed, are impermeable to liquids.
It is widely used in industry to make tiles, pavements and in the restoration of buildings
ca: GRES - Esmalts
es: GRES - Esmaltes
Glazed stoneware; can be fired between 1200º C and 1300º C. You can buy the glazes or prepare them yourself. Their main flux is feldspar which makes up over 40/50% of the whole. Whether in an oxidant or reducing atmosphere and using either electric or gas kilns, very good results with high resistance can be obtained. The glazes can be transparent, glossy, satin or matte and are very resistant to water.
In Europe the production of stoneware started in the XII century in Germany
ca: EINES PER BUIDAR
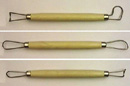 Strip turning tools are made with wooden handles and have a thin, round, steel head at each end attached by a ferrule. They are available in many different shapes and sizes and are useful for removing the rough parts of the clay.
ca: XERINGUES
es: JERINGAS
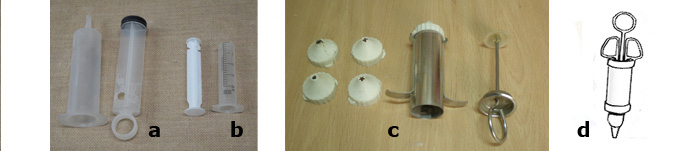 Syringe The first two photos a) and b) are syringes for medical use and the last two c) and d) are tubes for icing and decorating cakes.
The tube is filled up with a thick liquid, the handle is pushed down and the disk at the bottom pushes the liquid out through the nozzle. They are used for putting on colors and glazes, filling up a space in the slip and also for dry cord methods.
Read more about: Glaze-base textures / Glaze-base textures with colors

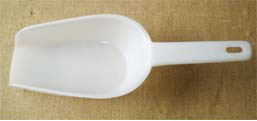 Scoop is used for scooping up large quantities of powder; it can be bought in plastic or metal and is made in different sizes. It is long and flat on the front side and the other three sides have a high wall.
 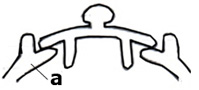 Shoulder is the part of a jar that bends in before the neck.
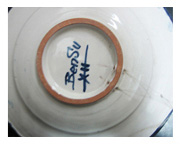
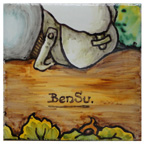 Signature is to write your name, business name or code to a finished piece of work so that it is recognized as yours and no one else can claim it.
 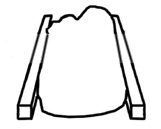 Slats are thin pairs of wooden bars put on each side of the clay to use as height guides when rolling out clay. They are known by several different names, Bars, Guide bars, Battens.