CADMIUM
ca: CADMI
es: CADMIO
Cadmium (Cd) is a metal that produces yellow and orange pigments in pottery colors.
ca: VERMELL DE CADMI
es: ROJO CADMIO
 Cadmium red is a strong, dark, reddish colored pigment used for painting in pottery. It is a metallic element and consists of cadmium sulfide and cadmium and is used to produce low temperature colors such as yellow, orange and red.
ca: CALCINAR
es: CALCINAR
Calcine is to clean by the heating of oxides or compounds to eliminate gases and water in clays: to heat to a high temperature but below the melting or fusing point, causing loss of moisture, reduction or oxidation and the decomposition of carbonates and other compounds.
ca: CALCI
es: CALCIO
Calcium is the chemical element with the symbol Ca and atomic number 20. It has an atomic mass of 40.078 amu. Calcium is a soft gray alkaline earth metal, and is the fifth most abundant element by mass in the Earth’s crust. Calcium is also the fifth most abundant dissolved ion in seawater by both molarity and mass, after sodium, chloride, magnesium and sulfate is widely used in the making of cements and mortars to be used in construction. Link: Wikipedia/Calcium
ca: BORAT DE CALCI
es: BORATO DE CALCIO (Boro-calcita)
Calcium Borate is an insoluble form of boron a natural frit. Used as a flux in all types of glaze, it also reduces crazing tendencies. It develops opalescence typical of boron compounds and in large quantities a broken mottled surface. A suitable raku glaze.
—————————————————————————————————————————-
Calcium Borate (Ca3(BO3)2) is an insoluble form of boron, a natural frit, used as a flux in all types of glazes, it reduces crazing. It is a bluish white crystal with a very defined structure and can be prepared by reacting calcium with boric acid. The resulting precipitate is calcium borate.
Link: Wikipedia/Calcium-borate.
es: CARBONATO DE CALCIO (Creta)
Calcium Carbonate is the main source of calcium in glazes and also a flux at high temperatures. Contributes hardness and durability and in large quantities produces a matt effect. It can enhance the finish of salt glaze ware by developing a thicker finish.
—————————————————————————————————————————-
Calcium Carbonate is a chemical compound with the chemical formula CaCO3. It is a common substance found in rocks all over the world, and is the main component of shells of marine organisms, snails, pearls, and eggshells. Calcium carbonate is the active ingredient in agricultural lime, and is usually the principal cause of hard water. It is commonly used medically as a calcium supplement or as an anti-acid, but excessive consumption can be hazardous.
The main use of calcium carbonate is in the construction industry, either as a building material in its own right (e.g. marble) or limestone aggregate for road building or as an ingredient of cement or as the starting material for the preparation of builder’s lime by burning in a kiln.
It is the main source of calcium in glazes and also a flux in all types of glazes, it reduces crazing and increases hardness and durability and in large quantities produces a matt effect.
Link: Wikipedia/Calcium carbonate
ca: CARBONAT DE CALCI I MAGNESI (Dolomita)
es: CARBONATO DE CALCIO Y MAGNESIO (Dolomita)
Calcium magnesium carbonate is a natural material that combines calcium and magnesium carbonates. Generally used as flux in high temperature glazes although in combination with other fluxes it can be effective down to 1060º C. Above 5% it begins to become opaque and will eventually produce a matt glaze.
ca: METASILICAT DE CALCI (Wollastonita)
es: METASILICATO DE CALCIO (Wollastonita)
Calcium meta-silicate. An alternative source of calcium in high temperature glazes.
ca: FOSFAT DE CALCI (Os calcinat, Cendra d'Os)
es: FOSFATO DE CALCIO (Hueso calcinado, Ceniza de Hueso)
Calcium phosphate is a body flux prepared from animal bone and essential for producing the translucency in bone china (up to 50%). If used in large quantities it reduces plasticity and workability and because of this it is used for casting processes.
ca: COMPÀS DE CALIBRE - Una eina de ceràmica per a graduar i comparar mides.
es: COMPÁS DE CALIBRE - Una herramienta de cerámica para graduar y comparar medidas.
 Calipers are instruments for comparing and checking sizes. They are made of wood, plastic and metal and each unit has two arms which join at one end and are curved at the other end. Both arms can be moved 180º, allowing the ends to be pointed inwards or outwards. At the joint they can be tightened so the size is exact when measuring and comparing sizes.
Drawings from left to right
a) Caliper to measure the outer edge of a flange, the metal one is handmade.
b) Caliper to measure the inner edge of a flange.
c) Caliper joined; an accurate way to size lids for pots so they fit exactly. When you measure the size of one, the other moves in the opposite direction so you have measurements for the inside of the neck and the outside of the lid.
Read more about: Teapot – Lid / Lid (a) In pottery
ca: ESPELMA
es: VELA
 Candle is a round, long, slender pole of wax with an embedded wick right through the center length wise. When the wick is lit, the wax controls its spreading. Used in the past for lighting up rooms and now for decorating and emergencies. An ordinary household candle can be melted down and the wax used for resist decorating.
Read more about: Slip decorating / Wax / Wax resist
ca: PORTAESPELMES
es: PORTA VELAS
 Candle stand is a small plate with the edges curved upwards to stop the hot melted wax running out and with a circular wall or hole to hold the candle in the centre. They can be with or without handles, made in pottery or other non-flammable materials.
ca: PREESCALFAMENT
es: PRECALENTAMIENTO
Candling is to fire clay very slowly in the first stage of firing until it reaches the temperature of boiling water. This is done to prevent cracking, breaking and explosions which are often caused when the clay is thick and the outside is dry but the inside still damp. If the object is not candled, the heat and gases cannot escape and their pressure against the outside wall of dry clay forces it, so it breaks.
ca: CARBONI
es: CARBONO
Carbon is the chemical element with symbol C and atomic number 6. The name carbon comes from Latin, “carbo”, coal. Carbon is capable of chemical self-bonding to form an enormous number of chemically, biologically, and commercially important molecules and can be used in ceramics in many different ways.
ca: PAPER CARBÓ
es: PAPEL CARBÓN
Click on the title to see more images Carbon paper (originally carbonic paper) is paper coated on one side with a layer of a loosely bound dry ink or a pigmented coating, usually bound with wax. It is used for making one or more copies simultaneously. In the past it was used when typing with a typewriter, layers of paper and carbon paper were put together so when typing an original document three or four copies were made.
In pottery it can be used to mark the outlines of a design on to ware that is going to be decorated. A design is prepared on paper, this is put on top of the carbon paper and they are laid over what has to be decorated with the carbon side touching it. Using a pencil, draw following the lines of the prepared design so it is marked onto the object. This can be done onto dry clay, bisque and glazed surfaces. When marking onto a fired glaze it is better first to cover the surface with a thin layer of Arabic glue, which acts as an adhesive to the colors and helps to hold the ink of the drawing. Both Arabic glue and carbon are natural products and will burn away when fired.
ca: CARBONAT
es: CARBONATO
Carbonate in chemistry is a salt of carbonic acid, characterized by the presence of the carbonate ion, CO2−3. The name may also mean an ester of carbonic acid, an organic compound containing the carbonate group
C(=O)(O-)2.
Carbonates are widely used in industry, e.g. in iron smelting, as a raw material for Portland cement and lime manufacture in the composition of ceramic glazes.
Link: Wikipedia/Carbonate
ca: PLANTILLAS - Formes per a l’argila
es: PLANTILLAS - Formas para la arcilla
Card shape; is a piece of cardboard or thin wood cut with a profile of the inside or outside of an object. When being used with damp clay, it should be well varnished to stop it from warping. It is used when throwing, to check that the shape is the same all the way round, that repeated pieces are the same and that two separate parts fit together.

1 The shape of the plate inside.
2 The shape of the plate outside.
3 Height of the plate.
4 Height of the foot.
5 Width from foot to edge.
The illustration shows two cards with the profile of a plate, the inside and outside. It is good to code the cards and to file with a photo, all the information, measurement, date, type of clay, etc.
This type of card is also known as a template and in the following sections more is explained.
Read more about: Jiggering and Jollying / Borders (2) In relief / Template
ca: GUBIA –Eina per estriar l'argila.
es: GUBIA – Herramienta para estriar la arcilla
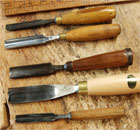 Carving gouges are tool used in pottery for fluting, which is to slice off strips of clay to form decorative textures. There are many different types, shapes and sizes, the main ones are metal with a wooden handle. They are tools made for carpentry, mainly carving into wood.
Read more about: Fluting
ca: CASSOLA – olla de ceràmica per cuinar.
es: CACEROLA - Olla de cerámica para cocinar.
Click on the title to see more images Pottery casseroles they are made of for cooking, they are always deep, with a lid, knob, and lug handles.
The two photos show a casserole made with a clay that is resistant to heat.
They can be used to cook directly on gas, electricity or wood and in the oven.
Read more about: Pottery flameproof ware – For cooking.
ca: MODELAT - Donar forma amb un motlle.
es: MOLDEADO - Dar forma con un molde.
 In pottery to cast is the verb to make a shape with slip or clay using a mold. In the drawing is a jar that has been cast.
Read more about: Mold
ca: BUIDAT - El peix (2) en ceràmica.
es: VACIADO - El pez (2) en cerámica.
Click on the title to see more images Casting the fish shows the second stage of making a cast in one piece. Mount a support to hold the plaster on top of a piece of wood, here is made with metal but it can be made of wood. The space and height between the support and what is being cast must be high and wide enough, so it does not break when being used. Put clay right round the bottom corner of the wall so it is held firmly in place and the plaster does not run out
Mix the plaster of Paris with water until it has the right thickness and is completely smooth. Tip a layer gently over the clay, run a large soft brush through the plaster and over the clay to make sure it enters all the small spaces. Add more plaster until it is level with the walls, flatten, smooth it and then leave it to dry.
To help separate the clay from the cast, use a small piece of clay and go round the part where they join, touching and pulling the clay outwards. Bang round the floor of the walls with the hammer, lay it all down then lift up the cast which should separate easily from the clay. Smooth off any rough edges of the cast, run it under tap water and with a brush clean off any clay that is left.
Photos taken in the workshop of Sot: www.ceramicasot.com
ca: BUIDAT - Dracs (1) en ceràmica.
es: VACIADO - Dragones (1) en cerámica.
Click on the title to see more images Casting is to pour slip or put clay into a hollow plaster mold to create an object. When the clay is leather-hard it can be separated and it becomes a copy, known as a cast.
Casting; work with clay in relief.
These photos are taken in the workshop of Sot, in Barcelona, who specialize in reproducing small copies of the work of Gaudí. The following photos with their explanations describe the working method.
The figure in clay covered in plaster is made from a mold in two parts. It is redone, changed and improved until it is correct, then it is taken to a casting business to make the quantity needed.
The design used here is a dragon copied from the stairs at the entrance to the Güell Park (Párque Güell). It is in one piece, 5cm long and 4cm wide, the bottom part of the dragon’s feet is flat, so it can be attached to walls or laid on a table.
The photos go through the stages of casting in the order of working and each one has a short description.
Photos were taken in the workshop of Sot and is the work of Jordi Salvador: www.ceramicasot.com
ca: BUIDAT - Guix
es: VACIADO - Yeso
Plaster casting: means covering an object or a model with a mixture of plaster of Paris and water to form an exact copy of the object. Plaster hardens into a mold that can be used to reproduce a piece many times.
Read more about: Casting – A fish.
es: VACIADO - arcilla de colage
Casting slip is clay and water mixed together to produce a thick smooth texture, which becomes a casting slip. It is tipped into a mold and in minutes a layer builds up against the walls of the mold as the water content is absorbed. The excess is poured out, leaving a coating or shell of clay in to form the shape of the mold.
Read more about: Slip Casting
ca: BUIDAT Taules - Per treballar amb barbotina i motlles.
es: VACIADO Mesas - Para trabajar con barbotina y moldes.
Click on the title to see more images Casting tables are designed to hold casts while in the process of working. They are long tables with wooden bars evenly spaced along the top to hold large and small casts. The casts are laid on the table and using a slip gun they are filled up with slip through the pour hole. The slip gun is electrically run and the intensity of the liquid expelled can be controlled from a small trickle up to a full flow.
Fill the pieces up slowly so the slip enters everywhere and no air bubbles are formed. After a short time, enough for a layer of slip to have dried round the inside edge of the cast, these are lifted up and the surplus slip is tipped out into a container or they are left upside down on top of it to drain and then put back on to the table.
When dry enough, the clay on the outside of the pour hole is scraped off and this falls through the bars on to the shelf underneath. The bars are made up in sections so they can be lifted up and the clay which has collected underneath can be removed and recycled as slip.
There are casting tables with an electrically run motor that with pressure drains the thrown off slip down in to a tank. The tank is underneath and has a pump which vibrates the slip with the water and keeps the slip in a condition to be used again for casting. Read more about: Casting – Dragons
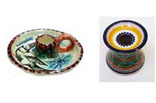
 Celadon is the western name for a type of glaze first used in China on stoneware and porcelain in an attempt to imitate the color and texture of jade, which ranges from shades of green to grey-green tones. The method of inserting these lines is called facet.
Photos lent by Monona Álvarez
ca: CIMENT
es: CEMENTO
Cement is a mixture of different clays and limestone, mixed with water and sand to form a thick liquid which when dry becomes concrete. It is a building material and also used to adhere and mend separated pieces.
There is a special product made for potters with high temperature cement for repairing unfired and broken bisque pottery that can stand stoneware temperatures and accepts glazes.
ca: CENTRAT – Fer bandes en ceràmic.
es: CENTRADO - Bandeado en cerámica.
Click on the title to see more images Centering for banding. Banding is to draw a line round circular ware, jars, bowls, plates or lids; they can be in different states, leather-hard, bisque and glaze-base. Center what you are going to band on a hand wheel. The circles marked on the wheel will help but look at the object from the side, turning the wheel slowly to see that the placing is correct.
Use a banding bar or bridge to support the hand that holds the tool so it just touches the ware and with the other hand turn the wheel. If correctly centered the two ends of the line should meet after completing the whole circumference. To practice, work on a bisque fired object, use a soft lead pencil or brush with water, the pencil marks will burn away when fired and water will dry off. Read more about: Banding (1) Working Process
ca: CENTRANT – Argila sobre el torn per tornejar.
es: CENTRANDO - Arcilla sobre el torno per tornear.
 Centering clay: The clay has been placed on the wheel and as the wheel rotates, pressure from the palm of your hands raises it into a column. It is then forced down with the right hand and the left controls it and keeps it from spreading. These movements are repeated to create the basic shape. When centered correctly the clay can be formed into circular objects.
Read more about: Clay (5) Centering
ca: CENTÍGRAD
es: CENTÍGRADO
Centigrade is the scale by which heat is measured and it is indicated by the letter C. Freezing point is 0º C and boiling point is at 100º C. On the Fahrenheit scale, freezing point is 32º F and boiling point 212º F.
ca: CERÀMICA
es: CERÁMICA
Ceramic comes from the Greek word keramos meaning clay changed by heat, burnt clay. It now has a wider application and covers every process using clay in industrial and handmade pottery, from working with clay to the finished product. Ceramic products were made from clay taken directly from the earth, which now for industrial reasons is mixed with many other materials. Some of the first pieces were produced in relation to food and liquids, to cook, to carry and stock water, wine, oil and corn and many other products. As the making of pottery progressed, it became an art and a luxury and figures, tiles, tableware and decorations were made following different styles and methods. Read more about: Clay
Read more about: Architectural Pottery / Arquitectura – Escultura
ca: CERAMISTA - Persona que treballa en ceràmica.
es: CERAMISTA - Persona que trabaja en cerámica.
Click on the title to see more images Ceramist is someone who works with clay at any stage, from working with clay to decorating and firing it. It applies to handmade pottery and industrially produced work and each stage has many different methods.
In English speaking countries the person who works in handmade products is known as a potter and the name of the profession is pottery. The two names come from the word pot,
es: TIZA (Carbonato de Calcio)
Read more about: Calcium Carbonate Chalk and Whiting
ca: CHAMOSITA
es: CHAMOSITA
Chamosite is a mineral of the chlorite group, a hydrous, aluminum silicate of iron, occurring in grey and white crystals in oolitic iron ore. It is also called egg stone and it is a limestone composed of minute rounded concretions resembling fish roe.
Note: This section is copied from the printed addition of Webster’s Encyclopedic Unabridged Dictionary and oolitic is a word you should remember for when you play “Scrabble”.
ca: CARBÓ - Pols
es: CARBÓN - Pols
Charcoal is a flux that is added to ceramic bodies and glazes. It is made up of vegetable products that are burnt and then broken down into a fine powder. Being a vegetable product, when fired, it burns away. For this reason it is used to mark designs on to clay, bisque and glaze-bases. It can be bought prepared to use in different ways, sticks, pencils and powder. You can make the powder by burning a wooden fruit box, breaking the ash down and sieving it.
Charcoal- Marking bag is made to hold a fine powder, either black charcol to mark on to a light color or white industrial talcum powder for a dark color. Read more about: Marking – Bag for charcoal
ca: CARBÓ - Pals
es: CARBÓN - Palos
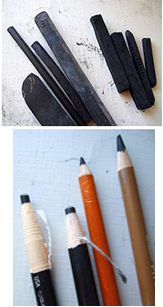 Four sticks of vine charcoal and four sticks of compressed charcoal.
Two charcoal pencils in paper sheaths designed to be unwrapped as the pencil is used and two charcoal pencils in wooden sheaths.
Charcoal is used in art for drawing, making rough sketches in painting. It must usually be preserved by the application of a fixative. Artists generally utilize charcoal in three forms:
Vine charcoal is created by burning sticks of wood (usually willow or linden/Tilia) into soft, medium, and hard consistencies.
Compressed charcoal is charcoal powder mixed with gum binder compressed into round or square sticks. The amount of binder determines the hardness of the stick. Compressed charcoal is used in charcoal pencils.
Powdered charcoal is often used to “tone” or cover large sections of a drawing surface. Drawing over the toned area will darken it further, but the artist can also lighten (or completely erase) within the toned area to create lighter tones.
Note: In pottery charcoal is used to mark the outlines of designs on to clay, bisque and glazed surfaces fired or crude, it is a natural product that burns away when fired without damaging the work in any way.
Read more about: Marking Tiles – Large / Marking Tiles -Small
Link: Wikipedia/Charcoal
ca: DURESA DE CUIR
es: DUREZA DE CUERO
Cheese hard is clay that has dried sufficiently to be moved without deformation but still soft enough to work on. At this stage handles and footings can be formed and added and decorating methods such as indenting and combing used.
ca: ANÀLISI QUÍMICS
Analytical chemistry is the study of the separation, identification, and quantification of the chemical components of natural and artificial materials. Qualitative analysis gives an indication of the identity of the chemical species in the sample and quantitative analysis determines the amount of one or more of these components. The separation of components is often performed prior to analysis.
Link: Wikipedia/Chemical Analysis
ca: FÓRMULA QUÍMICA
es: FÓRMULA QUÍMICA
Chemical symbols are the way chemical elements are coded.
Read more about: Elements – Names / Symbols / Elements – Symbols / Names / Elements – Used in ceramics
ca: QUÍMICA
es: QUÍMICA
Chemistry is the science of matter and the changes it undergoes. The science of matter is also addressed by physic, but while physic takes a more general and fundamental approach, chemistry is more specialized, being concerned with the composition, behavior, structure, and properties of matter, as well as the changes it undergoes during chemical reactions. It is a physical science which studies various atoms, molecules, crystals and other aggregates of matter whether in isolation or combination, which incorporates the concepts of energy and entropy in relation to the spontaneity of chemical processes.
Link: Wikipedia/Chemistry
ca: XEMENEIA
es: CHIMENEA
Click on the title to see more images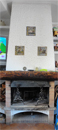 Chimney is a vertical structure, forming a tunnel or passage in which smoke, gases, powders, etc., can be carried off. It can be directly connected to a machine or be separated and is usually wider at the bottom, so it can overlap the space where the smoke of the burning material escapes. This creates a draft that sends the gases upwards and out. The top part is on the outside of the building and usually rises above a roof.
The top photos show chimneys which are attached to kilns.
The bottom photos show two kinds of chimneys; outside and inside a building.
Read more about: Kiln – Ventilation
ca: XINA - Pisa
China is the name for any white ware fired at a low porcelain temperature. It was developed in Europe to compete with the expensive imported Chinese porcelain and acquired its name from the country it came from.
China clay as the name indicates, comes from China and is well known for its whiteness and strength in bodies but firing higher than 1200º C could cause discoloration in glazes. It cannot be used in its natural state, but is an important and common ingredient for other clay bodies as it gives whiteness to earthenware, stoneware, porcelain and bone china and helps control the vitrification. When vitrified and ground down it is used as grog. It is used for all types of work but especially for slip casting and should not be fired higher than 1200º C. It is also the base for porcelain.
China paints are opaque over-glaze colors that are decorated onto an already fired glaze-base surface that can be fired at low range temperatures. Because of this, colors like red or orange do not burn out. It is also known as over-glaze enamel and as a porcelain color.
ca: PEDRA XINESA
es: PIEDRA CHINA
China stone is a medium grained, feldspar-rich partially decomposed granite characterized by the absence of iron-bearing minerals. Its mineral content includes quartz, feldspar and mica; accessory minerals include kaolin and fluorspar. It is found in one area of Cornwall in the United Kingdom and is known under the name; Cornish Stone. Link Wikipedia: China Stone
ca: PORCELLANA
es: PORCELANA
China ware is white clay that was developed in Europe to compete with the expensive imported Chinese clay.
ca: ÒXID DE CROM - òxids colorants
es: ÓXIDO DE CROMO - óxidos colorantes
Chromium oxide is toxic and is a high firing pigment that produces opaque green. Oxides are raw pigments from which prepared colors and stains are compounded. However, they can be used alone in all the usual coloring applications in bodies and in under and on-glazes. Their susceptibility to modification by other materials is greater than that of prepared ones, so eccentric effects should be anticipated.
ca: FORMA – Suports per polir un peça.
es: HORMA – Soportes para pulir una pieza.
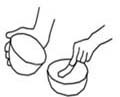
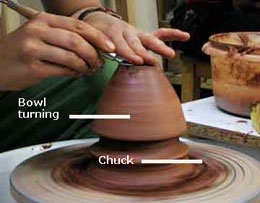
 Chuck is clay made into a shape to hold a pot or bowl in place when upside down on a wheel, so as to be able to finish off the back and footing. The clay of the chuck should be cheese-hard, dry enough not to change its shape when working with it or it can be fired for continual use. Rubber chucks can be bought and come with their own wheel head.
Read more about: Foot (a) Pottery; plates, jars and bowls / Foot (d) Classic throwing
ca: SEGELLAR - Acoblar peces d’argila seca.
es: SELLAR - Unir piezas de arcilla seca.
 Clam is to join two bits of dry clay. Score the parts to be joined and cover them with slurry. Push them together, hold until they are dry enough not to separate, clean and level off the joint and before firing leave the piece to dry.
ca: CLASSE (1)
es: CLASE (1)
Class is to grade people or products according to types, rank or education.
ca: CLASSE (2)
es: CLASE (2)
Class is a group meeting regularly to study a subject under the guidance of a teacher.
ca: PINCES - Eines per aguantar una peça d’argila roent.
es: PINZAS - Para aguantar piezas de arcilla ardiente.
 Claws are known as glazing claws. There are different types and sizes and they are used to hold vessels while dipping and to move ware while still hot after firing. There are special ones are made with long handles to move red hot work, as in Raku. Claws are also known as tongs. Read more about: Raku tongs
ca: ARGILA
es: ARCILLA
Clay is a naturally occurring material taken out of the ground and is composed primarily of fine-grained materials formed by the decomposition of granite and the gradual chemical weathering of rocks. Clay is made up of different materials that form different types of clay bodies which vary in maturing temperatures, strength and color of the clay and the bisque when fired.
Clay deposits are mostly composed of clay minerals which show plasticity through a variable range of water content and which can be hardened when dried or fired.
Clay has plasticity when mixed with water and when dry, it becomes firm and when fired permanent physical and chemical reactions occur which cause the clay to be converted into a ceramic material. It becomes solid, not pliable, breakable and still absorbs water but this does not make the shape changeable.
Different types of clay are mixed with different minerals and fired using different methods to produce earthenware, stoneware and porcelain. Depending on the content of the soil, clay can appear in various colors, from a dull grey to a deep orange-red and is used for making pottery items, both practical and decorative, all of which have to be fired with a glaze to make them non absorbent to water.
Note: The sections CLAY 1 to 6 are the first stages of preparing clay for working and throwing. They are linked, click here Clay (1) Kneading to go to the first. These are followed by two files Clay (7) Accessories and Clay (8) Tools. The next are sections on preparing and working with clay and are not linked to each other. The first is Clay: (a) Bodies. it is better to go into C and move down, there are 16 sections.
ca: ARGILA (0) Fabricació d' Argila
es: ARCILLA (0) Fabricación de Arcilla
Click on the title to see more images These photos were taken in the clay factory of Argiles Bisbal located in l’Empordà (Girona-Spain). The factory goes through the whole process manufacturing clay, most of the earths they use to produce the different types of clays are all found in the ground that surrounds their factory.
Clay has many properties, plasticity, shrinkage during drying and firing, texture the color before and after firing, hardness, it can be molded to form a shape that it retains while drying, when dry it loses its plasticity but the piece can be dampened, so the shape can be altered.
When the clay is dry it is hard and un-pliable, in this state it can be fired to become bisque. Bisque is the name used to define all types of clays that have been fired to become a ceramic. This chemically changes, turns it into a permanent shape, which cannot be altered or integrated with water but water can still pass through it
THE PROCESS OF MAKING CLAY
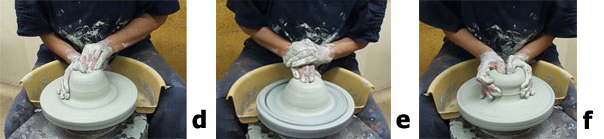
It starts in a quarry, they work with an earth digging tractor to extract different types of clay from the ground. This can be seen in the photos (a, b & c). The different types of clays are separated into big piles; that vary in particle sizes, shapes and colors and are placed round a large, flat, dry earth surface, where each one is spread out to dry in the sun. (d)
Each pile of is laid out on the ground and combed with a tractor; it turns and separates it into thin lines, which increases the speed of drying. (e) The drying will depend on the category of the clay, the heat and time required to bring out its maximum benefit. The moisture of freshly mined clay is 18% and after drying it ranges from 9% to 11%. (f & g) When dry they are again piled up, covered and left for 3-12 months to age
When dry the clays are moved inside a big nave (h). The piles are placed near the mill that will grind the clay so it is formed as a powder (100 micras) (i). The large ball mills, grind the earth until it has the consistency of a fine powder, the powder then passes through to separate any unwanted bodies (j). The soils milled to form the clay as a powder. It is stored in large silos, (k) to mix with feldspar, manganese, and grog..
This process has to be an exact (%) of the formulation of the minerals that are added and they are automatically weighed before being mixed with it.
Adding water is the first step of turning the rough clay into a pliable product. The right humidity for each type of clay is different and the exact amount of water must be determined correctly for each one. The process of adding water to dry clay can be seen in (l). After mixing all minerals and water with kneading machine/mixer, the product becomes a a smooth slip. (m).
Metallic machine/ roller use: 17% humidity.
Plaster cast: 19% humidity, medium plastic clay
For throwing: 22%-25% humidity, very plastic clay
The last stage is to pass it through a de-airing extruder also known as a plug mill, it has a vacuum and sucks the air out of the clay.
A nozzle (square rectangular or cylindrical) seat at the pug mill head, the clay passes through and that forms it into a long continues rectangular shape, moved on to a conveyor belt that cuts it in to sections the correct size in centimeters and weight. (o & p). The clay in photo (o) is black refractory clay.
The machine continues, packing and sealing the cubes in strong transparent plastic paper that keeps the clay at the correct moisture need to work with (q). They are lifted up with a machine, known as a palletize (r) and placed on a pallet (s). Standard pallet has 96 blocks of 12.5Kg, total 1200 Kg. Then the whole block, the four sides, the top and the outer edge of the pallet are packed in very strong plastic paper, this holds them together so they can be mover as one body. (t, u & v)
Note: The processes of preparing clay, is the same for all the different types made by this firm. As they are all prepared using the same machinery great care is taken not to mix them and perfect cleaning after every different clay production It is very important that what a client buys, has the same standard as the previous acquisition
 Kneading
1) Cut the clay to the size you find workable.
2) Push it down and outwards forming a rectangle of the size you require.
3) Turn and pull up the edge furthest away bending it into a vertical position.
4) Push it down pressing the part nearest to you and flatten it out.
5) Turn 90º and continue repeating until it is well mixed.

Wedging

1) On a work table, throw a lump of clay and push it down to form a long, thick oblong block, the width measuring about half the length.
2) Cut it through the center and separate the two halves and put one on top of the other.
3) Ram it down until it is the same thickness as before, lift it up vertically, cut through the center.
4) Lay one half top of the other, turning the top one 90º.
Note: Repeat the above steps until it is thoroughly mixed.
 Spiral Wedging
1. Take a lump of clay, which should be quite soft, push it out into a thick rectangular lump.
2. Pull a little of the far side up and towards you, rolling and pushing it downwards into the clay it overlaps. Continually doing this will form a rocking movement, backwards and forwards.
3. Slightly flatten out the clay, turn it round and repeat the process on the other side.
4. Go on repeating until the clay is well mixed.
The three different ways to prepare clay have been explained. When working with a wheel it must have an even consistency of texture, without lumps or air pockets and be strong and dry enough in texture to keep its form while being turned. The following are two ways to check the clay before starting to work.
 Clay Palming is to push the clay down, on a flat surface, with the palm of your hand so it leaves a very fine layer. This allows you to check the state of the clay, to see if there are any foreign bodies, lumps of clay or air bubbles which you can remove. Roll it up, turn it 90º and repeat what you have done several times until it is completely clean.
 Clay Slicing. When you think the clay is prepared to use, cut through what you are kneading in several places, to make sure it is correct and run your finger over the cut parts, to feel for anything you cannot see.
ca: ARGILA (4) Tornejat en ceràmica.
es: ARCILLA (4) Torneado en cerámica
Clay (5) Centering: Is the first action in throwing is the formation of a cone on the wheel and it consists of two passes. A ball of clay ready to work with, it is placed firmly in the center of the wheel and as the wheel turns with the strength and movement of the hands on the clay is centered.
Clay (6) Opening: Open it slightly and then start forming the shape.
Note: These are links to all the sections about “throwing”, in alphabetical order. Bowl Throwing / Cylinder Throwing / Jars Throwing / Lids Throwing / Lids Cones / Lids-Knobs / Plate Throwing / Stack Throwing / Teapot Body / Throwing – with a tube
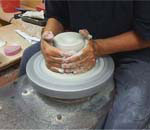
 Clay turning applies to pieces formed by throwing on the wheel that have to be turned upside down to finish the footing, such as plates, bowls, jars, cylinders and lids. When the throwing is finished they are moved, using the wheel bat as a tray and are left to become leather-dry, dry enough not to deform when being turned upside down to finish the footing..
When turning the pieces must be held in place, this can be done by putting small bits of clay to hold it in place or using a Griffin-grip or a chuck.
Read more about: Foot (d) Classic throwing.
 Centering clay is the first step in pottery to shape a round, uniform object like a bowl, pot, etc. A lump of clay must be placed correctly in the center of the wheel and forced by hand into a symmetrical form. Your hand movements to center the clay are known as coning. As the wheel turns, you apply pressure on the clay with both hands, if it is not correctly centered, your work will not be circular.
Clay – The methods of opening
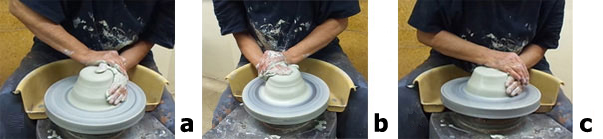
a) This position controls horizontal centering, the hands do not touch the wheel.
b) The position is a variation of the one before, used for cones that are flatter.
c) Another variation which allows stronger pressure on the clay that is dryer or the cone is bigger.
There are different methods of opening, conditioned by the size and the amount of clay centered, but basically there are two openings, one for bowls and one for tubes. The bowls require a curved form and the sizes vary in relation to the shape of the bowl. A tube requires a base that is open and flat on the wheel head and the same thickness as the walls.
d) The beginning of the opening of the clay or the final centering.
e) A way of opening used with a smaller piece of clay.
f) Another way to open, which allows opening from the center, this movement can also be used as part of the one before.
The process of opening requires a good equilibrium force between the left hand, which opens with pressure from the center and the right hand which supports and steers to the center.
To open you can leave a small indent in the center, which holds your fingers when starting to open.
g) The base position for enlarging the opening. Open it leaving the clay base between 1 to 2 cm, depending on the size.
h) The way to open outwards is to combine turning the wheel with the movements of the hands.
i) Opening bowls horizontally by pressing steadily upwards and outwards at the same time.
Remember: The sections on throwing are explained under the name of the piece being made. These links take you to the first section, if it has more than one they are connected so you can see them easily.
Note: These are links to all the sections on throwing in alphabetical order. Bowl Throwing / Cylinder Throwing / Jars Throwing / Lids Throwing / Lids Cones / Lids-Knobs / Plate Throwing / Stack Throwing / Teapot Body / Throwing – with a tube

How this section works: Each objects is in two places, here with an illustration and its name. If you click on a name below, which is in red, it will take you to where it is in the dictionary. This is to help you find what you want rapidly, without knowing its name
There are three sections of classifying in this way Clay Accessories which applies to the implements used when working with clay and Clay Tools and Kiln Furniture.
Read more about: Anvil / Bar suport / Bats / Beater textures / Biscuit Cutter / Bow cutter / Calipers / Card plate / Chuck / Cutting wire / Disk cutter / Gauge post / Giffin grip / Kidney / Modeling – Boards / Mold -Frame / Mold – Made with bars of wood / Rib / Rolling pin / Roulette wheel / Shape cutter / Stamp / Tile – Clay cutter / Wheel bats – handmade
ca: ARGILA (8) Eines


Read more about: Hole Tools / Loop tools / Modeling Tools / Turning tools / Bamboo tools / Saw Blade
ca: ARGILA - Cossos.
Clay Bodies are the mixtures of clays and minerals used for building up types of clay which are fired at different temperatures. They have different bisque strengths and colors and are used to form many objects such as pots, tiles, bricks, etc.
Clay Body Firing Temperature
Red Earthenware = 1000º C – 1080º C, medium shrinking and fine texture.
White Earthenware = 1060º C – 1180º C
Stoneware = 1200º C – 1300º C
Porcelain = 1280º C – 1350º C
Bone china = 1200º C – 1260º C
ca: ARGILA - Freda.
es: ARCILLA - Fría.
Cold Clay does not have to be fired, it was invented to repair and restore antique pottery. It has developed into pliable clay that can be used straight away; it is hard, dries at room temperature and can be used for modeling delicate pieces and large structures with rough surfaces.
There are two types; one is thick and used for modeling and the other is more pliable and used for filling cracks and to repair imperfections, both are made in different colors that can be mixed with each other. They can be thrown or moulded and diluted by adding water.
The clay does not need to be fired, as it will harden. Hardening times can be reduced by applying a moderate heat; a kitchen oven can be used, it needs about 15 minutes at 130 ° C. There is little or no shrinkage and when dry it can be carved, sand papered and polished. It is mainly used in school for children to model figures and to make jewelry and small crafts.
Clay color stains are also known as body stains and can be bought and added to clays to create a different color. White clays are the best to use particularly if you want strong colors. This can be done in two different ways, of which b) is more exact, as both products are powder and can be weighed.
a) Add water to the color and mix into a thick paste and then knead it into the clay.
b) Buy white clay in the form of powder and in a bowl mix it with about 5% of the color, which is also powder. Gradually add water until it becomes a thick paste then take it out and knead it until the two are completely integrated and it has the correct plasticity to work with.
Colored stains and colored clay can be bought and are used in many methods, agateware, slip trailing, etc.
Read more about: Agateware or lamination
Clay damping
a) Dampen clay by cutting it in slices, make holes and fill them up with water, then sandwich and knead the clay. You may have to do this several times.
b) If the clay is too hard to knead, slice it into several pieces, sprinkle water over them and put them on top of each other. Pack them together, cover with a damp cloth and leave in a bucket or large basin. Repeat this several times during the next few hours.
c) If the clay is too dry even to cut, then either put it into a bucket half full of water and keep turning the clay, or cover it with a very thick, damp, cloth, continually re-damping the cloth.
d) Clay must be kept damp while not being used. Keep it in a plastic airtight bucket or a strong well-closed plastic bag.
ca: ARGILA - Reparació en sec.
es: ARCILLA: (f) Reparación en seco.
Clay dry repairing
a) Scratch both parts that have to be joined.
b) Wet them with water, put on a thin layer of watered down damp clay, pushing it in to the inlets left by the scratching, leaving a thin layer of workable clay.
c) Join the two pieces by pushing them together and hold tightly or weigh them down until they stick together. Clean off the clay that has been squeezed out round the edge of the joint. When dry, they should have stuck together and can then be fired. This is good for repairing corners and edges that have been chipped off.
ca: ARGILA - Seca.
es: ARCILLA - Seca.
Dry clay is clay that is as dry as the air surrounding it.
Dry clay if it is too wet to be used; the water can be absorbed by wedging and kneading on wood or cloth. Keep turning the wood and changing the cloth so what you are working on is dry.
a) If the clay is in a very liquid state, spread it onto a large flat container, leave to settle down so the water dries out. When thick enough to move, lay it on top of a cloth which is on top of a movable wooden board. Leave to dry for a while and then put another dry cloth and a dry piece of wood on top, turn it over, using the two bits of wood as a sandwich. Take off the damp cloth and board, which are now on top and repeat this until it becomes dry enough to knead.
b) Before firing, all clays should be thoroughly dried out. If not dry enough the dampness can form an uneven heat and cause it to crack, break or deform. The following drawings are to give an idea of how the process of drying works.
The water migrates from the center, through the pores to the surface and the particles close more on the outside where it is dryer. As this happens it becomes more difficult for the water to move outwards and this slows up the drying process. If the work is a plate or jar where the walls are thin, there are fewer problems but if thick, such as work in relief, it is very difficult to know how dry it is and for this reason the first hours of firing should be at a low heat and for a long time.
Primary clay, is clay that has remained in the same ground in which they were formed. There are few and the main one is China clay. Its characteristics are whiteness and strength and it is the main base for porcelain china, also called residual clay.
Clay reclaiming has to be done when clay has dried too much, pieces have been made and not used because they are broken or cracked, bits are thrown off while working with the wheel, they can still all be used again. If you use many types of clay, when ordering them make sure you keep them separate, in different colored plastic buckets. Put the clay into a bucket and cover it with water and leave it for a day, then look at it.
If the clay was in very large chunks it may need more water, add some and then leave it until it has disintegrated into a thick, chunky sludge which must be thick enough to be lifted out of the bucket so as to start kneading it. If there is too much water, leave it in the bucket and mix it as much as possible then leave it to dry off. Do not remove any water as it has many clay substances and this might damage its basic structure. When taken out of the bucket, put it onto a flat surface and flatten it out to dry.
There are two ways of doing this:
(a) Lay it out onto plaster bats, as level as possible, and keep turning it so it dries out evenly.
(b) Have two or more large planks of wood and sheets, the same size, of strong finely woven canvas. Put the canvas on top of the wood and the clay on top of the canvas spreading it out evenly. When dry enough to turn lay a canvas on top and another piece of wood and turn the sandwich over, take off the wood and canvas that are damp and leave it to dry.
Continue with one of the two methods until the clay is dry enough to wedge. Wedge it very well, cutting and turning it many times. Pack it in a plastic bag or airtight bucket in a cool room, to keep it moist enough to use again.
CLAY Recuperating. Electric controlled extruders also known as plug mills are machines for compressing and recuperating clay so that it can be used again, this also improves its strength and workability. It breaks down the clay and shapes it into a solid tube, known as a coil. There are many different sizes and types, for big industrial business and for small studios and schools.
Read more about: Extruder (3) Electric (Plug Mill)
Clay: repairing dry clay
a) Lute both parts that have to be joined.
b) Wet them with water, put on a thin layer of watered down damp clay, pushing it in to the inlets left by the scratching which leaves a thin layer of workable clay.
c) Join the two pieces by pushing them together and hold tightly or weigh them down until they stick together. Clean off the clay that has been squeezed out round the edge of the joint. When dry, they should have stuck together and can then be fired. This is good for repairing corners and edges that have been chipped off. This is known as clam. Read more about: Clam
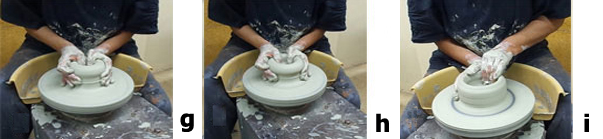
Clay – Clay shrinking samples
Clays when fired change color, have different textures and shrink. They shrink during drying, firing, and if fired at a high temperature they shrink more than at a low temperature. Most shrink between 5% and 10% so it is extremely important to test the clay you are going to use for the first time and necessary if working on a project which has an exact size.

Working sequence
a) Roll out four pieces of clay, the same size, about 2mm thick 10cm long and 5cm wide.
b) Scratch a code on their backs so you know which is which, then on the front of each one, indent, lengthwise a line 8cm long.
c) Keep one damp and leave the others until they are dry.
d) Fire two of them at different temperatures, depending on the temperature that the clay can take, red clay at 800º C and 1000º C and refractory at 1000º C and 1280º C.
e) Lay out all four pieces, damp, dry, low and high fired, so the bottom edges are in line. The heights of the indented lines will be different, so the percentage of shrinking at each stage can be measured.
f) Make a photo of them together and next to a ruler. File it with all the information on the clay, make, type, color, shrinkage, etc.
ca: ARGILA - Etapes.
Clay Stages
Cheese hard is clay in a plastic state that has dried sufficiently to be formed into a shape that does not alter or change when working on a wheel or lathe without the force of your hands and can be handled or moved, with care, without deformation.
Leather hard is when the clay is hard and the basic shape cannot be altered but still soft enough to give it textures, such as burnishing, scratching, scraping and piercing.
Dry clay is when the clay has dried completely; it is as dry as the air surrounding it.
Bone-dry occurs in the first stages of firing at 120º C and continues until it reaches 600º C when it changes to become bisque.

Clay storing. Clay can be kept for a long time in a plastic state by keeping it in the unopened plastic bag in which it has been purchased. With leftover pieces of the same type of clay, knead and roll them together, and to keep the clay in a damp state, put it in a plastic, airtight container. Plastic buckets with flat, airtight lids are very good as they can be piled one on top of the other.
ca: ARGILA - Textures i Colors.
es: ARCILLA - Texturas Y Colores.

Clay: textures and colors
Different clays have different colors and textures. Sands and grog can be added to clay to change the texture, to add strength and to slightly alter the color. Electric tile cutters throw off fine grain that can be used as grog. Always be sure that the grog you are using can be fired up to the temperature you require for your work. Most red brick can only tolerate up to 1050º C and some cheap building bricks even less.
Combustible materials make textures by mixing or pressing them into unfired clay. When fired they will burn away leaving a texture. You can use; rice, coffee beans, any form of dried vegetable, dried leaves, etc.
When special colors are required in clay, colors can be added. These are known as coloring stains or body stains and are produced in powder form. There is a large selection of colors but remember that the color of the clay will always influence the color you are adding. So to achieve a required color, white or light clay is better. Colored clays can be bought prepared.
ca: ARGILA - Tipus.
es: ARCILLA - Tipos.
Preparing clay for use
Clay is the fundamental material for all types of work in ceramics, from industrial brick and tiles to decorative jars and plates. The two main types of clay are primary and sedimentary. Clay is a damp plastic material that can be manipulated into any shape, left to dry and then fired to become bisque, which is not pliable, but breakable and porous. To stop it being porous it has to be covered with a glaze and fired again.
Primary Clays are also known as residual clays. They are clays that have remained in the same ground in which they were formed. There are few and the main one is China clay. Its characteristics are whiteness and strength and it is the main base for porcelain china.
Secondary clays are also known as sedimentary clays. They are clays have that been displaced and eroded by earth movements throughout thousands of years.
All clays have to be prepared before using or purchased already prepared. Clay is the material out of which all ceramic work is made. It is heavy, damp and has to be prepared to have a workable consistency that can be molded and shaped. When fired, clays change after reaching 600º C into bisque, which is hard, breakable and porous. There are many different types of clays, with different colors, textures, plasticity and shrinking capacity that become fusible at different temperatures. All clays are fusible, this means that they can melt and disintegrate if fired above a certain heat.
It becomes bisque at 600º C, but the more it is fired the stronger it becomes. When using new clay always check to what temperature it can be fired. Normally clays for pottery can be fired up to 1050º C and there are refractory clays that can stand temperatures of up to 1300º C.
ca: NETEJAR
es: LIMPIAR
To clean is the act of removing dirt or an unwanted object. It is a word that can be applied to every impurity and includes to scrub, sweep, brush, wipe, mop, dust, wash, rinse, lave, deterge, purify, clear; decontaminate.
In pottery it is also used to imply that materials have no form of dirt, stains, impurities, foreign matter or pollutants.
ca: NETEJA
es: LIMPIEZA
Cleaning is to remove or eliminate unwanted foreign bodies; dust and dirt, defects and blemishes, etc. that can damage clay, glaze, colors and your health and appear in all stages of pottery. In pottery you work with many materials that are dangerous, so always read the labels of what you buy, so that you know what you are working with and what precautions you should take. Powders and sprayed materials float in the air and can be inhaled. Cleaning where you work and what you work with is very important, use goggles, gloves and masks and buy an industrial vacuum cleaner, it is a must.
Read more about: Vacuum Cleaner
ca: NETEJA - Taller de ceràmica.
es: LIMPIEZA - Taller de cerámica.
Cleaning the workrooms. There is so much dust and powder coming from the products used in pottery that the best way to clean up is with an industrial vacuum cleaner. This absorbs the dust without dirtying the atmosphere, as sweeping does. With the extensions that come with the machine one can clean floors, walls, shelves, etc. and after vacuuming, mop the floors, if needed.
Cutting and filing tiles is a very dirty job. Electric tile cutters are not designed to absorb what they throw off. They use water and it carries all the very fine grains that fly off while cutting ceramic ware, covering and dirtying everything that is near. To avoid this I have had my electric tile cutter adapted in such a way that it can be connected to the vacuum cleaner, so all the powder formed is absorbed into its dust bag and water does not have to be used.
Read more about: Tile – Cutter electric / Vacuum Cleaner
ca: TRANSPARENT
es: TRANSPARENTE
Clear is when a product is free from flaws, containing no foreign body and can be seen through.
ca: ENDREÇAR
es: DESPEJAR
To clear is to remove all unwanted objects from a specific place, leaving it empty.
The table was cleared of books or his mind was clear of worries.
Clobbering is decorating already decorated work without permission of the artist or firm.
ca: RECOBRIMENT – Barreja per pintar les plaques del forn.
es: RECUBRIMIENTO - Mezcla para pintar las placas del horno.
Coating In pottery is refractory, mixed with water to it to become a liquid. It is used to spray or paint a coating on kiln shelves and their insides. This makes them last longer and if glazes run it helps to stop it adhering to other objects.
Read more about: Bat wash – Paint to protect kiln shelves.
ca: COBALT
es: COBALTO
Cobalt is a hard, lustrous, grey metal, a chemical element with symbol Co and atomic number 27. Cobalt-based colors and pigments have been used since ancient times for jewelry and paints, and miners have long used the name kobold ore for some minerals. Cobalt is used in the preparation of magnetic, wear-resistant, and high-strength alloys. Smalte (cobalt silicate glass) and cobalt blue aluminate, CoAl2O4 gives a distinctive deep blue color to glass, pottery, inks, paints, and varnishes.
Cobalt has been detected in Egyptian sculpture and Persian jewelry from the third millennium BC, in the ruins of Pompeii (destroyed AD 79), and in China dating from the Tang dynasty (AD 618–907) and the Ming dynasty (AD 1368–1644).
Link Wikipedia: Cobalt
Cobalt carbonate Cobalt carbonate is the inorganic compound with the formula CoCO3. This reddish paramagnetic solid is an intermediate in the hydrometallurgical purification of cobalt from its ores, as an inorganic pigment, and as a precursor to catalysts. Commercially available pale violet basic cobalt carbonate has the formula CoCO3(Co(OH)x(H2O)y(CAS 12069-68-0). Cobalt carbonate occurs as the mineral spherocobaltite, which occurs as pink/red triangular crystals with a specific gravity of 4.13g/cm3.
ca: ÒXID DE COBALT
es: ÓXIDO DE COBALTO
Cobalt oxides also known as Coloring Oxides are raw pigments from which prepared colors and stains are compounded. They can be used alone in all the usual coloring applications in bodies and in under and on-glazes. Their susceptibility to modifications by other materials is greater than that of prepared colors. Cobalt oxide appears as olive-green to red crystals, or grayish or black powder. It is used in the ceramics industry as an additive to create blue colored glazes and enamels and for centuries it was used as a coloring agent in pottery.
ca: TASSES DE CAFÈ
es: TAZAS DE CAFÉ
 Coffee cups are small, with a saucer and used to drink black coffee after a meal.
ca: CAFETERA
es: CAFETERA
 Coffee pots are usually tall jars with a lid, narrow spout without a filter. The coffee grains collect at the bottom and the spout controls the flow of coffee into small coffee cups.
They began to be used at the beginning of the XIX century, before coffee was mixed directly with boiling water.
ca: XURRO
es: CHURRO
 Coil is a loop that winds around itself or another object.
Explanations:
a) In pottery it refers to a long, rolled out piece of clay that is used to build up objects.
b) A coil of hair.
c) A snake forming a coil round the leg of a chair.
Note: In English the same word is used with different materials, in Catalan and Spanish different words are used.
Read more about: Coiling (2) Ways of using coils
ca: XURROS (1) Buidador rodó; eines per fer-los.
es: CHURROS (1) Vaciador redondo, herramientas para hacerlos.
 Coilers are clay tools used for producing coils and for shaping and shaving while throwing on the wheel.
The first two are industrially made with wooden handles and an empty metal circle at one end that has a cutting edge on both sides.
The last five are all handmade, with strong, thin metal wire that is cut to the lengths required, bent in half round a round object that is the size you want your coil to be. When the wires meet they are twisted together tightly three times and then slipped off the object. The last parts of the two wires are bent to form a handle. Very good and cheap!
The next section; Coiling (2) Ways of using coils
ca: XURROS (2) Diferents usos d’argila.
es: CHURROS (2) Diferentes usos de arcilla.
A coil is clay rolled into a solid tube by hand or using a slab roller, it can be of any size, length or width.
DIFFERENT WAYS OF USING COILS

a) Rolling out a coil.
b) Building up a bowl with coils.
c) Coil decorating; adding coils to form a design on clay already shaped.
d) Coils to attach; are used to provisionally join a cay object to a board or wheel, to prevent it from moving while being turned or moved.
e) Coils to strengthen joins; like the inner and outer corners of boxes. They can also be used for attaching wooden walls for making molds. .
Read more about: Coiling (4) Clay with a slab roller
ca: XURROS (3) Construcció amb xurros de argila.
es: CHURROS (3) Construcción con churros de arcilla.
Coiling is one of the oldest ways of forming pottery. Clay shapes such as bowls are built up by using coils of pliable clay, putting one on top of another and pressing them together. The shapes of the coils on the inside and outside of the bowl can be left as a decoration or flattened by beating to become thinner, stronger and forming a shape. When working, support the inside with your left hand and beat the outside with your right, then do the same on the inside, if what you are making is big enough. This can also be done with a paddle and anvil. The method of beating can make the walls very thin and strong and when finished, the clay can be smoothed out or left with an uneven texture.
Coiling, the drawings below illustrate the two different ways of coiling.
The following rules apply to both types of coiling.
a) Coils can be made in all sizes; length and width-wise.
b) If you want to make a round article, use a wheel.
c) To stop cracking, all clay must be damp and have the same consistency.
d) To strengthen the wall, the first coil at the base should be the largest.
e) To avoid weakening the wall, cut the coils so that the joints do not fall on top of each other.
f) When making the joints, cut the coils at 45º.

Working sequence.
a) Squeeze the clay into cylinders. Lay them down onto a flat surface, roll them backwards and forwards until they are the size you need.
b) You can make the floor either with coils or flatten out a ball of clay. Make it to the shape and size required for the floor.
c) When the coils have to be joined cut them at 45º and join them, this makes the joint stronger.
d) Both systems are the same, except with snake coiling, a cut is not made on each floor but continues until another cut is needed.
Read more about: Pinching – Clay / Pinching – Plus coiling clay
ca: XURROS (4) Argila amb planxes fetes amb laminadora.
es: CHURROS (4) Arcilla con planchas hechas con laminadora.
Click on the title to see more images To make a coil you need a slab roller; set it to the height you want for the thickness of the coils you are going to make and the two sheets of canvas you have to use with this machine.
a) Prepare the clay by making it into a block, lay it between two sheets of canvas, bang it down slightly with your fists and turn it through the slab roller.
b) Take off the canvas that is on top and with a coiling tool, starting at the far end pull it through the clay, in a straight line, towards you.
c) Pick up the far end of the coil and lift it up, lay it down on one side and continue coiling.
d) If you want a coil flat on one side, do the same except the clay when rolled out must be half the circumference of the coil tool being used.
Note: Coiling tools can be bought or you can make them to the sizes you need. The photo shows a handmade one, the top is a circle that is the size of the cone, the twisted part is the neck and the bottom the handle.
Read more about: Coiling (2) Ways of using clay coils.
ca: COLEMANITA
es: COLEMANITA
Colemanite (CaB3O4(OH3)•H2O) is a borate mineral found in deposits of alkaline lacustrine environments and is a secondary mineral that forms by alteration of borax and ulexite. Link Wikipedia; Colemanite.
Collapsing occurs when clay is over fired it collapses and becomes liquid. I have seen a kiln in which clay spread over a wall and floor like thick melted chocolate and when the firing finished, it had become a solid block. The whole kiln had to be dismounted and repaired. Always check when buying clay to what temperature it can be fired.
ca: COLLARET - Disseny al voltant del coll d’un gerro.
es: COLLAR – Diseño alrededor del cuello de un jarro.
 Collar is name for the design in the narrowest part of a jar, a decoration on the neck; this is a style appropriate to pottery.
Read more about: Neck
ca: COLORS – Mètodes d'aplicació en ceràmica.
es: COLORES – Métodos de aplicación en cerámica.
Color applying: there are many different methods to give different textures, the same ways can be used for an opaque glaze-base as for colors and slips. The following list shows different sections in the dictionary that cover them with more information.
Read more about: Dry cord / Extruder / Glaze-base (m) Textures / Glaze-base (n) Textures with added substances / Glaze-base (o) Textures with colors / Majolic: Colors (c) how to use / On-Glaze / Spattering / Trailing
ca: COLORS - Humit en ceràmica.
es: COLORES - Húmedo en cerámica.
Colors when damp in powder form must be dried for using in the on-glaze method as they have to be mixed with varnish or other substances that are nonabsorbent to water. To dry spread the powder over a piece of paper and leave in a warm place. Newspaper is good as it is absorbent.
ca: COLORS - Doble cocció en ceràmica.
es: COLORES - Doble cocción en cerámica.
Colors, double firing: colors that are going to be fired two or three times, at the same or at a lower temperature, should be tested to see if they can be affected. The higher the temperature for verification, the more likely it is for a change to occur. They can lose their shine, become darker and suffer other alterations. If using colors that vitrify at different temperatures, you must always start with the highest temperature that the clay can take and then move downwards as over firing can damage the clay and change and burn colors away. Stoneware can be fired up to 1300º C and then decorated using and mixing different methods, first with earth pigments and oxides, which vitrify at 1280º C, then with oxide at 1000º C, then Majolica method at 980º C and then porcelain at 800º C.
Read more about: Majolica: 4f – Colors fired at two temperatures / Majolica: 4g – Relief in four different thicknesses
ca: COLORS - Instruments per l'aplicació en ceràmica.
es: COLORES - Instrumentos para la aplicación en cerámica.
ICING TUBES can be a bag or tube, metal or plastic and come with a selection of different shaped nozzles. As colors are not solid, round ones of different sizes are used. Read more about: Icing tubes (c) & (d)
SLIP TRAILERS have a soft plastic body in the shape of a bulb with a long, thin nozzle about 3cm in length. They are filled up with slip which with the pressure of your hand on the bulb comes out in a long unbroken line and texture. They are small and can be bought with interchangeable nozzles.
Read more about: Slip trailers
SPRAYS are used to put a liquid onto an object. They have a bottle to hold the liquid and a spray gun attached, like a lid. They have a trigger that with hand pressure expels the liquid onto a surface. There are many types, sizes and methods and they can be controlled by hand or be electric.
Read more about: Spray / Spray – Equipment
SYRINGES were originally made of glass for medical use, they are now plastic and special ones are made for pottery to draw lines and fill up spaces. There are different sizes and nozzles.
Read more about: Syringes
TRAILING BOTTLE They consist of a small plastic bottle which allows the pressure of the hand to push the slip out through a nib. They are in four pieces the bottle, the neck, the top and the nib. The nibs are made with different sized holes to trail lines of different widths. There are very fine ones made for writing.
Read more about: Slip trailers
ca: COLORS - Etiquetat en ceràmica.
es: COLORES - Etiquetado en cerámica.
Click on the title to see more images
Colors labeling: naming glass and plastic bottles or boxes has always caused problems as dampness gradually blurs the writing. Fortunately, there are now pens with inks that can mark directly onto anything and should not come off. The old fashioned way would be to stick a marked label onto the glass and then cover it with adhesive, which keeps it dry and clean. Besides labeling pots, make two trial pieces of the color, one to keep with the files and the other to glue or tape onto the lid of the jar in which the color is kept, as shown in the photo below. This is for easy recognition and to remember the exact color. Mark the pots with a code and file them, as after a while you have so many colors that it becomes impossible to remember them all.
The small photo shows the test piece glued to the lid.
Read more about: Majolica: Colors (b) Preparing / Pots – For prepared colors
ca: COLORS - Superposats en ceràmica.
es: COLORES - Superpuestos en cerámica.
Click on the title to see more images In pottery there are many different ways of applying, preparing, and firing colors at different temperatures.
In the dictionary each color is under its name and then under the name of the method of decorating being used, there is more information on colors.
The photos here are colors fired at 980º C using the Majolica method and give an idea of the possibilities when colors overlap with each other.
Read more about: Majolica: Colors (a)
ca: COLORS – Problemas en ceràmica.
es: COLORES - Problemas en cerámica.
Colors have their problems; firms change hands, the products change, they think new colors are needed and stop making the ones you have been using for ten years! Often, you have to work out new combinations for preparing the colors you want. You can try buying from another company, but a color with the same name can be completely different.
Note. When you buy a new color, first buy and prepare a small quantity and test it. In the last two years many of the color combinations I use have had to be changed. Now instead of manganese for the outlines I use 50% brown-red + 50% strong brown. Recently, the firm I have bought colors from for 20 years, changed hands and changed their colors and clearly the changing of one color will affect all the colors it is mixed with. The color most affected was ochre; they stopped making it and the nearest one they had was a strong brown. I now buy from another firm but as their ochre is very weak and when painted on top of yellow can hardly be seen, it has to be mixed with the strong red instead of crimson.
Read more about: Tile – Problems
ca: COLORS - Lluentor en ceràmica.
es: COLORES - Brillo en cerámica.
Color shine is made up with different glaze intensities, from matte to a crystal shine. If the glaze is too matte after being fired, cover it with a thin layer of transparent glaze and fire again; this is also a sign that the kiln has not reached the required heat.
ca: COLORS - Emmagatzematge en ceràmica.
es: COLORES - Almacenamiento en cerámica.
Click on the title to see more images Colors storing: they must be kept clean as dust and dirt in them can spoil your work. Keep the different states of preparing colors in different types of pots to help make them easily recognizable. Make sure the pots are the right size in relation to what you buy or use
1) Keep the colors that are in powder form in well closed jars.
2) Have a medium sized, well closed jar for prepared colors.
3) For working, keep colors in small jars and if one can be mistaken for another, name it.
ca: COLORS - Prova de ceràmica.
es: COLORES - Prueba de cerámica.
Color testing: you should keep a file on all the colors you use, classifying them according to the temperature at which they are fired. File not only the name of the color but also where you buy it, the industrial names of the ingredients and the measurement of everything needed to make it, plus two samples of each color and a photo of the sample. To test colors use a small piece of dry clay or bisque of what is going to be decorated.
With a dark color, mark on the back either a code or what you are testing. A code is better as the pieces are very small and there is a lot to write. Before long, you will have hundreds of such pieces, so mark them well and keep the different methods in different boxes.
One can buy small kilns for testing colors, which makes the firing much quicker but the color is never exact. It is better to fire them in the big kiln when firing other pieces.
The easiest way to keep samples is to hang them up, for this each piece is made with a hole. There are two ways:
a) They can be threaded onto a metal bar that is hung up, which means you have to take the bar down and take off all the bits to find the one you want.
b) Put a wire through the hole and make a hook and then hang them up, which allows them to be lifted individually.

From left to right: Test pieces – front, Test pieces – back, Test pieces to hang up.
Read more about: On how to keep your colors, the last photo in: Tenmoku
![]() Columns are rectangular, vertical designs in tiles made as a decoration. They are used to decorate fireplaces, front doors, etc. They were in fashion during the Art Nouveau period, at the last half of the 19th and the first half of the 20th century.
Columns are rectangular, vertical designs in tiles made as a decoration. They are used to decorate fireplaces, front doors, etc. They were in fashion during the Art Nouveau period, at the last half of the 19th and the first half of the 20th century.
The photo below shows some of our column designs. Each consists of 16 tiles, 15×15 cm each with outer measurements of 120×30 cm.
ca: PENTINAT - Argila i barbotina.
es: PEINADO - Arcilla y barbotina.
Combing is to indent parallel lines into clay, slips and colors with any tools that have two or more fingers, such as forks and feathers. Feathers were one of the first instruments used for decorating.
 Combing clay: push a fork into the clay and pull it, this will leave parallel lines with rough edges. These should be brushed and smoothed off with a damp soft brush before adding the colors. The lines indented form a pattern or texture and when covered with a transparent glaze or slip, the shadows caused by the indented lines will be accentuated.
 Combing slips and colors: cover what is being decorated with one color, then decorate it with other colors by trailing or dripping and comb across them so the colors overlap and integrate. This can be done directly on to clay or bisque but if any parts are left without paint they must be covered with a glaze. The overlapping of different colors creates a nice effect.
ca: COMPONENTS
es: COMPONENTES
Components are all the substances required to complete a specified composition.
ca: COMPOSICIÓ
es: COMPOSICIÓN
Composition is the manner and arrangement of different artistic parts and methods combined so as to form a unified whole.
 Cone grading: the cone map below shows the relation between heat and methods in cones.
Pyrometric cones measure and control the heat in the kiln while firing and cut off the electricity when it reaches the correct temperature. There are two methods; the American Orton and English Harrison. They work in the same way but have two basic differences; one is their numbering in relation to heat and the other is their shape. Ortons are a slanted pyramid and Harrisons are straight and square.
There are two sizes, cones and mini-bars. Cones are larger and measure 63mm in length and mini-bars measure 25mm. They are delicate, can break easily are colored and numbered differently in relation to heat and are made up of minerals that reach a specified temperature.
 They are placed in a kiln sitter between the sensing rod and the cone supports. When the kiln reaches the correct heat, which is a collapsing point, the cone bends and this automatically cut off the electricity, which turns off the kiln and finishes the firing.
In the following section there are three charts showing the different types of cones with their coding, make and temperatures in Centigrade and Fahrenheit.
KILN SITTER: a) Sensing tube, b) Sensing rod, c) Cone, d) Cone supports.
ca: CON (3) Suport
 Cone sockets are small blocks of clay made to hold a witness cone vertically, when it is being used to test heat in different parts of the kiln. They are usually made to hold one or three cones. The photo below shows the cones placed in a cone socket.
CONE SOCKETS; a) Cone Socket, b) Cone.
ca: CON (4) Cocció.
 Witness Cones are put inside the kiln, in different places, to check that the temperature is the same throughout it. After firing, it can be seen to what extent they have collapsed so that one can judge the heating of the different parts. Large cones should be used and the thicker end should be stood in a clay socket at a slant of about 10º from vertical. Place them in different parts of the kiln. If one has collapsed more than the others you will realize that part of the kiln is slightly hotter, or on the contrary, if one is straighter it will mean it is cooler. This can be checked when you open the kiln.
CONE, WITNESS. a) Over fired, b) Correctly fired, c) Under fired, d) Clay socket.
ca: PASTÓ - Argila.
es: PELLA - Arcilla.
 Coning is placing a well wedged lump of clay firmly on a wheel in preparation for first centering it and then throwing. It is known as a cone until the clay that has been centered starts to form a selected piece. This method is used for throwing small products such as lids and very small bowls, As the wheel is turned they are formed at the top of a cone and then sliced off.
Read more about: Lid (a) / Lid (d) – Made using a cone / Stack throwing
ca: CONSISTÈNCIA
es: CONSISTENCIA
Consistency is when a product always has the same standard. In pottery this is very difficult, as what you buy is never exactly the same. Glaze and slips depend on the product you are putting them on. Handmade bisque needs less water with the glaze than industrially produced pieces. Instruments called densimeters test the density of a liquid, but as the substances you are using separate and dry all the time, they are not very accurate.
 Clay containers come in different sizes and shapes and are meant for keeping clay damp. They are made out of strong plastic materials, with wheels and airtight fitted lids. Clay is bought in plastic packets and if not opened can be kept without drying for many months but once opened the clay should be kept damp in a container.
ca: CONRENIDORS (2) Esmalt-base.
es: CONTENEDORES (2) Esmalte - base.
Containers for keeping and applying glazes should be big and covered when not in use. They are for applying crude glaze and colors onto all types of ware, either by dipping or throwing. The table we have designed holds three containers, one for each of the different glaze-bases we use. They are part of the table and have flat lids that form the table top, which can also be used to work on. The biggest one is 64cm in diameter and 30cm deep, with the capacity to hold about 35 litres of the main glaze-base we use; the other two are 30cm wide and 29cm deep. When designing a table, make sure that the biggest container will take the largest object you plan to decorate.
a) Table designed to hold 3 containers with different glaze-bases.
b) A close up of a basin with tiles prepared for throwing.
c) The 3 basins covered with separate table tops that form one flat surface.
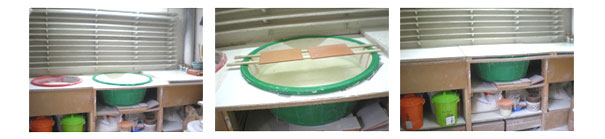
Read more about: Glaze-Bases applying it to tiles / Glaze-base © Video – Stage 1 – Preparing the glaze-base
ca: CONTENIDORS (3) Barbotina.
es: CONTENEDORES (3) Barbotina.
Click on the title to see more images Container for slips are large, strong and made in plastic. The one on the left shows the preparation of the slip with an electric mixer, that is attached to the wall and when turned on mixes the clay with water to make slip. The one on the right is connected to an electrically controlled tube, which moves the liquid into the molds. They are on wooden planks with wheels so they can be moved or their places changed.
Read more about: Casting – Dragons / Slip Preparing
ca: CONTRACCIÓ
es: CONTRACCIÓN
Contraction is the shortening and thickening of a material; clay contracts, shrinks, during drying and firing. Glazes contracting can be accidental or intentional, as when being fired the glaze shrinks more than the ware that it has been applied to. If accidental, it is impossible to repair; this is explained under cracking, and if intentional, under crackle.
Controlling Measurements; there are instruments to control different elements.
Read more about: Densimeter / Kiln – Heat controller / Pyrometer
ca: RECIPIENTS PER CUINAR - In ceràmica.
es: PLATOS PARA COCINA - En cerámica.
Cooking dishes in pottery are different utensils prepared to withstand heat.
Read more about: Pottery Flameproof ware – For cooking
ca: REFREDAMENT
es: ENFRIAMIENTO
Cooling is when heat goes down in temperature. This happens in the kiln after firing and should be a slow process. Opening the kiln before time may cause a state of stress, which could lead to shattering and crazing. Modern kilns tell you the temperature and one should roughly be able to tell the heat by looking at the color through the peephole.
ca: COURE
es: COBRE
Copper is a chemical element with the symbol Cu (Latin: cuprum) and atomic number 29 and is used in the construction of ceramic colors. It is a ductile metal with very high thermal and electrical conductivity. Pure copper is rather soft and malleable, and a freshly-exposed surface has a pinkish or peachy color.
Copper compounds are known in several oxidation states, usually 2+, where they often impart blue or green colors to natural minerals such as turquoise and have been used historically widely as pigments. Copper metal architectural structures and statuary eventually corrode to acquire a characteristic green patina. Copper as both metal and pigmented salt, has a significant presence in decorative art in the construction of ceramic colors. Link Wikipedia; Copper
Copper carbonate (often called copper carbonate or cupric carbonate) is a blue-green compound (chemical formula CuCO3) forming part of the grey-green patina one sees on weathered brass, bronze, and copper. The color can vary from bright blue to green, because there may be a mixture of both copper carbonate and basic copper carbonate in various stages of hydration. It was formerly much used as a pigment, and is still in use for artist’s colors.
Copper in moist air slowly acquires a dullish green coating because its top layer has oxidized with the air.
Link Wikipedia;Copper Carbonate
ca: ÒXID DE COURE
es: ÓXIDO DE COBRE
Copper oxide or cuprous oxide is the inorganic compound with the formula Cu2O. It is one of the principal oxides of copper. This red-colored solid compound is a component of some antifouling paints. This oxide can appear either yellow or red, depending on the size of the particles and degrades in moist air, losing its shine.
Copper oxide, Cu2O, a red powder.
Copper oxide, CuO, a black powder.
ca: PEDRA DE CORNISH
Cornish stone is a rock consisting of feldspar and quartz and is used as a flux in pottery, giving whiteness to clay and glazes.
Cottle is a piece of cardboard or plastic used to form a wall round work when making a mold.
Read more about: Mold: 3 Cottle
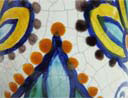 Crackle is the name given to the method of intentionally forming fine cracks in the glaze-base as a decoration, and crazing is the name for accidental crackle. One can buy a glaze-base with this texture prepared. When mixing the crackle-base with water, it must not be passed through the sieve as it has a very fine, sand like texture, which causes the cracks. Crackle appears after firing, during the cooling down process and is caused by the glaze contracting more than the bisque.
Before opening the kiln, while it is cooling down, you can hear it clicking as it shrinks and breaks. When taken out of the kiln, the texture is difficult to see, so to accentuate it, rub the whole piece using a cloth dipped into a prepared color; strong brown is the one usually used. As the paint integrates into the cracks, the lines appear. Then rub it with a soft, disposable paper, taking off all the unnecessary color. If the piece is going to be used for decoration, it can be left as it is, otherwise it should be fired again. Remember that non-fired colors could be poisonous. One crackle glaze can be laid over another and very interesting results can be obtained. Crackle weakens the glaze and is not advisable to use for outside work where the temperature varies or for something that is going to be continually used.
Crackle surfaces when used a lot get damaged. The next four photos are of two different crackle plates decorated by us. I have used them in my house for about six years and only for keeping fresh fruit. These are to show how the dirt from the fruit and frequently washing the bowls has affected the crackle; it has integrated and cannot be cleaned off. The plate above is still perfect, it is older but has never been used as it has been hung up as a decoration.
 Cracks are caused by a fault in a solid pottery material, such as dry clay, bisque and fired glazes. It is a very fine space, which is usually as thin as a pencil line. It is the start of a piece separating and if you put the piece onto a solid object like a table and push the opposite side down, it will break in two or more pieces. In dry clay or bisque, cracks can be attributed to different causes: drying too quickly, contraction & expansion, mixing different clays, adding the same clays but of different consistencies, connecting a thin bit of clay to a thicker piece so the drying of the thinner is quicker, adding elements such as handles or footings, firing too quickly during the first hours, the material not being dry enough when fired.
Remember that pieces may be broken without the damage being seen, so sound each piece before starting to decorate, including the ones that are industrially made.
Cracks in glazes are usually caused by shrinking, either the bisque shrinking more than the glaze or the opposite, the glaze more than the bisque. This happens during the firing and can usually be seen as shown in the photo below. Sometimes a product can be bought and the cracks do not start to appear for a long time. The crack forms small spaces which just fall off or can be lifted off by slipping a knife underneath. To repair it is impossible as it continues appearing in other places and is known as crawling.
Read more about: Sounding Plates / Sounding Tiles
ca: FIRA D'ARTESANIA
Craft fair is a periodic gathering to sell and show different crafts. Can be local or international and is usually held at an appointed place in the town or country and repeated yearly on the same date.
ca: CASELLES - Accessoris del forn.
es: CASILLAS - Accesorios del horno,
 Crank is a support for plates, tiles etc., inside the kiln. They are made in many shapes and sizes and have walls, with arms, pins or shelves to support the objects one on top of the other, separately without touching. The one on the left is in one piece and can be bought for tiles 10×10cm, 15×15cm and 20×20cm.
Read more about: Packing (c) Decorated work / Packing (d) Process / Kiln – Furniture
ca: CASELLES - Omplint-les amb rajoles
es: CASILLAS – Llenándolas con azulejos
Click on the title to see more images Cranks packing tiles. Start by packing the tiles at the top of the crank, so if anything is scraped off, nothing underneath may be damaged. Using your fingers like a flat tray, balance a tile so it is straight and push it until it is supported on each side by the small shelves inside the crank. Make sure that the decorated part is not scratched by the shelf above it.
When the crank is full, straighten the tile using a ruler that is longer than the height of the crank. Stand it on the table and push it against the edges of the tiles until they are level. When full a crank becomes very heavy. it can be held underneath when you move it, or on both sides, but when filling a kiln that opens from the top, it is difficult to put the last one in onto each floor. Because there is no there is no space for your hands, it has to be held at the top between one fingers and the thumb of each hand and let down into the last space.
Read more about: Packing (c) Decorated work / Packing (d) Process
ca: CASELLES - Paret accessoris del forn.
es: CASILLAS - Pared accesorios del horno.
Click on the title to see more images
Cranks walls: we make them as they are very useful for filling up small spaces in the kiln and can take all the odd sizes of tiles. As they are separate, moving them is difficult, so set them up either in the kiln or as near as possible. The first time we made them we used red clay, but it is much better to use refractory and fire them at a high temperature, as they last longer. If the arms break, cut them down with an electric tile cutter.
Read more about: Kiln – Furniture / Packing (c) Decorated work / Packing (d) Process /Mold – Hand made cranks
ca: CRÀTER-SEPARACIÓ
es: CRATER-SEPARACIÓ
Crater crawling is when a crater opens in the glaze and pulls away from the bisque, leaving a bare space.
ca: CRÀTER - ESMALTS
es: CRÁTER ESMALTES
Crater glazes form craters on purpose, as part of the decoration; the craters must have smooth edges, not sharp like accidental craters.
 Crawling is a defect, which usually happens on the outside of an enameled piece and it often occurs on curved parts where the glaze is thinner. The bits fall off and small pieces can be removed by sliding a knife underneath. Repair is impossible, because it may continue to appear in other parts.
The photo shows an object where crawling did not appear for a long time after being purchased.
Many things can cause enamels to crawl, the following are some of them:
1) Pieces exhibited outside which have been fired at a low temperature are more likely to be damaged by changes in climate, temperature, humidity, frost, etc.
2) Some parts affected by the impurities in the clay eventually come to the surface creating crawling on the outside of it. This can occur even if the piece was made a long time previously.
3) When the glaze and clay have different contractions and the biscuit is very porous and cannot stand the tension of the shrinking of the opaque enamel.
4) The crawling usually occurs at the edges of pottery pieces, but not with all colors, as some oxides can act as fluxes.
5) It can also happen when the layer of glaze is too thick.
Crayon is a pointed stick or pencil of colored clay, chalk or wax, etc., used for drawing. There is a large variety of colors made especially for pottery, for drawing directly onto bisque or a fired glaze. After the drawing is finished and before firing, a thin layer of glaze is painted or sprayed over the whole work. Many very attractive designs are produced with this method.
Crazing is when undesired hairline cracks appear in the glaze surfaces after firing. This is caused by the glaze having a higher expansion and so contracting more than the clay or bisque during the cooling down, forming cracks. If a glaze-base is prepared with this texture to use as a decoration, it is known as crackle.
es: CREMA - Nombre de un color.
 Cream is an off white color, slightly yellow. It gets this name as it is the same color as the fatty part of milk, which rises to the surface when the liquid is allowed to stand. The photos show two tiles; one is white, industrially made; the other is “Siglo 18” (Spanish for 18th Century), which is the glaze-base we use as explained in the Majolica Method.
Read more about: Glaze-base (b) Types of bases
ca: REBLONS
es: REMACHES
Crimps are designed to hold one or more cords together without joining them and are made using different materials for different uses; plastic for wires, metal for industrial use and valuable metals for jewelry and clothing. In pottery they are to hold bracelets, necklaces and belts and are attached to the ends that have to be joined to another piece like a hook, claw or buckle. The drawing shows three that are designed to use in different ways.

a) The crimp has two sections so the cord can be slipped through both, leaving a semi-circle
b) The second does not open so what it is attached to must open, like a hook.
c) A hook.
ca: CRISTAL•LITZACIONS - ESMALT
es: CRISTALIZACIONES - ESMALTE
Click on the title to see more images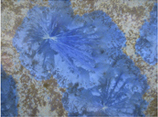 GLAZE, CRYSTALLINE
Crystalline glazes contain zinc and titanium oxides which cause the crystals to grow. When the heat is raised, the glaze becomes fluid and forms the distribution of the crystals on the pottery. If you have decorated the inside of a basin, all the crystals will fall to the centre and form a solid thin layer of coloured glass with the crystal effect inside it. For the inside of a basin there is no danger of the colours running, but for a pot or the outside of a basin precautions should be taken to ensure they do not run off and fuse into the kiln shelves.
Photos by Concha Martín Soriano
ca: CRISTOBALITA
es: CRISTOBALITA
Cristobalite is a quartz substance occurring in volcanic rock in the form of colorless translucent crystals and used in ceramics to improve craze resistance in slips. Very dangerous if inhaled.
ca: TRITURADORA
es: TRITURADORA
Crusher is a machine designed to reduce large rocks into smaller rocks and gravel. The earliest crushers were hand-held stones, known as hand-stones and anvils, which were used against a Quern-stone which is a stone block, to grind down materials.
ca: TASSA
es: TAZA
Cup is a drinking utensil made of china, consisting of a round, hollow ball cut in half, with a footing to balance on and a handle. It comes with a saucer, which is designed with a center the same size as the cup’s footing but a little lower; this works as a wall to stop the cup slipping when being moved. There are tea cups and coffee cups, basically the same, but coffee cups are smaller.

ca: TAMÍS - Embut per colar productes líquids en ceràmica.
es: TAMIZ – Embudo para colar productos líquidos en cerámica.
 Cup Lawn is a small conical cup-sieve in two pieces, which allows you to sieve and pass small amounts of liquid through a narrow neck, like a bottle or jar.
Read more about: Sieves
ca: TALLADORS
es: CORTADORES
Cutters: there are many tools for cutting different types of materials. The following is a list to help you find the one you are looking for.
Read more about: Biscuit cutters / Slab – Cutter / Tile – Cutter electric / Tile – Cutter by hand / Tile – Clay cutter
ca: PLANXA DE TALL
 Cutting pad is a product used for cutting different types of paper, cardboard, etc., using a cutting knife. It is a flat piece of plastic made soft enough to let a blade sink into it without damaging it. The blade goes through what is being cut, sinks into the plastic and can be pulled along, leaving a clean cut. Use a paper cutting knife with a sharp, thin, pointed blade. Very useful for cutting out stencils.
Cutting pad, old method; this consists of laying the object to be cut on top of several pages of newspaper and cutting through the lines of the drawing with the razor knife. The blade also goes through the newspaper underneath and this avoids pulling and leaving a rough edge to the stenciling design.
Read more about: Stencil: (3) Preparing the paper / Lines – Stenciling / Stencil: (3a) Preparing the paper
ca: TALLADOR FILFERRO - Per l’argila.
es: CORTADOR ALAMBRE - Para la arcilla.
Click on the title to see more images Cutting wire tools are made up of two wooden handles connected by a long thin piece of wire and used to pull through lumps of clay, separating them into sections.
Read more about: Bow – For cutting clay
ca: CILINDRES - Tornejats en ceràmica.
es: CILINDROS - Torneados en cerámica
Click on the title to see more images") The cylinder is the basic form for throwing jars, it is the same process for them all when working with a wheel, they must be, knead well, centered and formed upwards.
The cylinder is the basic form for throwing jars, it is the same process for them all when working with a wheel, they must be, knead well, centered and formed upwards.
It is important when turning a cylinder that the walls have the same thickness, this is achieved by repeatedly stretching them upwards vertically.
Note: These are links to all the sections on throwing in alphabetical order.
Bowl Throwing / Cylinder Throwing / Jars Throwing / Lids (c) Throwing / Lids (d) Throwing Cones / Lids Knobs (f) Attached / Plate Throwing / Stack – Throwing / Teapot (a) Body / Throwing – with a tube


 Clamps are tools, usually made in metal, to hold two or more separated objects together.