MARKING TILES (a) Small designs
ca: MARCANT RAJOLES (a) Dissenys petits
es: MARCANDO AZULEJOS (a) Diseños pequeños
Marking on small designs between one and four tiles. Many designs are names of houses so keep your border designs separate from the written part so they can be reused many times. The following photos show one tile, 15×20cm. Make the designs, just the outlines, and print them on to transparent paper and pounce them.
The order of work
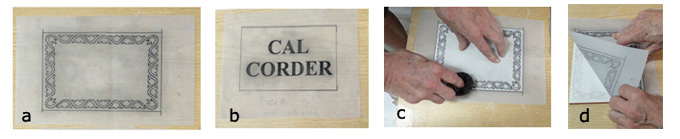
1) The border a) and the center part b) to be marked on.
2) Over a tile with the glaze base prepared, lay the pounced drawing. Making sure that it is placed correctly and that the smooth side is against the tile.
3) With one hand hold it in place and with the other tap the marking bag over the over the pounced lines. c)
4) Rub the surface with it, covering all the holes so the ash goes through.
5) Lift one corner of the tracing paper d) to see if it is well marked. Until the marking is finished one hand must always be holding the tracing paper in place.
6) Gradually remove the paper, checking to see that the lines have come out clearly. If not, rub that part again.
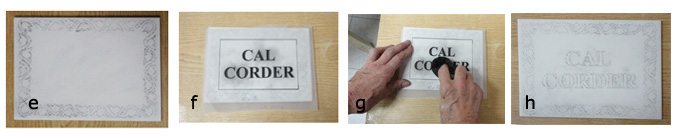
7) The tile with the border marked on.e)
8) In the same way place and mark on the center design making sure not to damage the border. f-g)
9) The whole design marked on in preparation for painting.h)
NOTE: When marking a design onto an opaque glaze-base, either with a marking bag or screen printing, it will come out much clearer and cleaner if the base is slightly damp. When too dry the glaze becomes powder and blocks the holes in the transparent paper and sticks to the screens when printing.
If too dry, with a simple hand spray with water, spray the prepared pieces, wait a few seconds, the water will spread over the surface, then mark on the design.
