FACE
ca: CARA
es: CARA
Face is the front part of human head, eyes, mouth, etc., and it also applies to the front part of an object, a tile or plate, etc.
ca: FACETA - Tallar l'argila per formar molt angles
es: FACETA - Cortar la arcilla para formar muchos ángulos.
Click on the title to see more images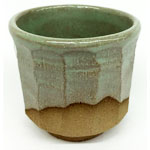 Facet: in a dictionary is defined as “many sides of a cut stone or jewel”. In pottery it means to cut or beat a clay object, like a bowl or jar when the clay is soft, so as to form it with many sides. Work out the design you want, the size and shape and number of facets and make a bowl with thick walls, turn it upside down and to hold it in place on to a chuck or banding wheel.
Measure and mark the spaces of the facets into the soft clay. Slice off the parts with a wire cutter or looped modeling tool. The drawing shows a bowl with a circular inside, the faceted outside wall is cut away to form a polygon. It is attractive and shows the contrast between inside and outside.
 Faceting is a method of altering the surface of a piece by cutting off slices that can vary in size, amount and verticality. This method is of oriental influence.
You can use knives, wires that can be held tensely and other cutting instruments, it is better to do the cutting while the piece can still be manipulated. You must calculate the cuts so the last coincides with the first.
This technique requires a large size of main wall to allow luting lengthwise. The angle and cuts must be smoothed to avoid the lines and angles being broken. If there are more than 12 slices it is better to use a ruler to measure and mark on the spacing. The cuts and facing can be extended to the base.
Photos (a-f) have been taken in the Pottery School of Núria Pié
Photo (g) has been lent by Monona Álveraz qnd photo (h) by
ca: FAHRENHEIT
es: FAHRENHEIT
Fahrenheit is the English scale for measuring temperatures; 32º F freezing point and 212º F, boiling point. In this dictionary we only use centigrade; freezing point 0º C and boiling point 100º C.
ca: PISA
es: FAYENZA
Faience is the French name for the Majolica method of decorating pottery. It developed in France at the end of the 16th century in Quimper in Brittany and which today has a museum that covers this specialty.
This method was brought to Europe by the Arabs to their kingdom in Spain and at first it was made for their nobility in the kingdom of Granada, but it soon became an important export and was shipped to Italy, France, Holland and England.
What makes this method different from others is that over pieces of bisque, already fired clay, an opaque white glaze-base is laid and decorated, then the two are fired together to vitrify at 980º C. The verification turns the glaze-base into an opaque layer of glass and this prevents the bisque from being porous, accentuates the colors and integrates them so as the form another pne.
The products faience made were rarely signed and now are identified by their methods of working: the shape, the glaze colors and the style of decoration. They made tiles, baring mottoes or banners; apothecary jars with name and plates.
Catalan – Majólica / Holland – Delft / England – Majolica / France – Faience / Italy – Maiolica/ Spain – Mayólica.
If you want to learn how to work in the Majolica Method of decorating you can do it through this web or buy my digital book in Internet. Link to The Majolica Method
How to work with the Majolica method starts in this section of the dictionary and is linked through the whole process of working Read more about: BISQUE (1) Clay after the first firing.
To see tiles painted with the method Link to my web: www.ceramicsbensu.es/en
ca: A LA PLOMA
es: PLUMEADO
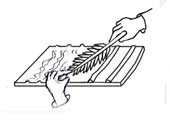 Feathering is to use a feather to indent a texture into glazes and was one of the first instruments used for decorating pottery. Dry clay is covered with a slip, over it using a slip trailer apply lines using a different color, then with a feather you comb through the lines. Both colors must be fluid and great care has to be taken not to scratch the clay as it will dirty the colors.
Read more about: Combing
ca: FELDESPAT
es: FELDESPATO
Feldspar is used as a flux in clay and glazes, extensively in stoneware and porcelain. It comes from certain types of rock and is never pure but always has traces of other materials such as aluminum, potassium, sodium and calcium.
ca: FÈRULA
es: FÉRULA
 Ferrule is the part of the paintbrush that holds the hair and connects it to the handle. It is usually metal, but can be plastic or as in some Chinese brushes, ox horn. Read more about: Brush – Hair Lengthening
ca: LLIMAR
es: LIMAR
To fettle is to file down small imperfections and flaws in many different products, such as lumps and seams left by a mold where casts meet.
Read more about: Fettling knife
ca: EINA PER LLIMAR
 Fettling knife is for filing down strong materials like stone or metal. It is similar to a palate knife but stronger, longer, with a straight blade of metal attached to a handle and with rough surfaces on both sides of the metal. There are two types, one straight on both sides and the other rounded on one side. A fettling knife is used for trimming, smoothing and leveling out uneven surfaces on dry clay, bisque and fired glazes caused by beading or crawling.
ca: ARXIVADOR
es: ARCHIVADOR
Filing is to put and keep selected information in some form of logical order so as to have easy and quick access.
ca: ARXIVANT (1) ceràmica dibuixos.
es: ARCHIVANDO (1) Cerámica dibujos.
Filing drawings: Keep all drawings and photos of your work, big or small, pounced or not pounced, on normal or transparent paper. Mark and file them so they may be found easily as they will be used again and again. You can mix the different parts of the designs, a center of a plate for a tile, etc. When you have a lot of work, filing of drawings becomes very difficult but very necessary.
Read more about: File – Filing drawings by subject and size / File – Filing jar designs / File – Filing plate designs / File – Filing tile designs / File – Filing screen printing
ca: ARXIVANT (2) ceràmics dibuixos per tema i mides.
es: ARCHIVANDO (2) cerámica dibujos por tema y tamaño.
Click on the title to see more images Filing drawings and photos in pottery is a tiring, boring and complicated job. It is something one doesn’t want to do, but has to. Designs can be used again and again, copied, made smaller, bigger and changed; having them saves time, so you must know what you have got and where they are!
If possible keep a photo of every new, fired, pottery design and file them in your computer, with photo, name, number, size, year, client and any other information you have, such as; if you have a drawing pounced, what type of paper it is prepared on, etc. The filing of designs for plates and jars is basically the same as tiles except the designs are smaller and all fit into the file-boxes.
Separate the designs by object, subject and size.( Illustration a – c)
Keep each type and size in separate folders and in separate file boxes and mark both folders and boxes on the outside with the names of what is in them. These boxes are for designs of one or two tiles, plate centers, plate borders, jars and lids. They are all filed first by subject, then by size.
Filed and classified drawings of plates, jars and lids are kept separately; plates have two files, one for the centers and one for the borders. The centers and the borders are filed separately and can be used one with another. Photos are particularly important when filing borders, as recognizing the drawing is difficult since the designs have no subject. The centers are filed under subjects; birds, hunters etc., as designs are pounced on transparent paper to, recognize them is very difficult, even if they are classified by object and size. There might be up to 50 different designs all with the same subject e.g. flowers. It is particularly hard for people who have just started to work and do not know the designs, which is why to file them in your computer is important, making it easy to run through a large selection of photos quickly and to choose a design.
Filing lage tile designs. (Illustrations d – e)
The first photo shows a table with large thin drawers, which are ideal for keeping the drawings flat. They are for designs of more than 2 tiles and each subject is kept in a folder made up of brown paper to the size required. For drawings of Saints I have 6 folders, one for designs of 6 tiles, one for twelve tiles and one for bigger and odd sizes, each category has two folders, feminine and masculine. On the front of the folder, a printed list is attached with the names of the Saints in alphabetical order plus their coding numbers for the computer, where there is a colored photo and all the information needed.
Filling very large tile designs (Illustration f)
Use a drawer on wheels. After a few years, one’s studio becomes so full that you have to find practical ways for storing and filing your drawings. The following is one which makes use of unused space and is easy to pull out when looking for designs or for cleaning the floor. Wherever you have shelves or tables, leave a space between the first shelf and the floor and make a box with wheels that fits into it. I found two of these drawers in the road ready to be thrown away. They were made to go under a bed but I put one under the large table I use for drawing and packing. The box is square, 100×100 cm and 25 cm high. Some of the drawings are so big that they have to be folded two or three times.
You should have a thin piece of wood, in the big drawer that goes inside the box from wall to wall, lying on top of the drawings. This helps to keep the drawings flat and clean. Cut out a half circle on one side of the wood, just big enough to slip your hand into it when picking it up and put a handle on the front of the drawer to make pulling it in and out easier. This is shown in the last photo in the second group.
Filing has changed (Illustration g – h)
Since the changes of digital photos, scanning and printing started it makes work quicker, cheaper and you can do it yourself, I now do a large design on a small scale and then have it photocopied to the correct size on to transparent paper, up to 6 tiles in size. This is much better as you can keep all the sections of one design together and flat. The photo is of a design of 30 tiles and shows how they have been separated.
ca: ARXIVANT (3) ceràmics dibuixos per tema a gerros
es: ARCHIVANDO (3) cerámica diseños para jarros
Click on the title to see more images Designs for jars and lids can be very small and when on transparent paper and pounced difficult to recognize. The best way to file them is in plastic folders, each of the designs being classified by number and size and accompanied by a photo and date of firing.
Jars can have designs used for plates or tiles; figures, birds, flower etc. The only ones kept separately are for albarello or chemist jars. These are drawings of plants and herbs connected with health, their names and the shield borders; they are now made to decorate kitchens to keep herbs and spices.
In the past many types of jars were used, different shapes, sizes and with lids. Some had the name of a plant in Latin with a picture of it; this was to help the illiterate public.
Preparing them to paint is the same procedure as the section on plates, the differences being that they are always decorated on a banding wheel and using a banding bar and that what you are decorating must be centered correctly.
The first six illustrations show designs of different sizes for use on chemist jars and are drawings prepared to use since they are on transparent paper and pounced. Some are drawings of plants with the name; many have a design, like a shield that surrounds the name of a plant but has nothing to do with it, the addition just makes the decoration purer the last one a name only. They can all be used with each other.
Note: In the center photo at the bottom, both jars, the first and fourth have the same frame and name but the rest of decorating is different and the second jar on the left has the illustration a) Setting with an owl.
Read more about: Centering / Centering – Banding
ca: ARXIVANT (4) ceràmics dibuixos de plats.
es: ARCHIVANDO (4) cerámica diseños de platos.
Click on the title to see more images Plates are filed in two separate sections, one for the centers and one for the borders, as they can be used with one another. Photos are important for borders, as to recognize drawings with no subject, is more difficult. The borders have to be filed with numbers and the centers with number and subject, birds, hunters etc. As designs are pounced on transparent paper, to recognize them is very difficult, even if they are classified by object and size. There might be up to 50 different designs all with the same subject e.g. flowers.
This is particularly hard for people who have just started to work and do not know the designs, which is why filing and classifying them in your computer with colored photos is important and makes it easier to choose a design. It allows you to run through a large selection quickly, seeing all the different ones.
The next illustrations show the three sections, the plate finished with the center and the border design prepared for use. The last two, show how to file plate borders and centers, here are only a few shown, one page can hold about eight.
FILING PLATE DESIGNS:
Coding plates: PB, Nº 10, C3, B7.
Coding translated: PB =Plates Basket, nº10= Number 10, Center 3, Border 7.
Then, in your file under their code, you should have the information on them; the sizes, if they are pounced, what type of paper, etc. Each part should be marked clearly, with its code and size and if you keep them in an organized way, they will prove easy to find.
FILING PLATE BORDERS:
Coding borders: B-1. 20, 37 cms.
Coding translated: B-1= Border 1
Note; 20 and 37 refer to the diameter of the plates the border has been prepared for.
FILING PLATE CENTERS
Coding centers: CB-1= 20, 31cms.
Coding translated: Center Boat = 1
Note: 20 and 31 refer to the diameter of the plates the centers have been prepared for.
ca: ARXIVANT (5) ceràmics dibuixos de rajoles
es: ARCHIVANDO (5) cerámica diseños de azulejos.
Click on the title to see more images Filing Take a photo of every new design, once painted and fired. Keep it in your computer with all the necessary information, code number, sizes, method, colors, year, client, etc, so if needed they can be found quickly.
Designs drawn and pounced on tracing paper have been cut into pieces of six tiles as this is easier for marking on and filing. They are clipped together with a photo, in color of the design, fired and finished with its code number and size.
FILLING TILES WITH SEPARATE BORDERS
Coding boat: B.1= 12T, 45 × 60, Bo Nº8.
Coding translated: B.1= Boat-1, 12T = 12 Tiles, 45 × 60cm = size. Bo Nº8 = Border Nº8
Note: The first numbers are always the vertical side of the design
FILLING TILES WITH BORDER
Coding flowers: FL2=9T, 45×45, WB.
Coding translated: FL2 = Flowers Nº2, 9T = 9 Tiles 435×45 cm = size, WB = with border.
ca: ARXIVANT (6) rajoles serigrafia.
es: ARCHIVANDO (6) azulejos serigafía.
Click on the title to see more images Screen filing and coding.
Keeping the original designs is very important because the mesh might break or become unstuck. To have them repaired you should take the frame as well as the original design to where you had them made.
The original drawings have all been printed onto transparent paper and been prepared to be copied onto the mesh then an emulsion is pulled across it. The exposure to light burns away the unnecessary parts leaving clean spaces of the original design.
Keep the originals designs named and numbered with good photos of each one, so if damaged you will be able to renew them. If the designs are large they are cut into sections of up to six tiles and filed together. If they are small similar subjects are filed together; flower, boats, offices etc. Make folders for the designs in brown paper, sealed on three sides, shorter than the design so they are easily recognized, they should be named and numbered. I have two folders in which I keep all the designs. I was given the large one, which is 63cms wide and 90cms long and ideal for keeping big designs, it has a zip which goes round three sides allowing you to open it completely, and a smaller one 38 by 55 cms. They are good as they are flat and can be moved quickly with handles to carry them.
If you have of a lot of framed designs prepared for screen printing you must find ways to keep and file them. It is better if they stand vertically and the same way round, so the frame of one is against the mesh of the next one. If you have many, make shelves for them slightly narrower so the screen over laps, which makes picking them up easier. Name and codify them on the side that can be seen, with large strong letters of dark paint, always in the same direction in relation to the front of the screen, so that you do not have to keep turning you head when reading the names to find the one you want.
The biggest design I have has 72 tiles and needs 12 screens of six tiles, which are framed to work with horizontally, so when marking the design the paint has to be pulled over the shortest part of the screen. When framed, a larger space is usually left at the top and bottom to have room for the paint. The photos show shelves made to keep screens. When I started with small designs I had screens made up in proportion to the design, which was stupid as it makes keeping them more difficult, you can see these on the left. The smallest screen I use most is 30×40cm and now any new ones that are smaller I have made them to this size, which is always the inside measure of the frame.
Screen Printing has 10 sections this is the first, Screen printing. they are all linked in the order of working.
es: LIMANDO - Con un herramienta
Filing is to reduce in size or smooth down surfaces. It can be done with sand paper, a fettling knife or an electric machines for cutting, which are made to work with different products, wood, glass, ceramics etc. In pottery they are used for, bisque, leather-hard clay and fired glazes.
Read more about: Fettling knife / Sandpaper Block / Tile – Cutter electric
ca: FORN CERÀMIC
es: HORNO CERÁMICO
To fire in pottery is to heat up clay to become bisque and colors, glazes and slip to decorate at different heats; they vitrify and form a glaze that makes the work resistant to liquids.
The different types of kilns are classed by the method of heating. Read more about: Firing – Methods
ca: COCCIÓ (1) Argila en ceràmica.
Firing: Clay – process: The firing of clay transforms it into bisque and is known as “Bisque Firing”. This changes the chemical composition of clay so that it becomes a stone-like material, breakable but still porous to water. Heat should build up slowly during the first hours of firing until the temperature reaches 600º C, which is the moment when it ceases to be clay and becomes bisque, a transformation known as “Ceramic change”.
Clay pieces should be generously spaced to allow air and heat to go right round them when drying or being fired. The clay must be dry for bisque firing. The ware that is not decorated with any type of glaze can touch other pieces; one piece of ware can be put inside another or boxed edge to edge but do not overdo it. For example, placing cups upside down one on top of the other would allow heat to spread evenly round each piece, but to put one or more flat tiles on top of each other would create a barrier. Heat would rise quicker on the outside than the inside and lead to warping, cracking and breaking. I only work with clay for items in relief and tiles of a special size. If the pieces are big, scrape out as much clay as possible at the back and leave to dry for a long time. When starting to fire, bring up heat slowly, so that they can dry out completely and all the chemicals and water can escape.
During the whole process of heat rising, clay shrinks and changes color. The more slowly the heat rises during the first hours of firing, the less likely you are to have problems. Normal temperatures for bisque firing are between 850º C-1300º C. The higher the temperature, the lower the porosity will be in the fired clay. During the first hours of firing, many gases have to escape. For this reason the kiln peepholes must be left open. When firing work in relief at a final temperature of 1300º C, I make the kiln take about 5 hours to reach 600º C; the rest takes about 6 hours more. The following are temperatures for different clays. When you buy your clays they usually come with instructions that should be followed.
Red Earthenware: 900º C – 1100º C
White Earthenware: 1060º C – 1180º C
Stoneware: 1200º C – 1300º C.
Porcelain: 1280º C – 1350º C
Bone China: 1200º C – 1300º C.
ca: COCCIÓ (2) Colors en ceràmica.
Firing colors: There is a limitless amount of colors with different methods and textures, so that preparing colors can become a specialty in itself. Colors are separated into three groups, related to the different firing temperatures:
Soft fired between 600º C to 1050º C
Medium fired between 1050º C to 1200º C.
Hard fired between 1200º C to 1300º C.
If colors are going to be fired several times, either at the same or different temperatures, they should be tested. Soft colors are usually not affected, but Medium and Hard can be. With a second firing, even if at the same temperature, they can lose their brilliance, become darker and suffer other consequences. The lower the firing temperature, the glazes become softer and risk of them being damaged after firing is greater. The higher the temperature, the stronger they become and the risk of abrasion diminishes.
ca: COCCIÓ (3) Colors en ceràmica abans i desprès.
es: COCCIÓN (3) Colores antes y después.
Click on the title to see more images Kiln packing is a job that has to be done carefully and efficiently, one needs a lot of kiln furniture so you can easily build and pack the levels.
This kiln holds seven single stands for tiles 15×15cm on each of the two floors and on top there are four loose tiles of different sizes. Each stand hold 14 tiles and on the bottom floor there are small stands which hold corners and borders.
There is nothing more pleasing finding that everything in the kiln has been fired correctly.
The photos show tiles before and after firing so you can appreciate the change of colors.
ca: COCCIÓ (4) Cicleen ceràmica.
Firing cycle is the whole process of heat in firing, from starting at 0ºC to finish at 0ºC.
ca: COCCIÓ (5) Decoració de bescuit en ceràmica.
es: COCCIÓN (5) Decoración de bizcocho.
Firing – decorated bisque: When clay has been fired it becomes bisque and can then be decorated and fired again. The heating up period can be quicker than with clay. With decorated work you must make sure that the pieces do not touch each other or any part of the kiln or its furniture and that they are completely clean on the parts they stand on. Slips and glazes work as glue and will adhere to anything they are touching when being fired. If you are firing a piece and are afraid the colors might run, stand it on a tile and bits, to protect your kiln. This will allow you to hold the pieces, so they can be separated by forcibly twisting them in opposite directions.
There are many types of colors that have different reactions and that may be fired at different temperatures. Work can be decorated and fired; more decoration can be added then fired again at the same or lower temperature. If colors that vitrify at different heats are going to be used, start with the ones to be fired at the highest temperature, re-firing at the same or lower temperature, never higher, otherwise colors could burn out completely. Always test colors that are fired above 1000ºC because if they have to be fired more than once, they can change and become matte.
These are different ways of decorating bisque:
ONGLAZE – 3 firings. Bisque. Glaze-base and finally the fired glaze is decorated with colors and fired between 700º and 850º C. Read more about: On-Glaze
GLAZE COLORS – 2 firings. Bisque and then colors and glaze are mixed and fired together. Read more about: Dry Cord 1 / Red – using it
INGLAZE – 2 firings. Bisque, then the glaze-base and decorating are fired together.
Read more about: Majolica: 3 – Decorating
UNDERGLAZE – 2 firings. The clay is fired and then decorated with colors which are covered with a transparent glaze; both are then fired together.
Read more about: Decoration – Dragons
ca: COCCIÓ (6) Comprovació de calor en ceràmica.
es: COCCIÓN (6) Comprobación de calor.
For heat checking: there are many different instruments, pyrometers. Thermocouples, etc., that can be purchased, which allow you to know the actual temperature of your kiln. Pyrometric Cones should be placed in different parts of the kiln to measure the heat. If one collapses more, it implies that that part of the kiln is hotter.
ca: COCCIÓ (7) Enforar en ceràmica.
Firing: in pottery is the heating up of a ceramic product to a certain temperature. There are many types of clays and methods of decorating which mature with different degree of heat. There are two stages in the process of firing. First; when the kiln is turned on and the heat goes up at a controlled speed to the required temperature and second; when the kiln has been turned off and the temperature is cooling down. There are different methods of firing in pottery: gas, wood, sawdust, oil, coal, coke and electric.
ca: COCCIÓ (8) Mètodes en ceràmica.
Firing methods: A kiln can be heated by burning wood, coal, gas, or electricity. When coal and wood are used as fuels, they can introduce smoke, soot and ash into the kiln which can affect the appearance of the ware. Modern kilns powered by gas or electricity are cleaner and more easily controlled than older wood- or coal-fired kilns and often allow shorter firing times to be used.
Read more about: Electric kiln / Gas kiln / Pit firing (1) / Pit firing (2) / Raku / Sager fired /Salt glaze / Soda fired / Sawdust firing / Wood fired
Link: Firing Methods Robert Compton.
ca: COCCIÓ (9) Rangs en ceràmica.
Firing range refers to the different temperatures that pottery products can be fired at, clay, slip, bisque etc.
ca: COCCIÓ (9a) Colors de barbotina en ceràmica.
es: COCCIÓN (9a) Colores de barbotina.
Firing slips colors: Slip colors are always decorated onto unfired clay, jars, bowls, plates, etc., the two are then fired together in one firing.
Slip has 5 sections, this is the first Slip and they are all linked alphabetically
ca: COCCIÓ (9b) Coses per recordar en ceràmica.
es: COCCIÓN (9b) Cosas a recordar.
Firing – things to remember.
a) Make sure you never fire higher than is permitted for the type of clay you are using. All clay when bought is marked with the firing temperatures. Over fired clay can disintegrate, which means melting and this could destroy your kiln.
b) The normal temperature for firing clay is between 850º C and 1100º C
c) The higher the firing, the stronger the bisque and the better it is for exterior decoration.
d) Clay must be dry for bisque firing. The ware that is not decorated with any type of glaze can touch other pieces; one piece of ware can be put inside another or boxed edge to edge but do not overdo it.
e) Never put decorated bisque and clay together in the same firing. The gases from the clay can affect the colors, making them dull and matte, as though not completely fired.
f) When a design is made up of many pieces and you are mixing decorating techniques and color, all the pieces must be fired at some time to the highest temperature being used, so that they shrink in the same proportion.
Stoneware
a) It can be bisque fired up to 1300º C and then decorated, fired again with colors that vitrify at temperatures up to 1280º or less.
b) It can be bisque fired up to 1000º C and then decorated, fired again with colors that vitrify at temperatures up to 1280º or less and if there are any parts that are not decorated, they must also be fired as the shrinking will continue.
ca: PRIMER VERMELL
es: PRIMER ROJO
First red is when the clay in the kiln being fired shows the first glow of red. This is near 600º C and the point where the clay is completing the change into bisque.
ca: VORELL
es: REBORDE
 Flange: A ridge on the lid and neck of a jar added to control the movement of the lid.
es: DESTELLO O FLASH
Flash is a sudden and short burst of radiant energy, a momentary brightness.
ca: VAIXELLA PLANA
es: VAJILLA PLANA
Flatware: Low plates, saucers, etc. Being low makes them very difficult to shape using a wheel, so they are usually made with molds.
ca: FLOCULANT
es: FLOCULANTE
Flocculant is a chemical for product for producing flocculation of suspended particles, as to improve the plasticity of clay for ceramic purposes.
(Webster’s Encyclopedic Unabridged Dictionary)
ca: FLOCULAR
es: FLOCULAR
Flocculate is to make a glaze and clay slurry into a thick liquid. Deflocculate is the opposite.
ca: TEST
es: MACETA
Click on the title to see more images Flowerpots are containers that can be decorative or functional and which serve to cultivate plants. The most common ones in pottery are terracotta, as in the first photo, but they are also made and decorated in many different ways. They have a small hole in the bottom or side to allow the excess water to run away and to avoid the hole getting blocked; they are placed on top of a small stand, creating a space between the floor and the base of the pot. Some can also be bought with legs as part of the structure of the pot.
ca: CONDUCTE DE FUM
es: CONDUCTO DE HUMO
Flue: The passageways in a kiln designed to carry the heat from the chamber to the chimney or vent.
ca: ESTRIAR - Tallar ranures en l'argila.
es: ESTRIAR - cortar ranuras en la arcilla
Click on the title to see more images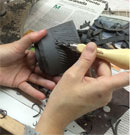 Fluting is to cut grooves into to a clay surface as a decoration. It is done when the clay is leather hard and it is easier to work on an upright object because the slots have the same width from top to bottom. When fluting, you should have a support to stabilize your hand, use a table or a bridge.
There are special tools that are called carving gouges, metal with wooden handles; the metal part are made with different cutting angles and sizes. As the gouge moves forward it cuts through the clay and separates a long, thin, even piece, in one movement. This allows the clay to be slipped out leaving a groove.
Photos (a, b, c) have been lent by Monona Álvarez
Photos (d-j) have been taken in the Pottery School of Núria Pié
ca: FUNDENT
es: FUNDENTE
Flux: One of the essential ingredients of a glaze that can cause fusion and melting in glazes and glass. Usually the most influential of the glaze materials, it dictates the gloss and color of a glaze. Oxides such as iron, sodium, potassium, calcium, zinc, lead, boric oxide, and others combine with the silica and other heat resistant materials in a glaze, helping them to fuse.
ca: RODA O VOLANT
es: RUEDA O VOLANTE
Flywheel is a heavy disk or wheel rotating on a shaft so that the momentum gives almost uniform rotational speed to the shaft and to the connected machinery, (Webster)
 Foam rubber: Is an artificial plastic sponge and is manufactured to use in many different ways from mattress to sleep on, mops to clean floors with, it is soft and collects water.
a) Useful for cleaning clay, leveling out transfers, stamping a texture into slip or onto a fired glaze.
b) A design can be cut out of it, dipped into a color and then marked onto the surface.
Read more about: Impressing
c) Used to rest the edge of the plate so that it does not slip while standing it up to paint and to protect the glaze-base from being damaged.
Read more about: Plate – stand
ca: PEU (a) Ceràmica: plats, gerres I bols.
es: PIE (a) Alfarería: platós, jarros y tazones.
Click on the title to see more images FOOTING
Foot: The basis or foundation on which anything is established – Webster`s,
Foot: The outside bottom part of a utensil designed to stand on – Susan.
The different types are separated into the following sections:-
Footing made in the process of throwing.
Footing that is turned and formed like a jar.
Footing that is molded separately and then attached.
Footing ridge that goes round the outer edge.
Footing that is completely flat.
Footings and the purposes they are made for:-
To make a rounded base straight so as to balance the piece when standing.
To add elegance to the basic shape and the overall design.
To leave a space in the center of the footing that can be left with a glaze, this leaves space for a signature or stamp.
A footing can be of any height and width, in relation to the object it is supporting.
The following section explains and shows illustrations of the method of turning the footings of a bowl and the same is used for plates, pots and all round objects.
The Illustrations
a) This is to show how clean a footing should be when glaze fired. It has holes and metal for hanging,
b) The first photo is to show the footing in relation to the shape of the bowl and the next is from underneath with the signature.
c) Stem turning tools that are good for footing.
Note: Chucks are to hold work upside down while working on the foot. They can be handmade or industrially made.
ca: PEU (b) Ceràmica: tornejat como un bol.
es: PIE (b) Cerámica: torneado como un cuenco.
Click on the title to see more images FOOT – Turning like a bowl
The foot is formed by throwing the main part on a stack. A stack is a cone of clay at the top of which bowls or pots are turned. Once finished, they are cut off the wheel, turned upside down and have enough clay to form a large foot. In Spain special chemist pots are made with this footing and are caller “cálices”. The first photos show three different ones that have been decorated. The second line show the main body and the underneath part of the foot of one that has been clay fired but not decorated and the next is a pot decorated. The last one shows the underneath part painted with the signature and fired
ca: PEU (c) Ceràmica: fet per separat.
es: PIE (c) Cerámica: Hecho por separado.
Click on the title to see more images Footing that is made separately and then attached: The bowls are made in clay on the wheel and the legs are separately formed by hand, then both are left to become leather dry. The parts that have to be joined are scored and dampened with a thick slip, placed very firmly together and all the spaces round the outer edges of the joint are filled up with clay, this when fire seals them firmly. In this photo you can see how the inside of the basin is glazed but the underneath and the leg are not this is so the basin can be put on top of heat to cook. The cups are made in the same way but as they do not have to touch heat they are completely glazed, except for the tips that touch the floor. These are made for making a special Catalan party drink of burning brandy and mixing it with hot coffee and other substances. If you want to learn how to make it go to bowl cremat
ca: PEU (d) Ceràmica: clàssic de torn.
es: PIE (d) Cerámica: clásico de torno.
FOOTING
 a) Work with a bat which is a portable wheel head, it resembles a tray that can be attached to and detached from the wheel. Using a bat the clay is centered and the basic shape of the bowl is prepared leaving enough clay at the bottom for the footing.
It is then moved to one side until it is dry enough to be turned upside down without deforming. When dry enough, the clay is separated from the bat by pulling a wire cutter over the surface of the bat and under the clay.
b) Turn the bowl upside down on the bat and put it back on the wheel. Turn the wheel slowly and with your hands carefully move and center it without deforming the shape.
c) Then attach it to the bat with a coil of clay so it does not move while being turned.
 d) Turn the wheel and with a turning-tool remove the rough surface round the foot so it curves correctly with the rest of the bowl.
e) Turn the wheel using the turning-tool to slice off the clay until the wall of the foot is at 90º.
f) Turning the wheel, use a needle tool and mark, quite deeply, the outside circumference of the footing. This becomes a guide when slicing off the outer clay. To do this correctly use a circle cut out in cardboard, a compass or a banding bar with a needle tool.
g) With the turning-tool sideways remove the rough surface round the foot so it curves correctly with the rest of the bowl.
h) In the same way as the outer circumference mark one for the inside of the footing.
 i) Carefully peel off the clay on the inside of the marked circle work with care not to go too deep or to pass the line.
j) Following the marked and holding the turning tool vertically, carefully slice off the inside wall, making it the same depth as the outside and parallel to it. Turning the wheel, remove all the surplus clay and smooth off the center.
k) If it is a plate that will be hung up as a decoration make two holes in the footing by pushing a needle tool, which is not too thin, through it. Leave the holes big enough to pass a string and far enough apart to have enough strength to take the weight of the plate when hung up.
l) Add the finishing touch by smoothing off the rough edges that making the holes has left and removing any imperfection on the surface, then turn and check that the front of the plate has not been damaged in any way.
 Foot cleaner is a machine run by hand or electricity, designed to clean the footings of decorated work, the parts that touch the floor. it removes glaze, slips and colors before the object is fired, as with heat they act like glue.
The photos show one that is electric; the continuous rotation of the rollers turn and move a band of foam rubber, which is dampened by the water in the deposit below, the pieces to be cleaned are held lightly on top and as it moves it cleans the underneath part. What is removed falls and collects at the bottom and occasionally needs to be cleaned and the water changed.
Read more about: Molding – Press molding – Stage (3)
Photos taken in the workshop of Sot: www.ceramicasot.com
es: ESPÁTULAS CORTANTES - Acero
 Forming tools made in steel have a head at both ends and some are serrated. Used mainly for dry clay, plaster and delicate decorating.
ca: MARC
es: MARCO
1) Frame is a rigid structure built up to surround and support empty spaces, like the frame of a window, and is used in building, ceramics etc. In pottery it is the outer walls of a mold that form the shape and height needed to completely cover a work with plaster.
2) Frame is an open border, usually made of wood or metal, which surrounds, holds and hangs up a flat object like a picture, mirror or tiles against the flat surface of a wall. On framing tiles there are 4 sections, this is the first: Framing tiles (a) Mounting
3) Frames for working with clay are in: Mold: 4 Made with bars of wood and Mold: 7 For walls
ca: MARC - TALLADOR
es: MARCO - CORTADOR
Frame cutter is an instrument for cutting bars of wood at 45º to form frame corners of 90º. Lay the wood flat, pull down the arm and the wood is cut so you have two cuts at 45º. Calculate where you have to cut the other edge of the frame, leaving a millimeter extra so as to be able to put in and take out the tiles.
ca: EMMARCAT DE RAJOLES (a) Muntatge
es: ENMARCADO AZULEJOS (a) Montaje
 Framing tiles – Mounting: There are two stages in framing tiles; mounting and framing. I do not frame tiles for shops, but for commercial reasons I mount them, otherwise they are left piled up, cannot be seen and do not sell. For a shop, I mount one of each design that is required.
Method of mounting tiles on wood: A picture is made up of separate tiles which must be supported from behind with wood which should be the size of the picture plus 1cm, leaving ½ cm of wood all the way round. In the drawing, above left, you can see that the wood is bigger than the tiles; this allows it to be framed without overlapping and cutting into the design.
Working sequence
1) Cut the wood to the size needed.
2) Cut pieces of newspaper the right size to cover the wood, it does not matter if they overlap. Cover one side of the wood with carpenter’s glue and stick newspaper on it, flattening it out as much as possible, then leave it to dry.
3) When dry, lay the wood on a table, showing the side with newspaper and put the tiles on top, placing them correctly, leaving ½ centimeter of wood all round. Weigh the tiles down with a heavy object, so they do not move.
4) Lift up a corner tile and with carpenter’s glue, cover its back and where it is going to be placed, then put it back. Do this with all the tiles until the whole design is glued down.
5) Wipe and clean off all the glue from its face, lay it on a flat surface, cover it with newspaper. If you are preparing several put one on top of the other, weigh the pile down with some heavy objects and leave it to dry. Put paper between each one so if some glue is left it sticks to the paper and not to what is on top of it.
Dismounting
6) If what should be dismounted is only formed by a few tiles small enough to be completely covered, leave them to soak in hot water, then the glue softens and they can be separated from each other.
7) If it is a large picture, too big to soak, heat the tile with a hair dryer, then the glue gradually softens and it can be removed. This system is suitable when it is a picture of many tiles and one is broken and must be replaced.
Remember: The ½ cm left is for professional framing, if working and using the following methods below, a lager space has to be added.
ca: EMMARCAT DE RAJOLES (b) Con fusta
es: ENMARCADO DE AZULEJOS (b) Con madera
Click on the title to see more images Framing tiles with wood A simple and economical way of framing tiles is explained next. The first drawing shows a frame for one tile that can also be made for any amount of tiles; and the second drawing shows six tiles framed as one, but separately. For the horizontal design of 6 separate tiles, each measuring 15 × 15cm., the wood that frames the tiles must be 3 cm wide. The wood that supports the tiles from behind will measure: height 3 + 15 + 3+ 15 +3 = 39 cm, length 3 + 15 + 3 + 15 + 3 +15 +3 = 51 cm, plus ⅛ cm length and width, to allow space for the tiles to be put in and taken out.
Preparing the wood
Frame Cutter: If you make simple frames for your tiles, a frame cutter is needed. It is an instrument that cuts the wood at 45º in both directions. The size of the wood to be cut must be the size of the tiles plus the width of the frame wood.
Working sequence
1) Cut the wood for the frame, which is 1in (3cm) wide at 45º.
2) Put the wood on a flat surface and lay the tiles on top. The wood is prepared with newspaper as explained.
3) Lay the frame round the edges to check that they all fit together correctly. Remove the tiles.
4) Apply strong, quick-drying glue to the back of the wood cut for the framing. Put it in place, hold it until it is firmly stuck, then continue with the other sides placing them correctly.
5) In the same way add the wood that separates the tiles, as shown in the second photo. To make it stronger when glued, very fine nails can be hammered through the back into the frames.
Coloring the wood: If the frame has to be painted or varnished, it is better to do it when the frame is attached to the wood and before the tiles are put on. Paint the back and all sides of the frame with the substance required and then when dry, glue the tiles onto the wood.
ca: EMMARCAT DE RAJOLES (c) Quadres grans
es: ENMARCADO DE AZULEJOS (c) Cuadros grandes
Framing large pictures: If a picture has a large amount of tiles it becomes very heavy and care must be taken in the method used for hanging it up, as ordinary hooks in the back are not safe enough. The following method is very good.

Working sequence
a) Calculate how many flat-hooks are needed to safely hang the picture.
b) On the wood that has been prepared with newspaper for mounting the tiles, calculate exactly how many flat-hooks are needed and where. Mark these points on the side without paper.
c) For each flat-hook you need two flat-ended screws and nuts. The length of the screws is the width of the wood plus the flat-hook and nut.
d) Drill through the wood at these points, making the holes the exact size for the screws being used.
e) On the side with the paper, file down the sides of the holes to 45º, deep enough so the head of the screw is lower than the wood.
f) Put in the screws, add the flat-hooks at the back, screw on the nuts and tighten them very firmly.
g) Glue the tiles to the wood, on the side with the paper.
h) Frame the tiles. At the back, the edge of the frame that overlaps the wood should be wider than the protruding part of the flat-hook, so the frame lays flat against the wall.
i) With pliers, bend the top of the flat-hooks outwards.
j) Insert strong hooks into the wall where the picture is going to hang.
The picture can be lifted and hung, just slipping the flat-hooks over the hooks in the wall.
ca: EMMARCAT DE RAJOLES (d) Amb fusta feta per emmarcar
es: ENMARCADO DE AZULEJOS (d) Con madera hecha para enmarcar

Working sequence
a) Cut the wood the tiles are going to be glued to, taking into account the width of the part of the frame that will overlap it.
b) Glue the tiles to it, as explained in Framing Tiles (a), leaving the necessary border.
c) The frame is then attached so that the bottom of the inside part is level with the top of the tiles, so as not to cover the tiles and cut the design. This looks exactly the same as a framed painting.
d) The frame can overlap and rest on the wood that supports the tiles
ca: FRITA
es: FRITA
Frit is a glaze material that been melted down and reground to be added to any glaze slop. Commercial ones can be bought and used with glazes and slips. Their main use is to help to control the fusion of the glaze; all prepared bases already have them. Feldspar is a natural frit. Two frits are Boron frit and Lead frit.
Frits for glaze bodies. In the relationship between the thermal expansion of body and glaze, a glaze ideally should have an expansion that is slightly lower than the body so that contraction during cooling puts the glaze under compression and thus prevents crazing.
es: COMBUSTIBLES - Para hornos.
Fuels: Oil, wood and gas are used for heating up kilns, but in my experience electricity is the easiest. For firing large quantities, gas is the most economical.
ca: FUNCIONAL
es: FUNCIONAL
Functional relates to a person or an object that is capable of serving the purpose or particular function for which it or he was designed for.
Functional pottery was the first type of pottery to be made many thousands of years ago; the basic objects were for cooking and transporting water. Now, there are hundreds of different functional uses, for cooking, eating from, drinking, decoration, etc.
ca: EMBUT
es: EMBUDO
 Funnels can be of plastic or tin and are made in different sizes and used to move liquid from one container to another, usually from a big one to a small one. I think they are badly designed, because the neck is usually too narrow. They are never made with an appropriate outlet for large amounts of thick liquid or powder. Read more about: Cup lawn
a) Furniture refers to movable articles such as tables, chairs, desks, cabinets or cupboards, all of which are used for functional purposes but can be austere or decorative in style.
b) Furniture applies to all the implements used to pack a kiln to its full capacity, such as shelves, cranks, stilts, etc. In this dictionary each piece of furniture is listed in two places, by its name alphabetically and under a separate heading called Kiln Furniture, where all the pieces are named and illustrated in alphabetical order. This is to help you to find things, to know what the piece is called and what it looks like. Read more about: Kiln – Furniture
