MOLDING - Press molding - Stage (3)
ca: MOTLLE - Premsa - Etapa (3)
es: MOLDE - Prensa - Etapa (3)
 The tiles have been bisque fired and are piled up ready to paint.
With a bucket of a slip prepared with the required color, stir it making sure it is well mixed and has the correct consistence needed for you work. With pincers pick up the tiles one by one and dip them into the slip, let any surplus slip run off and place it on top of a grid which holds six of them. When the glaze is dry you can hold the tiles by the edges, and clean off the glaze that is on the footing and any part that might touch the kiln.
In this piece it is only the outer board that has to be cleaned as the center is lower; this is where you can leave your signature or stamp. If you prepare many pieces, a foot cleaner is a very good purchase. It can be used for tiles, plates and pots. Hold the part that has to be cleaned on top of the band of foam rubber, it is electrically controlled, moves slowly, is damp and cleans off the entire unwanted glaze. Once cleaned put the pieces directly into the cranks, which have been designed size wise to fit in, this is something you must always take into account when designing a piece with a special size.
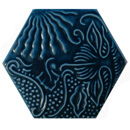
The last photos show the kiln being opened and the work fired allowing you to see the beautiful green that has been created.
Photos taken in the workshop of Sot and is the work of Jordi Salvador: www.ceramicasot.com
This is the last section, to go to the firts; Molding – Press molding – Stage (1)
Click on the image to enlarge it
 All the pieces bisque fired.")
 A tile held by clippers to be dipped into the glaze.")
 The tile has been covered with the glaze and lifted out.")
 The photo shows the clippers being used.")
 Six tiles dipped on top of the grid.")
 The foot cleaner showing the part that has to be cleaned.")
 Cleaning the foot.")
 The foot cleaned.")
 Putting each one into the crank. Always start at the top")
 The firing finished and the kiln slightly opened.")
 The kiln opened.")
 Taking the cranks out.")
 Taking the cranks out.")
 The cranks out.")
 A photo of a pavement in Barcelona.")
 One fired tile.")
 Several tiles put together showing how the design is repeated.")
 The same design used for an ash tray.")
