Ceramic - Pottery Dictionary

by Susan Mussi

ca: TAULES – Per Esmalt Base

es: MESAS - Para Esmaltes Bases

Click on the title to see more images

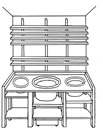
Tables, basins, shelves for working with glazes.
This table is designed for storing three different glaze-bases and for applying them to all types of ware; tiles, plates, jugs and lids. When making the table, remember it must be low enough to allow space for your arm to move over the basin when throwing the glaze-base onto tiles.

The size of the piece of furniture depends on where it is going to be, how many glazes you want to have permanently prepared and on the size of the products you decorate. The one that is described here has three plastic containers of different sizes, each a different color. The center shelves must be very strong, to take the weight of the containers full of liquid glaze-base, prepared for use. The inside measurements of the big basin are about 60 cm wide and 30 cm deep and the two small ones are 42 cm wide and 30 cm deep. In the small ones I keep crackle and semi-matte glaze-base. The big one holds about 30kg of Siglo 18, all ready to use.

Each of the three containers must have a separate lid to keep the glazes clean. They are made to fit together so they form a large tabletop, which is a useful space to work on. The wooden bar round the outer edge of the table supports each lid on one or two sides. On the undersides of each lid, bars the same height as the ones round the edge of the table, are attached on the front and sides that need support.

On the wall above the table, mount as many removable shelves as possible. There are two different widths, 15cm and 20cm, which are the width of the tiles. These are to leave work that has been prepared with a glaze-base to dry, before starting to clean it. When preparing jars or plates just take out a few shelves, put one on top of the other and you’ll have the space needed for them height wise.

The bottom shelf of the table should be high enough to make cleaning underneath easy with a broom, mop or vacuum cleaner. Boxes can be made with lids and wheels to fit into these spaces and used to store products.
The sections on containers.
a) Bars to support the shelves.b) Movable shelves to support prepared work.
c) Bars to support the lids. d) Containers with different glaze-bases. e) Glaze. f) Strong shelves to hold the containers. g) Shelves. h) Lids to cover each container separately.

Read more about: Container – Glaze-base / Glaze-base (e) Applying by pouring on to tiles

ca: TAULA - Prestatge

es: MESA - Estante

Click on the title to see more images

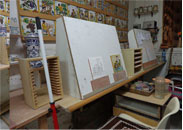
This is a table set up like a shelf, it is designed so three people can sit and paint at the same time. Underneath it has room for a table-trolley and the chair when not being used. It is deep enough to hold a tile stand which is big enough to put six tiles vertically or horizontally. Along the front it has a bar of wood to stop what you are working on from slipping off. On the left there is a pole clip to hold the hand pole you use for painting.

ca: TAULA - Carretó per a materials

es: MESA - Carrito para materials

Click on the title to see more images

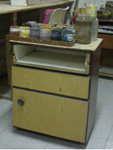
Table -Trolley to hold everything you need while working; it should have wheels as you could be working on two or three different pieces at the same time and it makes moving about easier. What makes an excellent table is a bedside table. It is the right height and if it has three or four drawers, take one or two out so as to make shelves. Put wheels on it so it is easy to move and use it for painting, sitting or standing. In the three photos the first is a doctor’s table designed to hold instruments and the next are bedside tables.

ca: TAULA - Amb rajoles

es: TABLERO - Mesa con azulejos

Click on the title to see more images

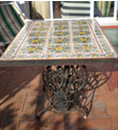
Tables with tiles: If they are for indoor usethe tiles can be supported by a wooden frame but for outdoor use, metal and plaster should be used.

Wood; Framing tje tiles is done the same way as mounting pictures.

a) Table: Wood is cut out to the size needed then pieces of newspaper are glued on to it with carpenters’ glue and left to dry. When dry, using the same glue, the tiles are stuck on top of the paper.

b) Table for a cup of tea: This was made for a client who wanted a support for the edge of the bath to hold a cup of tea. It is a tile 20×20cm, framed with wood, with two clips attached to the back, so it can be clipped on to edge of the bath. It was designed so no more cups are broken.

c) Table top can be made with tiles or a mosaic design. The photo shows an old sewing machine used as legs for a patio table. The table has a metal frame with bars that crisscross between it. On top goes a layer of cement and when dry the tiles are cemented to it, like laying tiles on a floor.

d) Tables with a sun shade. Many tables are made with a hole drilled through the center big enough to fit the leg of the shade. Make a floor of plaster over the metal table top and leave it to dry. Then drill a hole in the center of the table that will be big enough to hold the leg of the sun shade. Drill a hole, the same size, in the tile that will go on top of it. Use plaster to attach the tiles to the table. The mounting and framing of tiles is explained more thoroughly in Read more about: Framing and Mounting tiles

ca: VAIXELLA

es: VAJILLA

Tableware covers all utensils used at the table when prepared for eating and drinking; plates, glasses, cutlery and accessories.

ca: TALC

es: TALCO

Talcum powder usually defines a white toilet powder, but an industrial one exists, also white, unscented and heavier. It is made out of French chalk and used to mark designs on to dark ware and dark colors and when fired burns away. It is also useful for dusting inside molds, this helps to make separating the clay from the mold easier. Read more about: Marking bag

ca: CINTA MÈTRICA

es: CINTA MÉTRICA

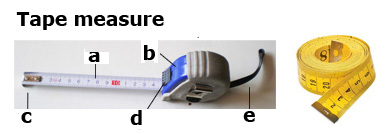
Tape measure is a long and flexible strip of cloth or metal, marked in subdivisions of centimeters or inches and used to measure spaces. When flexible it is known as a tape measure and when not flexible it is a ruler.

a) Centimeters or inches. b) Case. c) Hook. d) Tape lock. e) Hanging cord

ca: TETERA

es: TETERA

Click on the title to see more images

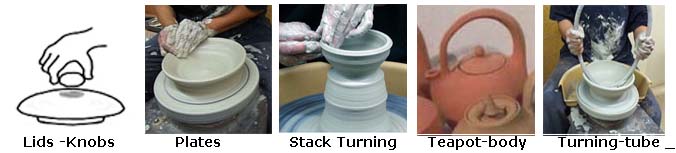
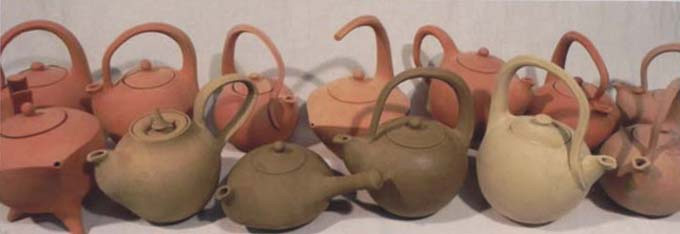
Teapot is a utensil for soaking tea leaves or herbal mixtures in boiling water. It has a lid, a handle, and a funnel which has a straining section.

Method of using: When the water is boiling, a small amount is poured into the teapot, swirled round to heat up the whole pot and then tipped out. The tea or herbs are put into the pot, which is then filled up with boiling water and left to stand for a few seconds before serving. It can be prepared with or without milk, lemon and sugar.

Making a teapot; it is a difficult piece to create, as it has many sections which have to be attached and each one has several styles and methods of working. When finished it should be a product that is useful, practical and elegant which pours correctly.

Note:
1) A spout must pour correctly and be the same height or higher than the main body so when the teapot is full and standing the tea does not come out of the spout.
2) In the past, before teabags were used, teapots always had grids but now they are made with and without them.
3) A lid must fit well so the heat does not escape and it doesn’t fall off while pouring.
4) The lid should have a knob that is big enough to pick it up easily.
5) Handles should be made to hold the pot comfortably when moving and pouring. There are many different styles of clay handles and they can be of different materials such as cane or bamboo and all are attached separately.

The sections on teapot have been lent to the dictionary by Ramon Fort from his book El torno, giro a giro.
It can be bought through his web. Link de l’autor – Ramón Fort

ca: TETERA: (a) Fent el cos.

es: TETERA: (a) Haciendo el cuerpo.

Click on the title to see more images

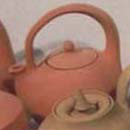
Method of working: To form the main body of a teapot, center the clay, turn it and make a cylinder. Gradually form the size and shape required for the main body of the teapot, to which will be added a spout, handle and lid. Before finishing the neck, clean the inside with a sponge to eliminate the excess water and with a kidney of metal or wood smooth the outer surface.

The sections on teapot have been lent to the dictionary by Ramon Fort from his book El torno, giro a giro.
It can be bought through his web. Link de l’autor – Ramón Fort

Note: These are links to all the sections on throwing in alphabetical order.
Bowl Throwing / Cylinder Throwing / Jars Throwing / Lids (c) Throwing / Lids (d) Throwing Cones / Lids Knobs (f) Attached / Plate Throwing / Stack – Throwing / Teapot (a) Body / Throwing – with a tube

ca: TETERA: (b) l'obertura del coll

es: TETERA: (b) Apertura Cuello .

Click on the title to see more images

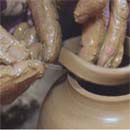
Method of working: When the shape of the body has been formed, open the neck a little to the size you require for the lid. With a saw blade cut off the top part and round it off using a kidney of wood or metal, clean and smooth the body. The last photo shows the finished work.

The sections on teapot have been lent to the dictionary by Ramon Fort from his book El torno, giro a giro.
It can be bought through his web. Link de l’autor – Ramón Fort

ca: TETERA: (c) Coll, formació d'una pestanya

es: TETERA: (c) Cuello formación de una pestaña

Click on the title to see more images

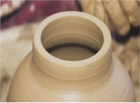
Method of working: Start as explained in the previous section, leaving the neck bigger so a gallery to support the lid can be formed. In the photo the tool used is half a clothes peg. Hold the tool vertically with one hand and support it with the other inside the neck and press it slightly as you smoothly turn the wheel, pushing it down and in the middle to create a gallery. The last photo show the neck finished with the gallery.

The sections on teapot have been lent to the dictionary by Ramon Fort from his book El torno, giro a giro.
It can be bought through his web. Link to Author – Ramón Fort

ca: TETERA: (d) Broc

es: TETERA: (d) Pitorro

Click on the title to see more images


Spout is a conical tube connected to some recipients that hold liquids controlling their flow when being poured out, such as tea or coffee pots. It must be the same height or higher than the main body, so when full, the liquid does not come out of the spout. The part of the pot that is covered by the spout can have one or several holes, forming a strainer, to stop the tea leaves coming out or simply to pour out the liquid

Method of working: A spout is turned on a wheel like a small jar with a narrow neck, and a section is cut off at 45º so when joined to the teapot it forms an angle. Bend the edge outwards, squeezing and flattening it. Hold it against the teapot to check that it fits with the curve and has the right angle and height, then with a saw blade indent a line into the teapot round the outer edge of the spout, so you know where it has to be placed. Score round the inside of the line, where the spout will be attached and make holes to form the strainer by pushing a strong round tool through it; a drill bit is good. Then finish by smoothing the rough parts with a damp sponge.

The sections on teapot have been lent to the dictionary by Ramon Fort from his book El torno, giro a giro.
It can be bought through his web. Link to Author – Ramón Fort

Read more about: Spout

ca: TETERA: (e) Nansa estirada

es: TETERA: (e) Asa estirada

Click on the title to see more images

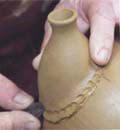
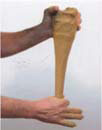
Pulling a handle. Make the clay into a cone shape, hold it with one hand and pull it down with the other that is wet. The movement must be smooth and continuous to avoid it breaking. As you lengthen it, start giving it a shape, round, rectangular or triangular.

This is done by holding and forcing it between your thumb and fingers in different ways. When you have the length needed separate by cutting it with a cord at 45% or the angle you require. It can be cut upwards or downwards, photos f) and g) Leave it to dry a little before attaching it to the teapot.

The sections on teapot have been lent to the dictionary by Ramon Fort from his book El torno, giro a giro.
It can be bought through his web. Link to Author – Ramón Fort

Read more about: Handles (a)

ca: TETERA: (f) Nansa - Extrusoras i Xurros.

es: TETERA: (f) Asa - Extrusoras y Churros.

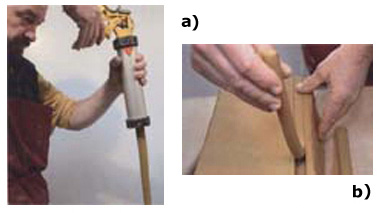
Extruders a) and coiling b) are both used for making handles and are explained in these sections; Extruder (a) Manual and Coiling (4) With a slab roller

The sections on teapot have been lent to the dictionary by Ramon Fort from his book El torno, giro a giro.
It can be bought through his web. Link to Author – Ramón Fort

ca: TETERA: (g) Nanses fetes a torn

es: TETERAS: (g) Asas hecha a torno.

Click on the title to see more images

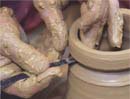
Turning handles on the wheel, first form a big cylinder, making the circumference bigger than the length you will need for the handle. Decide on the width you require and mark the height. When it is formed cut it with a saw blade to separate it from the cylinder.
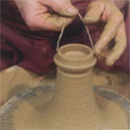
Lay it onto a straight bar of wood, with a sponge remove the excess water and smooth it, then leave it to dry a little before attaching it to the teapot.

The sections on teapot have been lent to the dictionary by Ramon Fort from his book El torno, giro a giro.
It can be bought through his web. Link to Author – Ramón Fort

ca: TETERA: (h) Tapa.

es: TETERAS: (h) Tapa

Click on the title to see more images

Method of working
With calipers measure the diameter of the mouth of the pot, it is important that the size is correct.
Form a cone and calculate the amount of clay needed to make the lid. Open with your fingers on the top, using the same movement as you would when making a small bowl, then raise the height needed for the lid.
Open the clay a little, the inner diameter of the walls should be equal to the mouth of the pot, check it using the calipers.
With your fingers form the flange that is the same diameter as the mouth of the teapot and check that the sizes coincide. With a kidney indent a line where the lid will be separated from the cone and separate it.

The sections on teapot have been lent to the dictionary by Ramon Fort from his book El torno, giro a giro.
It can be bought through his web. Link to Author – Ramón Fort

Read more about: Lid (a)

ca: CULLERETA

es: CUCHARITA

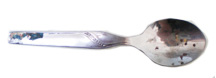
Teaspoon is a small spoon designed to add and mix sugar with a cup of tea and has got its name from this function.

ca: TÈCNICA

es: TÉCNICA

Technique is to have the ability to apply the technical skills of a particular art that can be decorative or physical; painting or dancing.

ca: TEMPERATURA

es: TEMPERATURA

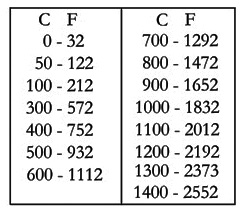
Temperature: there are two main scales of temperature, Centigrade (º C) and Fahrenheit (º F). All the temperatures in this dictionary are given in Centigrade; the following is a conversion table of Centigrade to Fahrenheit.

ca: TEMPERATURA - CONTROL DE FORNS

es: TEMPERATURA - CONTROL DE HORNOS

A pyrometer is an electrical instrument for checking the temperatures in kilns. It registers the rise of the heat during firing. It is connected to a porcelain sheath, which is passed through the spy hole in the wall of the kiln to protrude for about 2 cm inside and monitors the heat which is shown on the pyrometer.
Cones are used as another checking method. They are placed in different parts of the kiln in small lumps of clay to keep them upright and in line with the spy-hole so the heat process can be observed. When the kiln is opened, if one has bent too much, it means that the heat is too high in that part of the kiln, and if not enough, too low. Read more about: Cone – Witness / Kiln – Heat controller / Pyrometer

ca: PLANTILLA

es: PLANTILLA

Template is a cut out profile in a strong material like plastic, thin wood or metal.
They can be manipulated by hand or using a jigger and jolly.

By Hand: they are for forming and checking shapes in clay. Using a template (also known as a card – shapes for clay.) The example “a” is to form the outside profile of a bowl and “b for borders and skirting tiles.
Read more about: Borders (2) In relief

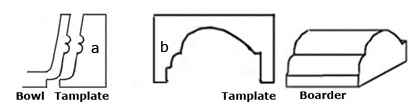
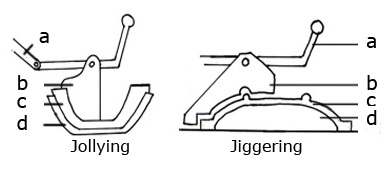
By jolly or jigger: They are instruments made to hold a template in relation to the clay being turned on the wheel. They must be very stable and for this reason are usually attached to a wall. A mold is put on to a wheel and centered, the clay laid over it or into it. The template is held in a jigger or jolly, placed against the clay then the wheel is slowly turned and the template scrapes and removes the unnecessary clay until it forms the shape of the template.
a) Handle, b) Template, c) Clay, d) Mold. Read more about: Jiggering and jollying

ca: TENMOKU

es: TENMOKU

Click on the title to see more images

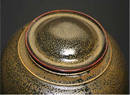
Tenmoku is the Japanese word for a type of tea bowl made ​​first in China during the Sung dynasty (960-1279). Tenmoku glazes are easily recognizable. The enamels are dark, from reddish browns to dark browns and blacks, produced by a high iron content. Ash is usually incorporated as a flux.

Firing and the cooling of the kiln both influence the transformation of the iron in the enamel. Sometimes when firing is long and the enamel has melted, the iron can separate from the enamel to create a crystallized surface with spots like “oil spots” and the edges or parts in relief can appear lighter due to the runoff of the enamel, which reduces the thickness in these areas.
Photos lent by: Monona Alvarez.

ca: TENSIÓ

es: TENSIÓN

Tension is when a cord between one or more people or objects and is pulled so tightly it reaches breaking point.

ca: TERRACOTA

es: TERRACOTA

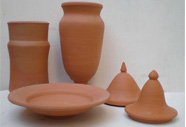
Terracotta is red-brown clay that has been fired. It is the most common clay, found in the earth throughout the world. It can be molded, cast and turned on the wheel and used to make bricks, tiles, flower pots and many objects, both industrial and decorative. It is cheap, easy to work with; it is formed into a required shape, left to dry and then fired at between 800º C and 1050º C. When fired it turns into a material that is solid and breakable but still porous. It is not waterproof, water can dampen and pass through it but without altering its structure and when fired it is also known as bisque. To make it waterproof, it must be covered with a layer of glaze and fired again, the glaze vitrifies and acts as a thin layer of glass and makes it non-absorbent. Read more about:
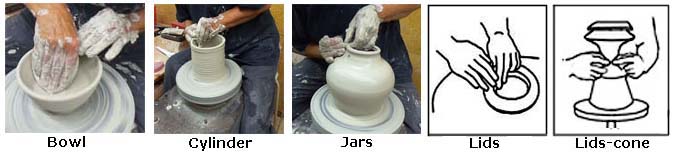
 Bisque

ca: PROVA DE COLORS

es: PRUEBA DE COLORES

Test colors: keep a file on the all the colors you use, classifying them under the temperature at which they are fired. File the name of the color, where you buy it, the industrial names of the ingredients and the measurement of everything needed to make it, plus two fired samples of each color and a photo of the sample. To test colors, use a small piece of dry clay or bisque, prepare it with the color, code it on the back and fire it. Read more about: Color testing

ca: FORN DE PROVES

es: HORNO DE PRUEBAS

Test kiln is a small kiln made for testing colors and clays. As the firing time is much quicker it gives colors misleading results, the higher the temperature, the more incorrect. The results of test-pieces are always better when put in a normal kiln. Read more about: Kiln – Test colors

ca: TEXTURES

es: TEXTURAS

Textures are visual qualities or rough, uneven surfaces given to clay, colors and glaze-bases.
Read more about: Glaze-Base (m) Tectures

ca: EXPANSIÓ TÈRMICA

es: EXPANSIÓN TÉRMICA

Thermal expansion is the relation of volume and size of ceramic material to temperature. The more it expands during heating, the more it contracts while cooling down. When firing clay, sculpture or work in relief where one piece has differing thicknesses, the change in temperature must be slow so the expansion and contraction are not too abrupt; a thin part will heat up and cool down much quicker than a thick part.

ca: XOC TÈRMIC

es: CHOQUE TÉRMICO

Thermal Ssock refers to extreme temperature change, usually caused by removing fired pieces too soon from the kiln, resulting in cracks.

ca: GROSSOR

es: GROSOR

a) Thick in solid products is the distance between two opposite sides.
b) Thick in a liquid is when a liquid is mixed with other products so its body becomes denser and more solid. Clay is mixed with water to get the correct plasticity for your work.

ca: PRIM

es: DELGADO

a) Thin in solid products is when the distance between two opposite sides is very small.
b) Thin in a liquid is when in the mixture of two products there is a lot of liquid in relation to the solid products.

ca: TORNEJAR – És donar forma a l'argila en la roda del torn

es: TORNEAR – Es dar forma a la arcilla en la rueda del torno

Throwing applies to the process of forming round objects in clay, like bowls, plates and pots on a pottery wheel which can be rotated by foot or electricity. Throwing ends when the work has to be separated from the wheel and turned over to finish the footing and this part is known as Turning.

NOTE: These are links to all the sections on turning, click the name in red and you will straight to it.
——— Bowl Throwing —— Cylinder Throwing —— Jars Throwing ————- Lids Throwing ——- Lids Cones ———


——- Lids-Knobs ———— Plate Throwing————- Stack Throwing ——- Teapot Body —— Throwing with tube —-

Read more about: Wheel (c) hand / Wheel (d) Foot and electric

ca: TORNEJAR - Eines Alternatives - Mànega.

es: TORNO – Herramientas alternativas - manguera.

Click on the title to see more images

Throwing a plate using a tube.

A normal hose, one you use for irrigation, can be used as a tool for throwing plates, bowls, etc., to make any shape that is concaved and opens outwards. The clay is turned in the same way as a cylinder but a little bit thicker and then is formed using a tube, this method is shown in the following photos.

Although it seems simple but some experience is needed to learn how to operating the tool so the clay is not deformed. The size and diameter of the hose must be proportional to what is being turned. The larger the piece the thicker and longer the hose must be.

This way of turning is demonstrated in this video by Thierry Fouquet, to see Throwing with a Tube

Note: These are links to all the sections on throwing in alphabetical order.
Bowl Throwing / Cylinder Throwing / Jars Throwing / Lids (c) Throwing / Lids (d) Throwing Cones / Lids Knobs (f) Attached / Plate Throwing / Stack – Throwing / Teapot (a) Body / Throwing – with a tube

ca: TORNEJAR - Fet amb torn

es: TORNEAR - Hecho en torno

Throwing covers all the different stages of constructing a vessel in clay by means of a wheel.
To Throw is to cast away an object which you are holding in your hand. You lift up your arm, move it backwards, then bring it forward and with force from the arm and hand, let go of the object which flies through the air. Read more about: Clay (4) throwing

ca: RAJOLA

es: AZULEJO

Click on the title to see more images

Tiles in ceramics: They are flat simple slabs of clay, earthenware, stoneware and porcelain made up in hundreds of different styles, shapes and thicknesses, handmade, semi handmade or industrially produced and can be used to cover interior or exterior structures in buildings for floors, walls, pictures, names and numbers and general decoration. Made to form patterns that have one or more tiles with proportions so they fit together to form a flat, continuous surface. On the back they are always flat and the designs on the front can be in relief.

Potters can make them or buy them prepared in different sizes and stages; clay, prepared with slip, slip fired, bisque and glaze-fired and they can be decorated with different methods.

The photos are to show how different shaped and decorated tiles can be arranged to form a tile design.
a) This is in the Museu Municipal Vicenç Ros, Martorell and is a design made up of four different shaped tiles.
b & c) Are industrially made modern floor tiles with antique designs.
d) This is an English tile made in about 1870 by Wedgwood and is to show how relief can be used as a decoration.

ca: RAJOLA (1) Tall formes.

es: AZULEJO (1) Cortado formas.

Click on the title to see more images

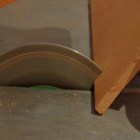
Tiles: When odd shapes are needed tiles can be made by hand or industrially and can be cut down altering their size and shape, but if many are needed you must make a mold. There are special cutters, made to cut curved parts; but they are a luxury not many people can afford or need. For cutting straight lines go to these sections and follow the instructions; hand cutter and electric cutter.

The following three sections cover cutting different shapes using an electric tile cutter and this section applies to all three. Tile – Cutting (2) Narrow bars. Tile – Cutting (3) Round pieces. Tile – Cutting (4) Round spaces.

1) Using an electric cutter; as the disk is round, it cuts the part underneath longer than the top one. Make a test with a tile that has the same thickness as what you will be working with, cut a line into it about 4 cm long and you will see that at the front it is perfect but at the back it has overlapped the correct distance, this can be seen in the photos “(c)” and “(d)”.

2) Always work with the main side facing upwards because the disk cuts the bottom part first and damages it more.

3) Start by drawing the lines of the shapes you want on the tile and cut off, bit by bit, the unwanted parts first. Do this because the larger part is the strongest and the pressure of cutting with the machine always breaks the smallest one, which is the piece you want. To avoid this make cuts into the tile about half the distance between the edge and the drawn line, then turn the tile round and cut them off one by one. As you get nearer the drawn line hold the tile slanted against the drill at about 80º and make more cuts, be sure that the underneath part of the disk does not cut too deeply and spoil the main piece.

Continue working in the same way until the parts being removed are so narrow that they can be filed down. Working like this is basically the same for all three shapes.

ca: RAJOLA (2) Tallar tita estreta.

es: AZULEJO (2) Cortar tira estrecha.

Click on the title to see more images

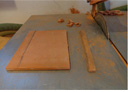
Cutting a tile; mark the lines on the tile where it has to be cut. It measures 15×15cm and can be used to make two bars of different widths, each one will have an uncut straight side of the tile which makes it stronger. With a pencil draw lines for the two sizes needed, the one on the left is 1cm and will be cut first and the one on the right is 2cm. Cut through half the tile that is going to be used, about 4cm from the drawn line and parallel to it, turn it and cut the other half, so it separates.

Hold the piece flat and cut several times into the part that has to be removed, remember do not let the lower part of the disk pass the line and cut off the bits one by one. Continue doing this until the part to be cut off is too narrow and the disk would damage the main piece or the pressure could break it. To finish narrowing it with the disk turning, hold it against the side and file it down, move it gently to level it out, smooth the side and round off the top corner.
The photos are in the order of working.

ca: RAJOLA (3) Retallant peces rodones.

es: AZULEJO (3) Recortando piezas redondas.

Click on the title to see more images

Cutting round curves; with the electric tile cutter make enough space for the tile to be flat and moved at any angle, always work with the face of the tile upwards. With a lead pencil, draw the outline of the circle on the tile. Start cutting off a small section from a corner, the first one can be done in one piece but when the part to be cut becomes long, cut the corners off in small pieces. After the first corner is cut off, do the same with the other three.

Once the space to be removed is narrow, start at the top of the curve and file it down gradually making it rounder to complete the curve of the drawn line. Finish all four corners then lay it flat and hold it against the disk, and as it turns you turn the tile and file off the edge all the way round, continuing until it is smooth. Hold the top edge against the disk and do the same, rounding it off slightly.

ca: RAJOLA (4) Retallar cantonades.

es: AZULEJO (4) Recorte esquinas.

Click on the title to see more images

Tile, cutting corners off. First, draw the outlines of the straight lines that have to be cut off to make the square smaller, to the size required. Move the wall of the cutter, so the tile can be flat and it can be turned round; remember always to cut with the good side upwards. Two sides are used and two sides and four corners have to be cut off.

Make two or three cuts into the two straight edges that have to be removed and then cut off these sections. Make sure the underneath part of the disk does not pass the marked line. Cut off all the corners, cut half way through it and then turn it and cut the other half. Doing this lessens the pressure of the disk and makes breaking it less likely. When all the parts have been cut off, file down the rough edges and the top corners. To do this lay it flat and hold it against the disk and as it turns move it from left to right, then tilt it forwards and file the edge.

ca: RAJOLA (5) Retall de les corbes.

es: AZULEJO (5) Recortar curvas.

Click on the title to see more images

Cutting out curves. To cut this tile, as the design is smaller than the tile, two sides have to be cut off and then the required shape is cut out. In the past this shape was commonly used is Spain. As large amounts were needed they were made with a mold, now as only one has got to be made, it is quicker to cut down a tile to the correct shape.

The way to work
1) Draw the outline of the shape to be cut; here, one that has already been made is copied.
2) Place it so that two sides are at the edge of the tile, the others have to be cut off. Draw the outline of the shape needed and the lines on the two sides that have got to be cut off.
3) First cut off the two sides then the four corners as explained in “Tile – Cutting corners”.
4) To cut out the curves, hold the tile at about 45º to the disk, and cut small sections into it.
5) Lay it flat and cut off half of the small sections.
6) Turn it round and cut off the others.
7) File down and smooth the uneven edges.
8) Gently round off the corners at the front.
9) Do the same at the back and make sure it is not wider than the front part.
10) If there are parts that cannot be reached with the electric drill, use a hand file for the last ones to be finished. The last photo (k) shows the tile finished and (l) the tile decorated.

ca: RAJOLES - Antigues

es: AZULEJOS - Antiguos

Click on the title to see more images

All these photos were taken in the Museu Municipal Vicenç Ro, in Martorell, Catalonia. It specializes in collecting and restoring all types of antique pottery, tiles, plats, jars, etc. It is open to the public by appointment, one person can go, you do not have to go with a group.

The basic idea behind this museum is to save the old tiles being destroyed by modern building. To separate tiles from a building is very difficult as they are so well attached and to save time the builders removes them with large chunks of the wall. The museum has to separate, clean and sort out each piece and fit them together correctly.

In the past there were many small local pottery business existed, they had their own wood-kiln and the local people decorated and painted. The main method of decorating during these years was the Majolica Method. These photos are to give you an idea different styles and how they were used. In thier work sometimes they were perfectionists and in others they made many mistakes which can be seen in several photos, one is o).

NOTE: When I went to the museum their web was not working so I have put their short video into our link section. Go to our link section, Go to Museums and Collections, Click on its heading MUSEU MUNICIPAL VICENÇ ROS and you will see it.

THE FOLLOWING ARE SHORT EXPLANATIONS ON EACH ONE.
a) On the left and right side it has two borders, the one on inside is half the size of the main tile and the one on the outside is the same as the main tile. This allows the pattern on the side to fit exactly to the corner one but the ones at the bottom don’t, one tile has to cut
b) This a design that is usually repeated but here it has a blue line painted at the top and bottom so it is know it was decorated to use as a border.
c) Decoration made for a church and you can see the tiles are cut so the joint dose o not go through the face.
d) This design is classic and one that is still being used. It has two colors, the white of the base and green copper, which are the ones most used. The colors are painted at 45º, corner to corner. In the next 3 tiles it is the same design use with different colors and laid out so as to form different patterns.
e) The bottom part is green made up into a sig-sag design and the top a border with two different blues.
f) The same tile design forming a patten with other tiles.
g) The sane design, with the color blue color forming a patten with many different tiles.
h) Two tiles cut to a special size and shape, when put together form a patten, here they all have a similar designs.
i) This has four different shaped tiles, 3 different size squares and one xxxx, it has six sides and they form a pattern when put together they are all blue and decorated with different desifns.
j) This an old Catalan repeated design, and id know by the “——-“ which means ——-
k) A flower design that has been used many times during the centuries and it is the same as the one below it (n). The border is also well known and it is incorrectly placed. The following two photos have the same border so show how it can be cut and placed differently.
l) The tile is 10×10 cm with the same border as (k).
m) A tile 10×10 cm with a lion and the same border as (k)
n) The same flowers as (k) but with a different border. The borders are correct except for the one in the center at the bottom.
o) The basket with flowers, everything is incorrect by today’s standards but the colors are strong and it’s attractive.
p) Many tiles showing different occupations, places, instruments and animals.
q) A large religious picture, 15 tiles long and 9 high and has a border, on the tiles that is paint to look like an elaborate wooden frame.

ca: RAJOLA -SANEFES I CANTONADES – Per a emmarcar quadres de rajoles.

es: AZULEJO - CENEFAS y ESQUINAS – Para enmarcar cuadros de azulejos.

Border is the decoration that goes round the edge of an object. With plates, jars and lids the border is always part of the piece but with work in relief and tiles it can be part of it or completely separated. In the following sections on borders, all types are covered.

Read more about: Borders (1) In relief / Borders (2) In relief / Borders (3) Plate structure / Borders (4) Plate designing / Borders (5) Plate painting / Borders (6) On tiles.

Bisque border tiles can be bought but are difficult to find so you have to cut tiles 15×15, 15×20 and 20×20 cm in half for borders and in quarters for corners. They are used in architectural decorating, for framing mirrors and pictures on tiles.

Note: While painting a picture on tiles, a line of borders must be put on the stand between the tiles being painted and the small shelf they stand on, to protect them from products being used which could damage them. If these fall, they collect on top of the bar against the border and do not touch and damage the prepared tiles.

Read more about: Architectural Pottery / Tile – Cutter electric / Tile – Stands

The next section; Borders (1) In relief

ca: RAJOLA - Trencada i esquerdada

es: AZULEJO - Roto y agrietado

Click on the title to see more images

Tiles – broken and cracked.
Tiles must be sounded before decorating to make sure they are not broken or cracked. This can be done when the piece is in the state of dry clay state, either bisque or glaze fired. With bisque sometimes the cracks can be heard but not seen, if so using your hands force them downwards until they separate, The broken parts can be cut down to special sizes for borders, corners, testing colors, making mosaic patterns, supports for the kiln, etc. With tiles that have been glaze fired cracks can be seen as they separate the glaze, this is shown in the two photos.
Read more about: Bisque (b) Sounding tiles

ca: RAJOLA - Per a la construcció

es: AZULEJO - Para construcción

Tiles – Builders’ tiles are usually redder in color, come in many different sizes. They are difficult to cut down, not well finished off, have a rough texture and do not fit together evenly. If you have the time to experiment and make trial firings you will find some leave rough, strange textures, which can help certain designs.

If the bisque has a texture full of small holes, you can help eliminate some by wetting the part that is going to be decorated with a large soft brush and clean water. The water blocks the holes so the glaze-base when thrown over it is not affected too much. When fired some are left and this helps to give an antique texture.
Read more about: Bisque dampening

ca: RAJOLA - Tallador d'argila

es: AZULEJO - Cortador de arcilla

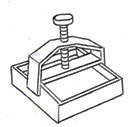
Tile – Clay cutters are made in metal to cut out different geometrical shapes and sizes in flat clay, some of which can fit together to form a flat surface. The clay is rolled out to the required height, the cutter is laid on top, the walls, controlled by a spring, are pushed down into it and the shape is cut out.

ca: RAJOLA - Tallador

es: AZULEJO - Cortador

A tile cutter is needed to make special sizes and shapes that are not industrially made. It is mainly to make borders that are separate from the main design and go round the outside of pictures made out of tiles. The following sizes can be bought, 7.5 × 20 and 10 × 20 cm which can be cut to make corners and x x 7.5 × 15 cmx to make the borders for tiles, which are 15 ×15 cm. This last size is the one most used.

A hand tile cutter is needed if only cutting a few borders and leaves rough edges which have to be sandpapered. If you need to cut a large amount an electric cutter would be much better, quicker, more exact, and it can file and smooth the sides and corners of the parts which have been cut.

Note: The following two sections cover hand and electric tile cutting.

ca: RAJOLA - Tallador a manual

es: AZULEJO - Cortador a mano

Click on the title to see more images

Buy a good cutter that holds the tile in place and has measurements clearly marked on to it.

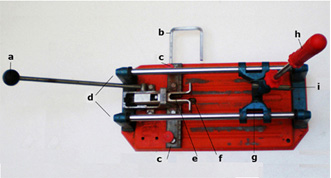
The parts of the tile cutter:
a) The breaking handle.
b) The lateral guide which holds the tile in place.
c) Screws that hold the lateral guide in place.
d) Static supports that hold the scorer.
e) U to force down on each side of the pressure point.
f) The pressure point that moves up under the tile.
g) The bridge, moved by pushing the scoring handle.
h) Scoring handle holds the scorer and moves the bridge.
i) The scorer.

Remember: when cutting tiles in half to make borders and corners, they must be as exact as possible as they are going to form a line. If cut too short or too long, when put together this fault in length will multiply in relation to the amount used. It is much better that they are longer, if longer they can be filed down but if shorter they cannot be used!

Working Sequence:
1) Measure and mark the center of the tile with a pencil line.
2) Place the tile correctly so when the scoring handle is pulled down, the scorer touches the pencil line, tighten the screws to keeps the tile in place.
3) Lower the arm until the scorer touches the pencil line at the front. Push it forwards and downwards across the tile indenting a line. Lift up the arm and pull it back.
4) Push the handle that is attached to the U forwards this moves the U down and the pressure point under the tile up and with the force of the two the tile is divided in half.

The edges that have been cut are rough and have to be filed. If you are only dealing with a few, lay out a piece of strong sandpaper on a flat surface and rub the rough edges of the tile over it two or three times, also file and round off the corner of the upper cut edges.
If you have to sandpaper a lot, make a block to file with. It can be a flat piece of wood with the sandpaper firmly attached.

Note: when framing the edges that have been cut should always be put on the outside, so that the straight edges of the frame are against the straight edges of the tiles.
Read more about: Borders and corners / Borders (8) Separate.

ca: RAJOLA - Tallador elèctric

es: AZULEJO - Cortador eléctrico

Click on the title to see more images

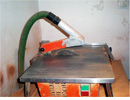
Tile – Electric tile cutter
There are many electrical machines to cut and file tiles, but unfortunately they are all designed for builders, not for potters. They throw out dirty water and wet grains of bisque while cutting. I have had my electric cutter altered so it can be used with my industrial vacuum cleaner, so my walls and floors are kept clean. The basic principle is to alter the cutter so two exhaust pipes can be attached to the vacuum cleaner. In this way the powder thrown off while cutting is absorbed into the bag of the vacuum cleaner and water does not have to be used.

Electrical cutters are designed to cut a tile to a measurement but not in half and a border for a potter has to measure exactly half a tile. On a cutter the size is calculated from the right hand side of the blade to the right hand side of the tile which is going to be cut. The width of the blade is ⅛ cm and this is eaten away by the cutting, leaving the left half of the tile smaller. You have to calculate the exact placing of the tiles in the machine so it cuts through the center, eating the same amount off each side. If you use the machine a lot for certain sizes, mark a line on its floor with indelible ink where the tiles should be placed.

In the photos you can see the bar, like a step, that supports and holds the tile in place. This step slants the cutting slightly so we lay the tile on the floor but against the step, not the wall of the step.

Working Sequence
Measure and mark the center of the first tile with a pencil line. Place the tile so the disk falls exactly in the center of the tile, on the line. Fix the metal wall that holds the tile in place. Tighten the screws that keep it in place and make sure it is straight. Turn on the cutter, cut halfway through the tile. Lift up the tile; turn it upside down, so the back of the tile is facing upwards and the same edge is against the bar. Cut until you reach the first cut and they separate. Lay the two borders on a flat surface and check, by putting each side together, that they are exactly the same height. For the corners do the same, cutting a border in half. To file the rough edges, turn on the cutter and file the sides, lay them flat and push them backwards and forwards against the disk to leave a smooth finish. Hold the border at 45º so the top front corner, that has been cut, just touches the disk and very gently rounds it off. Read more about: Vacuum Cleaner

ca: RAJOLA - Decorar

es: AZULEJO - Decorar

Click on the title to see more images

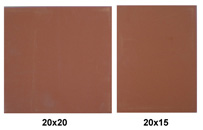
Tiles for decorating
1) Are usually made in red terracotta clay, bisque fired and can be bought industrially made, handmade or semi handmade. There are many sizes, the two main ones are 15 × 15 cm and 20 × 20 cm and each one has a choice of heights.
2) The industrially made one are between 6mm and 1cm in height. These can be cut down to make specially required sizes, such as borders and corners; they are well finished and curve slightly round the edges.
3) Handmade and semi handmade are thicker, 1 cm and more and never exactly the same size. There is a smaller selection of sizes and they are more difficult to cut down.
4) For potters, tiles can be bought prepared for decorating in three different ways, bisque, dry clay and clay with a layer of slip.
The first four tiles are industrially made and the size 20 × 7,5 cm is cut down to make borders 15 × 7,5 and corners 7,5 × 7,5 cm. The following photos show a few of the hundreds of shapes and sizes there are and the different basic color each one has.
Read more about: / Borders (7) On tiles / Borders (8) Of tiles

ca: RAJOLA – Industrial, esmalt

es: AZULEJO – Industrial, esmalte

Tiles – industrially glazed can be decorated with the on-glaze method. Before starting you should fire one at the heat you require, making sure the industrial color or colors are not affected in any way. The main problem is that they break easily. Read more about: Glaze-base (a) / On-Glaze

ca: RAJOLA - Problemes

es: AZULEJO - Problemas

Click on the title to see more images

In the past there were many different types of industrially made tiles with different trademarks, qualities, sizes and colors. Their production was carried out in two stages: the making of the bisque and the decoration, often by two different firms. The way of producing tiles in the last 60 years has completely changed, they are now made with non-stop machinery which shapes, dries, decorates and fires them and they are made to be stronger, lighter and cheaper. There are still a few firms which specialize in the fabrication, so the choice has become limited and the ways used have changed, affecting the Majolica method.

What affects it more than other methods is that it is an in-glaze, the tiles are prepared with an opaque glaze-base, left to dry, decorated and then fired. It is during the period of drying when the problems start. With on-glaze, as the tiles are fired before being decorated, they can be fired straight away, which avoids these problems.

We have been preparing tiles in the same way for twelve years; applying the glaze-base, cleaning them, leaving them to dry, piling them up by pairs, face to face, (base on top of base) then leaving them for days, weeks or even months before decorating and firing them.

Problem 1 The firm we bought them from stopped producing tiles and we had to find another place to buy them. The new tiles were made to be stronger, lighter and the soft red color changed into a strong and darker one. These changes mean they cannot absorb water quickly, so when they are covered with a glaze-base they take a long time to dry, the old tiles took one or two hours and then could be piled up face to face. When the new ones were prepared with the glaze-base they had a strange reaction, a rash appeared mainly round the edges; very small hard spots, which did not go away. When fired it damaged the work making it unsaleable. We just could not understand what was happening and suffered the consequences, as hundreds of tiles had to be thrown away.
By sheer accident we found the solution when making two pictures of thirty tiles for the same client; we laid out one on the tile stand to dry off so we could start to work and the other one we left piled up. After four days when we wanted to start to paint the second one, we found it had the disease. What causes it we do not know, but how to avoid it we did! Now one long wall has narrow movable shelves from top to bottom, where all the tiles are laid out and left to dry separately without touching each other. When the glaze-base and the tiles are dry, which takes about three days, they can be stored in piles on top of each other, as before.

Problem 2 When we started using the new kind of tiles, once fired to the correct heat the glaze surface was matte, as if not completely fired. The first way we found to avoid this was to spray the finished work before firing, with a layer of transparent glaze. The method was expensive and unhealthy. After doing this for about six months, we realized that the trouble was caused by the bisque tiles we bought being under-fired. So we fired them all at 980º C before starting to decorate, which was only necessary for industrially made tiles.

We use tiles that are industrially made as they are cheaper, thinner and lighter and this makes them more economical to use in many ways, less expensive as far as transportation, packing and firing are concerned. This is only needed for industrially made tiles, as every other object we use, plates and jars can be fired normally and handmade at the request of the client.

a) A tile from a picture of 20, where the whole surface is affected; if you increase the size of the photo, looking closely the small white spots can be seen.
b) This is the corridor prepared to dry the tiles. The wall has movable shelves and they are built up one on top of the other using small bars of wood, leaving enough air to dry them.
c) At the same time there were problems with the manganese – all the outlines started blistering, although the make and type of color had not been changed. Does any poor client know when a product he has bought has been changed? The solution to this was to stop using manganese and instead to use 1 part brown-red with 1 part dark brown.
d) The photo shows the back of two tiles; a new one and an old one. The simple difference in colors shows the better quality of the old ones, also the surfaces at the back of them are much easier to clean. The new ones are made with small indented lines (which doubles the work).

ca: RAJOLA - Prestatge

es: AZULEJO - Estantes

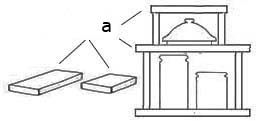
Tile shelves, are industrially made bisque tiles cut down to the sizes you require for shelves, to be used when packing the kiln and as a tray to move decorated work. As the work cannot be touched, the tile is used like a tray to move it from the place it has been decorated to the kiln, where it becomes a shelf supported by tube props.
Read more about: Packing (c) Decorated work

ca: RAJOLA - Suport

es: AZULEJO - Soporte

Tile Stands In the drawings below, there are two stands. Both have a small, narrow wooden bar along the bottom to support the tiles.

a) Tile support b) Border tile support c) Wooden bar – Tile support d) Wall supports.

1) The large stand can hold up to twenty tiles lengthwise and nine tiles high, which makes it 135cms high and 300cm long. The tile support is one piece of wood, and on each side has a leg that extends up to the top. At the top, the legs rest against the wall to support the weight of the tiles. This creates a slant in the stand so at the bottom the legs have to be cut at an angle.
2) A slight slant is necessary to keep the tiles from falling off, as is shown in the side view illustration.
3) The small stand is to put on a table so you can work sitting down. It is designed to hold up to six tiles, vertically or horizontally.

BORDER TILE SUPPORTS: Start by putting a line of bisque border tiles supports along the stand, to the length of what you are going to paint. This makes a space between the bottom tile of the design and the bar that supports it, so when products being used fall they collect on top of the bar and against the border and do not touch the prepared tiles. On top of the bisque tiles, place the ones that have been prepared to work with. They should have the design marked on, be numbered, coded and have the excess ash cleaned off.

Note: A border tile is a tile cut in half. Read more about: / Majolica: 5b – Tiles preparing to paint.

ca: RAJOLES – Posant rajoles sobre parets (EN CONSTRUCCIÒ)

es: AZULEJOS – Poniendo azulejos sobre paredes (EN CONSTRUCCIÓN)

Click on the title to see more images

TWO BASIC WAYS OF ATTACHING TILE TO WALLS

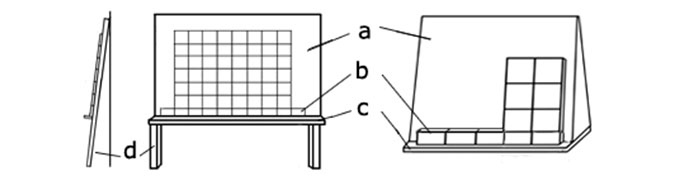
1) When tiles are decorated to be used in public places and attached to a wall that is outside, every inch it covers must have cement, so there are no spaces left between them. If a space is left and they are hit by strong article, like a ball or a ladder, they will break where the tiles have no support. Some have been placed on a building many years ago and they are very difficult to remove, nearly impossible, because the cement they have been attached with is so strong, when being separated they break.

2) In interior rooms such, as bathrooms and kitchens, tiles are attached with cement on each corner, leaving a space that makes them easier to be removed and where they have been placed there is no danger of them being damaged.

ILLUSTRATIONS
a) It is a drawing showing the lay-out of inlaying a tile into a wall.
1) Wall. 2) Two tiles. 3) The part of the wall with the tile inlaid. 4) The cement that covers the edge of the tile that is not in the wall. 5) The width of the tile
b) The tiles are framed with the same bricks as the wall but laid-out round the tile to form a frame and are at the level as the bricks.
c) This shows 6 tiles 20×20cm slightly inlayed, half their depth is inside the wall and the other half is protruding. The cement round the outer edge is curved to protect the corners of the tile from being damaged.

THE WAY TO WORK
Make a space in the wall where the tiles are going to be attached, correct in size, width, depth and as flat as possible. It has to be deep enough so half the thickness of the tile is inside the wall and the other half is outside. To attach the tiles first cover the space with cement, as well as the back of each tile before placing it correctly. The tile to start with, is always the one at the bottom left-hand corner, first do the bottom horizontal line and then continue adding all the lines in the same way. When attached, all the way round it there will be a small space. Fill it up with cement and add more round the outer edge of the tiles so the sharp angle of 90º is curved with cement, this protects the edges of the tiles from being damaged.

Click on the title to see more images

Tiles designs of one tile: are separated into two sections –

1) Occupations are one tile designs that illustrate different ways of working.

2) Collections of one tile designs that have several different designs on the same subject that go through a method of working, like making oil or wine.

In the past tiles were illustrative ways of educating the illiterate public.
During the century’s they have been made in many different parts of Spain, hand painted using the Majolica Method. The main places were Talavera, Valencia and Catalonia and they all differed slightly in style depending on where they were made.

A one tiles designs were never signed and the painters had different ways to recognize their work and how birds were painted was one way, with a very fine brush, using a dark color, the birds were painted and each artist had his own style and how they were placed was very important.

The first line of tiles shows three different ways the painters recognized the tiles as theirs, with birds. (a, b & c)

The second line shows three different ways to mix one tile designs and lay them out to form a picture to the size needed. (d, e, & f)

The third line (d) to (g) are with borders and (h) without one and (i) is the reproduction of antique tiles of fruit and vegetables for the decoration of a kitchen and the white tiles are prepared with the same opaque glaze-base the decorated ones.

Click on the title to see more images

Reproduction of tile designs. If you have to reproduce antique tiles that are going to replace one or two broken ones in a large wall design, to get an exact likeness is very difficult because many of the methods of working have change. Lead that was in glazes and colors is now illegal to use, it is dangerous to touch or inhale. The method of firing was with wood now it is electricity or gas and the way of making tiles has changed, most are industrially made but they can still be bought hand made. A potter once did everything, from taking the earth out of the ground to selling his work in the streets.

One of the problems is that many old designs have been copied and printed industrially. The buildings they are in can be 300 years old but the tiles are modern and printed and the person in charge of restoring knows nothing about tiles and informs some poor house owner he cannot change the tiles, he must get reproduction of the same design.

To copy an industrial printed tile is impossible because the firms are interested in printing thousands and your client wants 50 so the only way to do it is with transfers. When printed the designs and color are flat and each one is exactly the same they have not got the individual touch that hand painted work has.

Most of the old tiles were painted with the in-glaze method (Majolica). There are different ways and styles of decorating with this method but the basic way of working does not change. Clay that has been bisque fired is covered by an opaque glaze-base, it is decorated with colors mixed with a transparent glaze and the two are fired together at 980º C. The methods use in the past were mainly, stenciling and hand painting, two different ways of applying colors.

a) Stenciling is to cut out spaces in prepared paper, to form a pattern, it is laid on top of tile and with a large brush the space is cover with a color. The colors are flat and the lines, created by the hair of the brush, can be seen and round the edge of the part stenciled the color is thicker.

b) With hand painting you see the movements of the brush-stroke and the different density of a color and the ones that overlap to form shading and other colors.

If you are in the situation where you have a reproduction of an antique tile, first make sure they are antique. Send us a good photo, its measurements and anything you think might be important.

The following photos show the three different way of reproducing designs – a), b) & c) hand painted tiles. / d), e) & f) stenciling. / g), h) & i) transfers.

Click on the title to see more images

Tiles you can decorate with different methods for decorative or practical purposes . It can be a picture of your choice, numbers, names and repeated tiles that are modern or copies of antique designs. The great advantage of using tiles, if the finished work has been well installed, they can last forever,

Tiles can be framed like a picture or attached to a building. To do these installations correctly it is very important; you must make sure that no space is left between the back of the tile and the wall. If hit, a space will let the force beak it, both method are explained in the following sections of the dictionary; Tiles – attaching them to walls and framing tiles has 3 sections; Mounting, Framing tiles with wood and Framing large pictures.
The possibility for using hand decorated tiles is immense and here are links to the different sections in the dictionary so you can see some of them. Names and Notices. / Numbers. / Repeated tiles. / Tile – Antique. / Tiles – Reproduction of a design. / Borders on tiles. / Borders as a separate tile. / Majolica 12 private orders. ajolica 12 private orders

To have a special order you must send a photo or describe what you want, tell us the size it has to be and you must remember painting by hand is not a photos it is a free interpretation of an illustrative idea painted on to tiles. The following photos are to give you some idea of all the possibilities there are.

ca: ESMALT D'ESTANY

es: ESMALTE DE ESTAÑO

Tin glaze: The white tin glaze-base is a characteristic of Majolica decorating.
The white opaque surface makes the tin-glaze very good for painted decoration, which is applied in the form of metal oxides, usually cobalt oxide for blue, copper oxide for green, iron oxide for brown, manganese dioxide for purple and antimony for yellow.

ca: ESTANY - Óxid

es: ESTAÑO - Óxido

Tin oxide is a mineral which comes from a manipulated process.

It is used in ceramics for the fabrication of glaze. Its function is to opaque substances. At high temperature the proportion of the percentage is higher than at low temperature

ca: TITANI DIÒXID

es: TITANIO DIÓXIDO

The titanium oxide or titanium dioxide, is a mineral from the group of oxides whose formula is TiO2, is usually brown and known as rutile.
Titanium dioxide is widely used as a white pigment because of its great covering power. It is also used to make glazes opaque and matte.
It is virtually used at all temperatures and is a modifier of color glazes. Mixed with a small proportion of white enamel it can form an antique white.
There are other materials used for this such as zirconium.

ca: PINCES - Per esmaltar.

es: PINZAS - Para esmaltar.

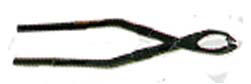
Tongs: are metal instruments used for picking up fired pieces and removing them from the kiln while still hot. They are also made with a much wider opening for holding large plates, pots, lids and other objects when dipping them into a glaze-base or color.
Raku tongs are specially made to be stronger, longer and more resistant to heat. Read more about: Raku tongs

ca: EINES

es: HERRAMIENTAS

Tools are utensils designed for a purpose and each specialty has its own tools. Under each of these headings there is a file with illustrations and the names of each piece. Then in the dictionary under the name, more information can be found on each one. This is to make finding what you are looking for easier. The sections are Read more about: Clay (7) Accessories / Clay (8) Tools / Kiln – Furniture / Brushes – Decorating / Brushes – Practicable

ca: RASPALL DE DENTS

es: CEPILLO DE DIENTES

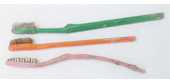
Toothbrush is a small brush with a long handle used for cleaning teeth. When old, hard and cut down they are good for cleaning small places and footings of plates, jars and lids It is very important that the footings are clean so they do not adhere to what they are standing on when being fired.

ca: PAPER VEGETAL

es: PAPEL VEGETAL

Tracing paper in ceramics; is mainly used for copying a design, pictures and letters onto objects that are being decorated, which makes placing and laying them out easier to see, as the paper is transparent. With your computer you can scan and copy what you want, and make it to the size you need removing any unwanted parts, or you can copy the outlines onto transparent paper scanning and preparing them in the same way. Designs and parts of designs can be used in many ways, mixing one with another and with different ceramic methods.

There are different ways of marking on a design: three ways are explained in the following sections. Carbon paper / Marking / Pouncing

All products used are vegetal and burn away when fired. The best way to mark on a design is by pouncing and rubbing it with a bag full of charcoal powder. This dirties the front and the back of the transparent paper and it has to be cleaned. The best way is to lay it out, on a flat surface and rub it with a large soft rubber. If the design is used a lot it should not be kept as a pencil drawing as it will gradually be removed. Print or do the drawing with a marking pen, with a dark color that is permanent.

Read more about: Filing has 5 sections go to File – Drawings there is a list of them all, if you go to the letter “F” they are aferbetical order.

Copied from: Wikipedia/ Tracing_paper
Tracing paper is a type of translucent paper. It is made by immersing uncut and unloaded paper of good quality in sulphuric acid for a few seconds. The acid converts some of the cellulose into an amyloid form having a gelatinous and impermeable character. When the treated paper is thoroughly washed and dried, the resultant product is much stronger than the original paper. Tracing paper is resistant to oil, grease and very impervious to water and gas.

ca: CÀNULAS – Decoració

es: CÀNULAS – Decoración

Trailing is to apply a color, held in a small container, by pushing it down and out through a nozzle to trail in a continuous line. For this a slip trailer, injection tube or a bag for icing cakes can be used. They can be bought with different sized nozzles.

Trailing can be done on to clay or bisque directly or by first covering what is being decorated with a color and then trailing other colors on top, using a slip trailer. The lines of different colors can be broken in irregular ways like feathering, tilting. Trailing can used to fill up spaces, draw outlines and to write.

Read more about: Syringe

ca: TRANSFERIR - En ceràmica.

es: TRANSFERIR - En cerámica.

Click on the title to see more images

Transfer literally means to pass something from one place to another. A transfer in ceramics is a design copied industrially to be reproduced many times. They are printed on specially prepared paper to form a film that can be transferred onto another surface, they can be bought prepared or you can have a design made.

When prepared they are on top of a white piece of paper and covered by tissue paper to protect it. The work needs 3 firings 1) Clay to bisque, 2) The bisque fired with an opaque glaze-base, 3) The transfers onto the fired base. They are made for cups, plates, tiles, etc. and the transfers are fired at between 700º and 800º C.

When not being used, do not leave them piled up on top of each other as the weight can make them stick together. Keep the large pages packed as they came, in a strong, thin, cardboard box that can stand on its side. To keep transfers that have been separated from the tissue paper and will not be used for a long time, it is necessary to apply a little talcum powder over the front side, this stops them from sticking to each other so they can be used whenever needed.

1) The size of the tile is 7.5 × 7.5 cm and it has been fired with a white opaque glaze-base.
2) Clean it with a soft, slightly dampened cloth, this makes it more adhesive and helps to hold the transfer in place.
3) There is a space between each transfer so they can be cutout. Cutout the transfers that are going to be used and remove the tissue paper.
4) Have a small, shallow bowl of clean water and put into it two or three cut-out transfers. Let them soak in it for a few seconds; they will roll up as the water filters down between the transfer and the paper. This starts to separate them, they will flatten out again.
5) Lift one out of the water, holding it by the two top corners and push the transfer up, so it slightly overlaps the white paper.
6) Lay the part of the transfer that is separated onto the tile, so the top two corners of the transfer are placed correctly.
7) Hold them down and pull out the paper from underneath the transfer.
8) Once the paper is removed, if needed correct the layout of the transfer, moving it smoothly.
9) With a soft kidney, spatula or simply a soft rubber, push out all the water that is still in between the transfer and the tile, pass the rubber tool over it, moving the dampness to the borders and off.
10) The last thing to do before finishing is to pass a cotton cloth over it in the direction of the corners to remove any last drops of water left. Any water left between the transfer and the tile can leave a damaged surface after being fired.

Notes: The first illustration is the handpainted tile 15×15 cm, which was decorated especially for making the transfer. The following photos are taken on top of a light brown canvas to give contrast to the white and transparent paper of the transfers. The photos are in the order of working, each has a short explanation.

ca: TRANSLÚCID

es: TRANSLÚCIDO

Translucent is when light can pass through a product but is diffused so what is on the other side is not clearly visible.

ca: TRANSPARENT

es: TRANSPARENTE

Transparent is when a structure allows the rays of light to pass through it so that the bodies on the other side can be seen distinctly; such as glass, glaze, plastic paper, tracing paper, water, etc.

ca: TRANSPARENT - esmalt

es: TRANSPARENTE - Esmalte

Glaze in ceramics works like a varnish for furniture, except it has to be fired. It is made up of finely ground powders which are mixed with water, then laid over ware either in the clay or bisque state. When fired, glaze melts and turns into a transparent, thin, layer of glass that can be brilliant or matte. The natural color of the bisque or clay reflects through the glaze and gives it a strong, attractive quality and makes ceramic work non-absorbent to liquid. This is known as glaze firing.

ca: SAFATA

es: BANDEJA

Tray is flat and shallow with slightly raised edges, made in different shapes, rectangle, square, round and oval and is used for carrying, holding, or displaying articles. It can be made of wood, metal, plastic, etc.

ca: AFINAR

es: AFINAR

Trim is to level out, smooth off, to give the finishing touch to something being made.

ca: TRÍPODE

es: TRÍPODE

The names of the parts of a tripod.
1) Camera screw. 2) Plate. 3) Quick release system. 4) Side-tilt lock. 5) Horizontal motion block. 6) Column. 7) Telescopic leg. 8) Camera platform. 9) Panoramic head. 10) Camera platform lock. 11) Column lock. 12) Column crank. 13) Collet

Tripods are made to hold cameras at different angles and heights. There are hundreds of different makes and types, so get one that is light to carry, easy to fold and strong enough to stay in place when being used.
In ceramics, photographing and filing your work is very important and as glazed ceramic work has a glass surface it cannot be photographed with a flash as this reflects on the object being photographed. You must have a good, strong, steady tripod so the camera is completely static when taking a photo as the slightest movement will spoil it.

ca: CARRO

es: CARRO

Click on the title to see more images

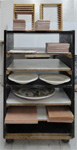
Trolley for a potter consists of shelves with wheels. There are different types, some can be folded, some have selves that can be taken off and moved up and down to accommodate work of all sizes. They are very useful for moving and storing decorated work.
a) A small handmade trolley with removable shelves.
b) A large trolley with shelves made especially to accommodate the size of the work being put and used in the kiln. The work is cleaned and prepared in the last stages of drying before being fired.

ca: SUPORTS TUBULARS

es: SOPORTES TUBULARES

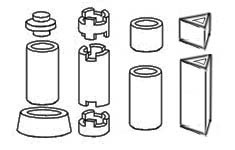
Tube props: are kiln furniture. They are legs used for supporting and building up space between shelves and are made in many different shapes and sizes. The first two from the left are designed so they lock into each other and the last two are straight and have to be well balanced. As the shelf is put on top of them, the weight helps to hold them in place.

ca: TUBS

es: TUBOS

Tube is a hollow cylinder which can be very long. It is used to transfer materials from one place to another, such as water and it is often called a pipe.

If made of glass it can be a test tube or a fluorescent one, if it is metal it can be the exhaust pipe of a car, or for water, etc. It can also be made of cardboard, ceramic or other materials.

Each has its use. Many are sealed at one end and others have a lid opening, which can be removed or replaced; there are tubes for creams, glues, paints etc.

Tubes may be flexible or rigid, for instance a hose to water plants is flexible, while a tube for moving cement and many other products is rigid.
Read more about: Slab rolled tubes

ca: FORN DE TÚNEL

es: HORNO DE TÚNEL

Tunnel kilns are also known as continuous kilns. The ware is put on to bats, the bats are on rollers which turn and slowly move the ware through a long tunnel and as it moves, it goes through the whole process of firing. The heat increases and when the ware reaches the central section it will be at the hottest part, the heat required for that type of ceramics. It goes on moving, but with the temperature gradually reducing until the ware leaves the kiln at room temperature.

ca: SOPERA - Font

es: SOPERA Fuente

Tureen is a large, deep dish usually with a lid, used to serve, hot liquid foods such as stew and soup.

ca: TORN -Eines

es: TORNO - Herramientas

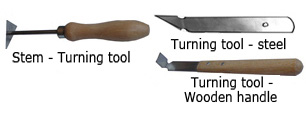
Turning tools: made of steel are strong and have cutting edges that can be sharpened. They are made in four shapes round, square, triangle and leaf. They are mainly for turning but can be used in many other ways such as for carving clay and plaster.

Read more about: Stem turning tool / Turning tools – Steel / Turning tools – Wooden handles

ca: EINES DE TORNEJAR – d’acer

es: HERRAMIENTAS DE TORNEAR – de acero

Turning tools that are steel, strong, with cutting edges that can be sharpened it is made in four shapes round, square triangle and leaf.They are mainly for turning but can be used in many other ways such as carving clay and plaster.

ca: EINES DE TORNEJAR - Mànec de fusta

es: HERRAMIENTAS DE TORNEAR - Mango de madera

Turning tools with wooden handles, the head is flat steel with the top bent outwards and with different shaped points square, round, triangle and leaf. They are mainly for turning but can be used in many other ways such as in carving clay and plaster.

ca: TREMENTINA

es: TREMENTINA

Turpentine is a liquid taken from pine trees and when distilled is made into a resin used for diluting varnish and certain types of paint and can also be applied to some methods of decorating. It must be of a good quality and can usually be bought at chemists’. It is mixed with varnish and colors to decorate in the on-glaze method.