ca:
CENDRA D'OS – Manufactura.
es:
CENIZA DE HUESO – Manufactura.
Bone ash makes up about 50% by weight of the final Bone China body recipe. It is produced from animal bone, which is first processed to remove any adhering meat which is generally sold as pet food. The bone is then treated to remove glue, which is processed and upgraded for use in applications where glue is used, and also for the sizing of expensive paper. The remaining raw bone is then heated to over 1000 C to burn off any residual organic material and change the structure of the bone to a form suitable for the manufacture of bone china. The high temperature used also sterilises the bone. The bone is ground with water to a fine particle size before inclusion in the bone china body.
Real bone ash chemistry
The typical analysis of calcined bone is 67-85% calcium phosphate, 3-10% calcium carbonate, 2-3% magnesium phosphate, and small amounts of CaO and CaF2. However this can vary significantly depending on the source of bones and the process used. The approximate formula is 4Ca3 (P04)2.CaO.
Although raw bone is chemically Ca3 (OH) (PO4)3 hydroxyapatite many authors ignore the hydroxyl group as they believed it is removed on calcination?
Real bone ash chemistry in bone china
On firing as a constituent of a bone china body the bone ash works in a complex manner. The free lime reacts with the stone (type of feldspar mineral) to produce Anorthite (Ca feldspar crystal), whilst the phosphate produces a complex glass and leaving a high level of residual crystal Beta tri-calcium phosphate Ca3 (PO4)2. It is considered that English bone china contains 70% crystals (mix of phosphate and silicate crystals) and 30% glassy material.
Bone ash substitutes
Bone ash and calcium phosphate are both used almost interchangeably in the market although bone ash is a relatively crude product and calcium phosphate relatively pure. The properties of Ca3(PO4)2 and bone ash are however quite different. Bone ash retains its cellular structure even after calcination. Direct substitution of one grade for another is not always easy. For example the replacement of real bone ash by the synthetic bone 1 creates several problems. These include colour, chemistry reformulation and processing issues.
A number of potential substitutes exist for bone ash used in ceramic bodies as follows:-
Tricalcium phosphate-mineral route
Phosphate rock in the form of apatite (Ca5 (PO4)3(OH,F) can be calcined to produce principally tricalcium phosphate Ca3(PO4)2 synthetic bone (1)
Tricalcium phosphate-chemical route
Tri calcium phosphate Ca3(PO4)2 can be produced by a costly chemical route by reaction of phosphoric acid with lime solution.-synthetic bone (2)
Dicalcium phosphate-mineral route
Phosphate rock in the form of apatite (Ca5 (PO4)3(OH, F) can be used to produce Dicalcium phosphates in both the anhydrous and hydrated form. Although chemically similar these are not the same as bone ash but are often marketing as synthetic bone. –synthetic bone 3 and 4
Dicalciumphosphate (CaHPO4.2H2O) and CaHPO4 (anhydrous) are chemicals produced through precipitation from phosphate rock which are demineralised first by
a)sulphuric acid dissolution and then precipitated by CaCO3
b) hydrochloric acid treatment and then precipitated by a saturated lime solution Ca(OH)2.
Dicalcium phosphate-bone route
Processing of animal bone to dicalcium phosphate CaHPO4 (anhydrous) by chemical processing can produce a synthetic bone ash 5 as follows:-
Dicalciumphosphate (CaHPO4.) (anhydrous) is produced through precipitation from degreased bones which are demineralised by hydrochloric acid treatment and precipitated by a saturated lime solution Ca(OH)2.
Author – Ivan Wozniak
Nowadays the product used is synthetic and it is part of the tricalcium phosphate in glazes. It is considered a material for high melting temperature (calcium content) due to its phosphorus content which is glass-forming.
 A Balance is an instrument for determining weight using suspended scales. It consists of a bar with a fulcrum in the center and at each end a scale hook or pan is suspended, one holding the object to be weighed and the other holding an object or weights. When the weight is the same on both sides the point or support falls into place and is shown as a straight line or 90º. The following photos show two types of balance used to weigh different material of different proportions.
 Balance scales. There are now many types designed to weigh automatically and separate weights are no longer required. Shown here is a weighing machine that is a great asset for preparing colors, it weighs products from 0.0g to 1200g. It deducts the weight of the container you use to hold the product you are weighing. Turn it on and put the bowl on top, you will see it weighs 74.4 grams, press the button “tare” and it deducts this weight and goes to 0.0g. Fill up the bowl with a product you are using until you have the exact weight required.
  Ball Mill is used for finely grinding and mixing colors with clay and pigments with glazes. It is a steel horizontal drum supported by legs with a door at the side and a small motor that rotates it at one end. The inside is lined with a strong material and contains loose pebbles or manufactured balls, so when the mill turns the pebbles fall to the bottom of the curve and grind down the materials. The cascading effect reduces the materials to a fine powder and mixes them. Different materials are used for grinding, including ceramic balls, pebbles and flint.
 Bamboo tools. In the photo on the left the tools have sharp points and a great variety of beveled edges with a smooth finish. The photo on the right shows a selection of modeling tools. They are all ideal for hand-building projects as they help get to places that are difficult to reach. The tools are very strong and delicately shaped with a smooth surface due to the inherent qualities of bamboo.
  Band refers to lines of different widths marked around circular pottery utensils, such as plates, jars or lids, so both ends meet exactly. Any method such as painting, drawing, scratching, etc., can be used and it can be done at all stages of production: freshly thrown work, leather dry, bisque, unfired glaze-base, as well as on a glazed surface.
  This section explains how to band and applies to the different ways of working that follow
 Banding with a bridge. To make a bridge put a bar of wood over two supports. When working on a plate or a lid the bridge must be the height of the wheel plus the object being decorated, and for jars it should be the same height as the lines that are to be painted around them. Put the wheel with the plate halfway under the bridge, rest your right hand on the wood to steady it and turn the wheel. Put the jar on the wheel, build the bridge up to the height needed and band round the jar.
 Banding by hand. Hold the neck of the wheel with your left hand and the tool with your right one at the required height and rest your arm against the edge of the table, to steady it. Turn the wheel with the brush touching the pot until the line has gone right round and joins the starting point.
 Bars can be circular, rectangular, square, narrow, of any length and made with different materials; wood, metal, chocolate etc. The following sections show four ways in which they are used and through the links many more are explained.
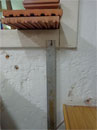


 Base: is the underneath part of an object. In pottery it can be of various shapes, flat, round or pointed. The footing is a protruding ring which the object stands on. It can be made as part of the object when this is being turned on the wheel or added later. If a base is pointed a separate footing in metal or wood has to be made.
 a) Basin; used for washing hands and faces. It is a half-circular bowl made of a ceramic or metal material. They are attached to a wall or table, have taps, a drain and are made to hold water. Also known as hand-basins and if large and used to clean objects are known as sinks.
  Bats are flat, rectangular pieces of wood with a handle and can be with or without indented textures. Used to hit clay to flatten it out and leave textures.
 Beading occurs when a fired glaze does not adhere to the surface to which it is applied. It separates, shrinks and rolls back leaving patches showing the bisque body. It can be seen round the edges, in small individual patches or all over the surface. Before the firing the decorated piece seemed perfect.
  Beaker is a large, straight, high-sided cup used for drinking. It can be with or without a handle and is also known as a mug.
 Bean balance scales are mainly used to weigh small quantities of colors, from 0.01 grams to about 10 grams and are used mainly for weighing colors. It is a measuring instrument that consists of a horizontal lever with arms of equal length called the beam with a weighing pan suspended from each arm. The object to be weighed is placed in one pan and standard weights in the other until the beam is as close to equilibrium as possible, it compares weights using the standard weights for balances.
 To beat is to hit vigorously using your hand or a tool and can apply to mixing a liquid or flattening clay.
.") Electric beaters can be bought and are similar to those used with food, but are expensive. It is more economical to buy the arm designed for mixing liquids which can then be attached and used with an electrical drill; this is shown in the first four photos . They are made in different lengths and head sizes to take into account the depth and density of the liquid. Used for mixing colors, glaze-bases, etc., they are very good when a product has become dry and hard; first cover it with water, leave it for a short period and then beat it.
Electric beaters can be bought and are similar to those used with food, but are expensive. It is more economical to buy the arm designed for mixing liquids which can then be attached and used with an electrical drill; this is shown in the first four photos . They are made in different lengths and head sizes to take into account the depth and density of the liquid. Used for mixing colors, glaze-bases, etc., they are very good when a product has become dry and hard; first cover it with water, leave it for a short period and then beat it.  Beater: It is a metal tool with a long, thin and strong handle and an oval head made of wires. They are used in cooking for beating eggs, etc. Different sizes can be purchased. Very large ones are used for mixing glazes and other liquid products.
  Beaters and bats are different objects used to indent textures into a soft clay surface. The result is similar to impressed decoration but less planned, more spontaneous. It can be done with string, a butter pat, a meat hammer, in fact anything with rough surfaces, onto a prepared clay object or onto a separate piece of clay, which is then luted and attached to another piece. When glazed, the textures reflect the light and this accentuates the uneven surface.
 Beating shapes is to beat clay when it is soft to form or change a shape and to level and thin out work. It is often used on coiling to level it out, forming very thin, strong walls. This is also known as paddling.
 Bevel: It is also known as a Bevel Square and is an adjustable tool for marking out dovetails and joints with angles greater or smaller than 90 degrees.
  Bicolor is the name given to a style of decorating pottery with only two colors, any colors can be used but the most classic are manganese and copper green. The plate on the left is copied from a photo; the original is in the Ceramic Museum of Barcelona. It was painted after 1400 AD in Paterna, a town in Valencia. The plates below are new ones which were decorated using and mixing designs from the past.
 Biscuit cutters are thin metal walls forming many different shapes and are made for cutting pastry to make biscuits. They are used to cut clay in the same way.
 Bisque is the name given to all types of clay which have been fired without a glaze. The lower the temperature of firing, the greater the porosity the piece has as it burns away all carbonaceous matter. The temperature for firing clay into bisque is between 650° C and 1050° C. Refractory can be fired up to 1300° C. The higher the temperature of firing, the less porosity it has and the stronger it becomes but it is still absorbent to liquids. When you use products in the bisque state that have been industrially made or handmade they can vary in porosity so the drying time of a glaze-base can differ.
  Cleaning: before applying the glaze-base to bisque it must be sandpapered, cleaned by brushing.
  Tiles: if a tile is visibly cracked break it by holding it with both hands and forcing it downward. You might not be able to see the crack but even so, if the sound is flat, it is advisable not to use this piece as it could break from the heat of firing. If you are not sure it is broken, put it at the bottom of the kiln during firing so that if it breaks there is nothing underneath it can fall on and damage. Use it for a one tile design, the replacement of one tile in a large design is too complicated to risk.
 Bisque dampened: if you are decorating hand-made bisque objects made from red clay, dampen them before applying the glaze-base. I always do this but it is not absolutely necessary; it helps eliminate air holes and makes the base run on more cleanly and smoothly. Quickly dip the bisque into clean water so every part gets covered, take it out and let it sit for a short while before applying the glaze-base. Only dampen handmade objects in red clay, not white or industrially-made ware.
 Bits in pottery are small pieces of bisque made with different types of clay in different shapes and sizes that can be hand or industrially made as shown in “a”, “b” and “c”. They are to support, heighten and balance objects when packing kilns. When not being used in firing, they can be made with any material. In screen printing, playing cards, “f”, are used to heighten a screen to a very fine degree.
  Black is a complete color. You cannot have a light black as it would be gray. Originally black was not used in the “Majolica” method, instead a color which looks like black was made up of other dark colors; brown, blue and red. Manganese, which is a very dark brown, was and is used for dark outlines. Black does not have the problems of manganese but it gives a hard, modern, industrial finish and is good when a powerful impact is needed as shown in the following photo of
  Blistering.") Blistering is caused by gases escaping during firing which cause faults in the process. Many things can cause blistering, over firing, too thick a coating of glaze or a color, inadequately dried clay.
Blistering is caused by gases escaping during firing which cause faults in the process. Many things can cause blistering, over firing, too thick a coating of glaze or a color, inadequately dried clay.  Blue was one of the first colors used in glazes, blue cobalt oxide has been found in Egyptian and Persian pottery. In Spain, where the Majolica ceramic method began in Europe, blue was one of the first colors and it was used in many different shades as can be seen on plates, jars, floors and wall tiles.
  Blunger is a mechanical container with electrically rotating arms or paddles, made to mix certain products with water such as slip. Slip must be well mixed so the water penetrates between all particles. These machines are produced in many different types and sizes for industrial use and for the small potter.
  Boards for mold walls: they are bars of wood of different widths held together with clay and used to build up the outer walls to make molds.
  Boards – Ware boards are wooden, can be of any size and are used for carrying tiles, plates, pots and lids. When made for tiles, they should be about 10 cm wide so that the tiles can overlap them on each side, high enough to enable you to slip your fingers underneath to pick up the tile without touching the decoration and long enough to hold five or six units. They are used to move work from one place to another while the base is drying or decorated. Ensure that the boards are the correct length to slide into shelf stands.
 Boards for molding: are large, rectangular wooden boards used to prepare clay. You should have two or three of the same size because if the clay has been rolled out and is very damp, the board that is dry can be put on top of the clay then turned like a sandwich and the top damp one taken off, thus quickening the drying process.
  Borders shown in relief: If a large quantity has to be made, it is better to use a mold. The following is just to give you an idea for a quick and simple solution. Remember the mold must be bigger than the finished work, to allow for the shrinking of clay during drying and firing.
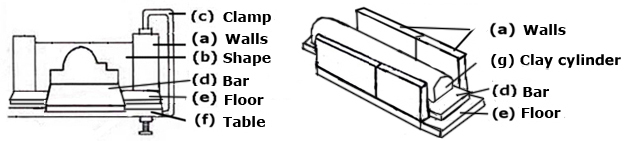
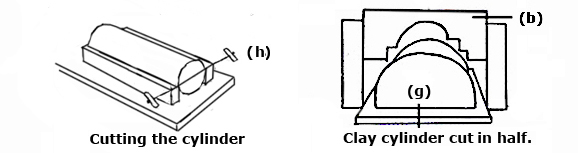

 Plate borders; borders are spaces that go round the outer edge of an object. With plates, the word border is used when describing a design or part of its structure. In the structure of plates the border is at a higher level than the center and can be any size, straight or slanted.

 Borders of plates: the six photos show a few of the many possibilities there are for using borders. They can be with banding lines of different widths and colors and with designs that are repeated or separate. There are so many, the same one can also be in different sizes depending on the size of the plates you decorate and as they are all on transparent paper and pounced, this makes recognizing them difficult. You must file each one with a colored photo and the best way to do this is explained in “filing borders”. These plates are decorated using the Majolica method and in the section “plates” the whole method of working is explained.
  The following photos show border designs as part of the tile.
  Border tiles are usually a repeated pattern of separated tiles that are laid horizontally and vertically round a design to form a frame. These can be any size but normally measure half a tile in width and a corner is usually half a border. Not all sizes can be purchased so they have to be cut down from tiles double their size. In Europe they are used in interior decoration: bathrooms, doors etc., and for framing tile pictures and mirrors. In the sections the
  Borders: If you want to buy borders to go with your choice of one tiles designs, it is very important, before making an order to work out how they are going to be laid out, because the same amount of one tile designs which are laid out differently, change the amount of borders that are needed.
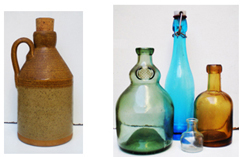 Bottle: We think of “bottle” as a glass object but you can also have a ceramic bottle. To be classified as a bottle it must have a narrow neck designed to control the volume of liquid as it is emptied. It can be any shape or size.
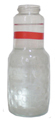 A bottle for containing water used to add to colors, should be of colorless glass, so you can see the water is clean and there is enough. It should also have narrow neck to prevent it for being used to clean brushes.
 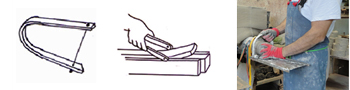 Bow – Cutter: has this name because it is of the same shape as a bow used by an archer. They are made in metal of different sizes and have a strong wire between both ends, used for slicing off pieces of clay.
 Bowl is a round vessel with sides to hold liquid; it is always open and can be of any size. There are hundreds of shapes, always round but differing in size and used for different purposes. As the photos are not to scale, the diameter and height of each bowl is given. Many bowls such as a salad bowl, fruit bowl, soup bowl, pastry bowl are in everyday use.
 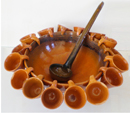 The photos show two bowls for making a “Cremat” which is a very enjoyable Catalan custom and very useful when a party starts to get boring. The bowls always have legs and are sold with cups and a deep serving ladle. The second photo shows cups without handles and with legs and the third and fourth show the opposite, cups without legs with handles that can be hung round the edge of the bowl.
  Bowl is a round vessel with a deep base. It can be of any size and the wall can curve inwards, outwards or be straight. It is one of the most popular and important pieces of pottery, made for decorative and practical purposes.
 Boxes for dirty glazes: This system avoids mixing one glaze-base with another. Use three boxes, each one of a different color, the same color as its corresponding glaze container, so you know which is which. They measure about 30×25cms and are used to keep all the dirty glaze of each type that has been brushed and scraped off prepared pieces. Dirty glazes can have water added, be cleaned by passing them through a sieve and put back into the container to be used again.
  Boxing is packing bowls, cups and jars rim-to-rim and foot-to-foot while drying and when being bisque fired. This can be done when they are cheese-hard. It helps to stop warping while the clay is drying, as it slows down the process.
 Boxwood tools are made in many different shapes and sizes to work with clay. The name comes from a tree which was given the name “Box tree” when it started to be used to make boxes.

 To lengthen the brush hair: if the hairs of a brush get very short and you want to continue using it, you can make them longer in the following way. With a match, heat the ferrule, the metal band which holds the hairs. When it gets hot, the glue inside will melt and become a molten liquid, then use pliers to pull out the hair slightly. Read more about:
 a) Flat brush; b) Sumie; c) Fan brush; d) Pointed brush. Paint Brushes.
 Brushes for decorating pottery are made with many different types of hair and fibers.

 Bung is the name for the way of setting up saggars vertically, one on top of the other, in the kiln.
  Burning out occurs when a substance in a product being fired has a lower burning point than what it is being fired with and burns away. This can be damaging or used constructively.
 Burnishing is to rub the surface of leather-hard clay with a smooth tool to produce a smooth, polished surface. The finer the texture of the clay the more polished the surface can be. The color will depend on the color of the clay. For burnishing, any curved tools can be used such as teaspoons, stone, etc., and the work can then be decorated with slip.