BORDERS (4) Plates Designing.
ca: SANEFES (4) Desseny de Plats
es: CENEFAS (4) Diseño de Platos.
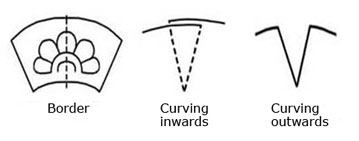
The center circumference of the border is narrower than the outer circumference. This must be taken into account by making the design narrower at the inner edge; both lines must follow the curve of the plate. Cut a piece of transparent paper so it is the same shape as the part it has to cover. Mark on the design and the center line and pounce the basic outlines. With any plate, jar, or lid that curves, either inwards or outwards, the transparent paper must be darted or cut so the size can be decreased or increased by overlapping or separating; this helps the paper to fit round the curves.

The plate has been prepared and marked with a pencil line in the following places
a) The top center on the front of the plate is marked. This help you to remember to paint the design the right way up.
b) The banding lines.
c) The border spacing.
You must calculate and make your design so it fits into the border height-wise as many times as it will be repeated, and it fits in exactly.
Here I am going to explain one design used eight times. Mark on the border with vegetable-ash starting at the top; turn the wheel so the center top is near to you. By marking here, you avoid working over the plate and damaging it.
Lay the transparent paper so its center coincides with the line on the plate and it is between the first two banded pencil lines. Mark the first design; turn the wheel and mark the one opposite, next mark the two at 90° on the right and the left then continue filling in the spaces between each one.
If the plates you are working with are made from molds there is no trouble fitting in the designs, but if made by hand you may have to adjust to size and spacing, as they are never exactly the same.
Read more about: Majolica: 5e – Preparing to paint plates and Majolica: 5f – Twelve plates painted
The next section; Borders (5) Plates spacing designs.
