MAJOLICA: 5e - Plates preparing to paint.
ca: MAJÒLICA: 5e – Plats preparació per pintar-los
es: MAYÓLICA: 5e – Platos preparación para pintarlos
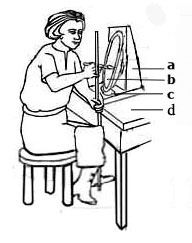 a) Plate stand`
b) Plate
c) Foam rubber
d) Table shelf
THE LAYOUT FOR PLATES
There are hundreds of plate designs that can be used; here I am referring to the ones in this section. When painting plates, you stand while banding them and use a banding-bar and when you paint them you sit and use a hand pole. While working attach a banding bar to the edge of the table, put the plate on the banding wheel and center it.
Turn the wheel with your left hand, hold the bar the little finger of your right one hold the bar with your little finger and between your thumb and index finger hold a soft lead pencil, just touching the plate, so that on turning the wheel it draws a line. This design needs three lines. Work out the correct spacing for the border that falls between the first two lines. There are two designs and each one is repeated 6 times, mark the 12 spaces with a pencil line. With a marking bag first mark the center design, then the borders.
STARTING TO PAINT
Center the plate on the wheel, place it correctly near the banding-bar and in the same way as you drew the banding lines, paint the three lines needed for the design. On your table shelf you must have a plate stand or a solid object to put the plate the right way up at about 80º, so you can balance it against a stand and on top of a bit of foam rubber to avoid damaging it and to stop it from slipping. First paint all the outlines then the center with colors, using a hand pole to steady your hand. It is easier to paint the border the right way up, holding the plate with one finger on each side and turning it. When finished put it back on the wheel, center it, and repair the edge with the glaze-base and if the design has a line round the edge of the plate, paint it. This part is always the last to be painted. Move it to where you keep it and lift it up by putting your fingers underneath. You can touch the glaze-base but not any part that has been painted.
Plates and designs for plates can vary in many different ways; in structure, size and shape and can be of one design or with a center, border and banding. In the section Borders (3) Plate structure there are two completely different designs (c) and (d) on the same type of plate.
Keep all your drawings for plates and file them in two sections, one for the centers and one for the borders; they can be used together and also on jars.
The following sections are in the order of working with plates. Read more about: Bisque (4) Sounding plates, jars and lids / Bisque (5) Cleaning plates, jar and lids / Glaze-base (g) Applying by dipping plates, jar and lids / Glaze-base (h) Cleaning the glaze-base on plates, jars and lids. / Borders (3) Plate structure / Borders (4) Plates Designing / Borders (5) Plate spacing designs / Borders (6) Plate Painting
The next section; Majolica: 5f – Twelve plates painted
Click on the image to enlarge it
 The plate finished, painted and fired.")
 The drawing that classifies the different sections of the design.")

 Design marked on with charcol powder.")
 Banding lines painted")
 The outlines painted")
 The first colors.")
 Second colors.")
 The plate fired with a list of colors")
