GLAZE-BASE (f) Cleaning it off tiles
ca: ESMALT-BASE (f) Neteja de rajoles
es: ESMALTE-BASE (f) Limpieza de azulejos
Cleaning tiles
When the glaze-base is dry enough to clean, you can stack the tiles in pairs, face-to-face and then back-to-back. If they are not dry enough, they will stick together and be unusable when separated. Place about ten pairs in a stack and then begin to clean the edges and backs of the tiles. The less you touch the glaze-base, the better. Your hands are naturally oily, and oil is incompatible with the glaze. As you work, move the tiles from one side of the table to the other. Start the cleaning process with the tiles stacked on your right. When the sides have been cleaned, move the tiles to your left and when the backs have been cleaned, on your right, then when dusted and finished back to your left.
Remember: All the glaze-base taken off can be cleaned and used again
To clean off the glaze-base you must have several scrubbing brushes with natural bristles and wooden frames. The more you use them, the more the bristles wear out, the stronger they become and the better they work, so keep them at varying stages of wear. The worn out ones are good to clean the back of tiles, on which there is a lot of thick glaze. This is a difficult part to clean because the tiles are manufactured with protruding designs or trademarks which collect and hold the glaze-base. To finish the cleaning, use a brush with long hair, to take off the last of the white dust.

Working Method
a) Cover a table with a large piece of plastic Have several wide bars of wood on each side to put the tiles on during the stages of cleaning.
b) Put pairs of tiles, with glazed sides facing each other, in stacks of about ten on your right, on top of the wooden bars.
c) Clean the tile edges, then move them to the left.
d) Have a small rigid container, about 13cm high to put the tiles on when brushing the backs. Clean the backs move to the right.
e) Dust and repair, move to the left.
Cleaning the sides.
When one side is done, turn the pile and clean the next side, until all four sides have been cleaned. The three ways outlined below to clean the tile edges are in my order of preference.
Note: With the first two methods, when you lift and turn the tiles around, to clean the sides, clean off the glaze that has fallen onto the board you are working on, so it cannot dirty the parts that are already clean. Loose glaze can be forced up between the tiles and damage the glaze-base.
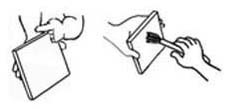
 Cleaning with your fingers.
Hold several pairs of tiles sideways on top of a bar of wood and run your index finger along the edges, lengthwise, to push off the glaze, turn and clean all four sides. In the past, old leather gloves were used for this. The last three fingers and thumb were cut off the glove; then, the first finger and the rest of the glove were used as protection. To do this use a plastic glove but if you find it awkward to work with, just cut off one glove finger and use it to cover your first finger.
 Cleaning with a scraper.
Holding several pairs of tiles, edges up, on top of a bar, use a plastic scraper to scrape the glaze-base from the edges, moving it lengthwise.
 Cleaning with a brush.
Strong brushes are needed and before starting to clean the edges, make sure the sides of the tiles are even. To check this, hold several pairs of tiles together tightly and stand them on their sides or pile them on top of the rigid container, where they are going to be cleaned. Then hold the flat back of your brush against one side and with your hand on the other side, flatten them out.
Hold them down with one hand and, with the other hand, use the end of the back of the brush, to scrape off the glaze, moving lengthwise along the sides of the tiles.
Then, brush the sides using a downward movement until they are clean.
Remember, when brushing the sides; always brush down the edges, not lengthwise, because the bristles ban go between the tiles, scratch and damage the glaze
 Cleaning the backs.
Once all the sides are cleaned, clean the backs. Pick up the pairs of tiles and put them on top of the container. With your most worn-out brush, which is the strongest, clean the backs of tiles, brushing the glaze off and outwards, the cleaner the better. Turn the tiles so the edge of each side is brushed outwards. Make sure that the edge of the underneath tile does not protrude, as the bristles could overlap and damage its glaze-base. If they are not clean enough, brush them again with a longer-haired brush, then pile them up on top of a clean bar of wood.
 Finishing the cleaning.
Pick up the tiles, one by one, holding them by the edges. Slant the tiles downward and tap on the top edge to knock off any loose glaze. If there is still some left, clean it off with a large, soft, dry brush. Gently rub any small holes with your finger. If a tile is badly damaged, put it aside so you can later repair all the damaged ones together. Lay the finished ones out on the shelves to dry.
Warning: Industrial tiles used to be very good to use but the manufacturing methods have changed and with this many new problems have appeared, most of them during the process of the glaze-base drying. They are now made lighter, thinner and stronger and something in them reacts against the glaze-base. Before, when the base was put on and cleaned, you could stack them one on top of the other, face-to-face and leave them for months. Now you can not do this as the glaze-base forms a rash, which is like hundreds of very hard, fine bits of sand and makes them unusable. Now you must lay them out, individually, on their backs to dry. There is a photo in the dictionary showing our corridor, with many movable shelves, full of tiles left to dry. When dry, after two or three days they can be piled up face to face.
Note: The cause of this problem is that modern bisque is so strong, when the tiles are stacked, that the glaze retains its dampness as it cannot escape. For certain clients we buy handmade or semi handmade tiles and these do not react in this way, but they are thicker and this makes everything more expensive, so we only use them when they are especially requested and the client is willing to accept the price. Here I have not explained these problems and their remedies as I am assuming and hope the readers can still buy good quality tiles.
Read more about: Tile – Problems
To see the next video; Glaze-base (f) video – Stage 2 Tiles: Putting on the glaze-base.
