TILES - Attaching tiles to walls (IN CONSTRUCTION)
ca: RAJOLES – Posant rajoles sobre parets (EN CONSTRUCCIÒ)
es: AZULEJOS – Poniendo azulejos sobre paredes (EN CONSTRUCCIÓN)
TWO BASIC WAYS OF ATTACHING TILE TO WALLS
 1) When tiles are decorated to be used in public places and attached to a wall that is outside, every inch it covers must have cement, so there are no spaces left between them. If a space is left and they are hit by strong article, like a ball or a ladder, they will break where the tiles have no support. Some have been placed on a building many years ago and they are very difficult to remove, nearly impossible, because the cement they have been attached with is so strong, when being separated they break.
2) In interior rooms such, as bathrooms and kitchens, tiles are attached with cement on each corner, leaving a space that makes them easier to be removed and where they have been placed there is no danger of them being damaged.
ILLUSTRATIONS
a) It is a drawing showing the lay-out of inlaying a tile into a wall.
1) Wall. 2) Two tiles. 3) The part of the wall with the tile inlaid. 4) The cement that covers the edge of the tile that is not in the wall. 5) The width of the tile
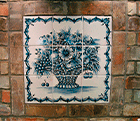
b) The tiles are framed with the same bricks as the wall but laid-out round the tile to form a frame and are at the level as the bricks.
c) This shows 6 tiles 20×20cm slightly inlayed, half their depth is inside the wall and the other half is protruding. The cement round the outer edge is curved to protect the corners of the tile from being damaged.
THE WAY TO WORK
Make a space in the wall where the tiles are going to be attached, correct in size, width, depth and as flat as possible. It has to be deep enough so half the thickness of the tile is inside the wall and the other half is outside. To attach the tiles first cover the space with cement, as well as the back of each tile before placing it correctly. The tile to start with, is always the one at the bottom left-hand corner, first do the bottom horizontal line and then continue adding all the lines in the same way. When attached, all the way round it there will be a small space. Fill it up with cement and add more round the outer edge of the tiles so the sharp angle of 90º is curved with cement, this protects the edges of the tiles from being damaged.
Click on the image to enlarge it
 It is a drawing showing the lay-out of how to inlay a tile into a wall.")
 It has the same bricks as the wall but laid-out to form a frame for the tiles which are at the same level as the bricks.")
 The tiles are laid into a wall and protrude slightly, the edge is filled is fill up with cerement to protect the tiles.")
