TILE - Cutter electric
ca: RAJOLA - Tallador elèctric
es: AZULEJO - Cortador eléctrico
 Tile – Electric tile cutter
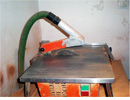
There are many electrical machines to cut and file tiles, but unfortunately they are all designed for builders, not for potters. They throw out dirty water and wet grains of bisque while cutting. I have had my electric cutter altered so it can be used with my industrial vacuum cleaner, so my walls and floors are kept clean. The basic principle is to alter the cutter so two exhaust pipes can be attached to the vacuum cleaner. In this way the powder thrown off while cutting is absorbed into the bag of the vacuum cleaner and water does not have to be used.
Electrical cutters are designed to cut a tile to a measurement but not in half and a border for a potter has to measure exactly half a tile. On a cutter the size is calculated from the right hand side of the blade to the right hand side of the tile which is going to be cut. The width of the blade is ⅛ cm and this is eaten away by the cutting, leaving the left half of the tile smaller. You have to calculate the exact placing of the tiles in the machine so it cuts through the center, eating the same amount off each side. If you use the machine a lot for certain sizes, mark a line on its floor with indelible ink where the tiles should be placed.
In the photos you can see the bar, like a step, that supports and holds the tile in place. This step slants the cutting slightly so we lay the tile on the floor but against the step, not the wall of the step.
Working Sequence
Measure and mark the center of the first tile with a pencil line. Place the tile so the disk falls exactly in the center of the tile, on the line. Fix the metal wall that holds the tile in place. Tighten the screws that keep it in place and make sure it is straight. Turn on the cutter, cut halfway through the tile. Lift up the tile; turn it upside down, so the back of the tile is facing upwards and the same edge is against the bar. Cut until you reach the first cut and they separate. Lay the two borders on a flat surface and check, by putting each side together, that they are exactly the same height. For the corners do the same, cutting a border in half. To file the rough edges, turn on the cutter and file the sides, lay them flat and push them backwards and forwards against the disk to leave a smooth finish. Hold the border at 45º so the top front corner, that has been cut, just touches the disk and very gently rounds it off. Read more about: Vacuum Cleaner
Click on the image to enlarge it
 Shows the connection between the vacuum cleaner and tile cutter.")
 The two tubes that connect the vacuum cleaner.")
 The vacuum cleaner next to and attached to the tile cutter.")
 The metal tube that has been attached to the tile cutter.")
 The tube that connects the vacuum cleaner to the tile cutter.")
 The center line drawn on to the tile and placed correctly for cutting.")
 The first half of the tile cut.")
 The tile turned over length wise, with the same side against the metal bar to cut.")
 The tile cut.")
 Filing the edge that has been cut.")
 Filing the top corner of the border.")
 The tile cut to be two borders.")
