STENCIL: (3a) Preparing the paper
ca: PLANTILLES- TREPES: (3a) Preparant el paper
es: PLANTILLAS - TREPAS: (3a) Preparación del papel
 Stencils are made with paper that has been prepares by covering it with wax. The number of paper pages needed for each tile depends on the design. Each one has different parts cut out and they are placed one by one on top of the tile and painted. The colors go through the cut out parts and mark-on the design. Normally deckle-edge paper is used.
(a) Work out how many pages are needed to reproduce the design you want, when prepared they can be used as many time as required.
(b) Now-days you can use your computer to copy, scan, remove all the colors so only the outlines are kept and make it to the correct size, this tile is 20×20cm and it has to be printed six times.
(c, d, e) It has been printed six times onto deckle-edged papers. Put each one on top of a cutting board and with a cutter with a very sharp, pointed blade, cut out the parts in relation to the colors they have to be printed with. It is important to mark exactly the outlines of the corners of the tiles so the different stencils can be placed correctly.
(f, g) Have a metal pan just for the wax, that can be heated up; here we use bits of paraffin candles that dissolve quickly.
(h) To know when the wax is at the correct heat, paint a corner of the deckle-edged paper, if it becomes transparent the fusion of the wax is correct.
Note: if the wax is too cold the part will not be transparent and if is too hot you will notice the brush does not run well.
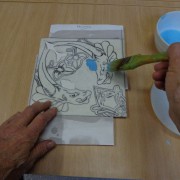
(I, j, k, l) On top of a piece of newspaper put a stencil and with a brush that is flat and smooth, paint it with wax, including the cut out parts. The photo shows how the deckle-edge paper becomes transparent on contacting the wax. It dries quickly and then it can be separated from the newspaper.
Note: Do not leave the brush to dry with the wax, it will become very hard. Put it into a special dissolvent known as Perchlorethylene and leave it to soak.
(m, n, o, p) The cut out spaces have been blocked with wax, remove it all with great care using the cutter and a dry brush. The spaces must be perfectly cleaned as the colors have to be applied over them.
(q, r, s, t) The stencil on the right shows the outlines of the tile traced, so it coincides exactly with the size of the tile on the left. Place the stencil on top of the tile and start to paint, the colors are applied so they are smooth.
(u, v) The flowering colors are applied using the different stencils already prepared.
(w, x) When all the colors have been applied, to finish the tile the outlines must be painted. Mark them on with carbon powder using the pounced design and then paint it in black with a fine pointed brush.
Note: Stencil has 6 sections, to go to the next click on Stencil (4) and if you go to the letter “S” you can see them all together.


