STENCIL: (4) With one color
ca: PLANTILLA: (4) Amb un color.
es: PLANTILLA: (4) Con un color.
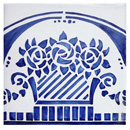 The photos show nine stages of stenciling one tile, 20×20cm with one only color.
The design is cut out in transparent filing paper. It is laid on top of a gray material so the design can be seen, as in the photo. The tile that has been prepared with opaque glaze-base is laid down and on each side of it a bisque tile is laid. These are to help to keep the plastic paper at the same level as the prepared tile to stop it from bending, which would distort the design.
The paper is laid onto the tile and weighed down with bits. Mix the paint you are going to use so it all has the same thickness you require. Use a large brush to paint, dip it into the color and move it so the paint is well absorbed into the hair, as you take it out press it against the inside neck of the pot to take off the excess color and to flatten out the brush hair. Pull the brush over the stencil, painting the spaces that have been cut out,, holding it in place with you left hand if needed. Lift up the stencil and you have your decorated tile. The paint on the plastic dries very quickly, it can be brushed off and you can start again straight away.
Note: Stencil has 6 sections, to go to the next click on Stencil (5) and if you go to the letter “S” you can see them all together.
Click on the image to enlarge it
 The design is cut out and put on top of a gray material so it can be seen in the photo.")
 The tile prepared with a bisque tile on each side.")
 The design laid on the tile and weighed down with bits.")
 The tile starting to be painted.")
 The tile being painted.")
 The tile painted.")
 The painting finished")
 Close up of the painted tile.")
 The tile fired.")
