STENCILING: (5) With many colors
ca: PLANTILLA: (5) Amb diversos colors
es: PLANTILLA: (5) Con varios colores
 Stenciling with many colors. The following tiles were made in about 1910; they are the bottom half of a wall in a long passage. To repair it many tiles had to be reproduced, the first photo shows the work finished.
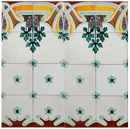
These tiles were reproduced about 20 years ago and the methods have changed slightly and in the section Stenciling 3a explains how we now prepare the paper and the design. a) Shows 16 tiles, 20 × 20 cm, there are 4 different designs. The top one and the second down, A1 and B1, are the same as the ones next to them, but in reverse, and C1 and D1 are repeated. Stenciling can always be recognized as the colors are flat and show the strokes left by the brush.
Correctly placing several stencils for one design: When working with a complicated design that has many different stencils, it is very important to place the stencils correctly, one on top of the other. With tiles the corners can be used as a guide.
This tile was made before scanners were invented. Photos and photocopies were used to reproduce them. The following is to give you an idea of how it was done and the work involved.
1) This is to show how the design is repeated; there are 4 tiles laid out 4 times, in all 16 tiles.
2) The tracing of the original tile is on transparent paper and pounced; enlarge it to see how closely it is pounced.
3) In this design the colors are stenciled and the outlines are the white of the glaze-based. Work out how many stencils are needed; each color has to have one or more, this tile needs seven.
4) The paper has been prepared with wax and cut to cover the tile with two corners that fit exactly; this is for placing it correctly, the other sides can overlap.
5) The tile has seven colors; the red of the flowers is painted by hand. Seven stencils are needed, the light blue needs two.
6) The pounced outlines of each stencil were marked on to the prepared paper with carbon powder, these were then drawn with a pencil and when finished the powder was brushed off.
7) To cut out the shapes, two or three layers of newspaper were laid out as flat as possible, a section of the design was laid on top and with a very sharp and fine cutting knife the spaces for each color were cut out. The layers of newspapers allowed the knife to sink right through and move so the cutting was smooth.
8) Prepare enough of each color to paint all the tiles. Keep them in basins wide enough for the large brush that is used.
9) Lay out four or five tiles and place the first stencil correctly. Dip the paint brush into the color, on the side of the basin push the brush to remove excess color. Pull the brush over the space, always moving it in the same direction so the lines are continuous and are straight.
10) Remove the stencil and paint the other tiles. As soon as the paper gets too damp to use put it between pages of newpaper and leave it to dry then dust off the color and use it again. While drying mark on the next color and continue doing this until all the colors in the five tiles are finished. Put them in a crank and start on the next five, the paper should be dry.
There are 7 stencils
a) Green, b) Dark green, c) Light green d) Light green e) Red-brown f) Yellow g) brown (The red and light blue of the flowers is painted by hand.) Read more about: Repeated tiles
Note: Stencil has 6 sections, this is the last, to go to the first click on Stencil (1) and if you go to the letter “S” you can see them all together.
Click on the image to enlarge it
 A design with 4 different tiles, repeated 4 times")
 The main design A1 and A2, drawn and pounced")
 A close-up of b), which measures 4cms")
 The tile finished and fired")
 The 7 sections in relation to the finished tile")
 Light blue first section")
