GLAZE-BASE (o) Textures with colors
ca: ESMALT-BASE (o) Textures amb colors
es: ESMALTE-BASE (o) Texturas con colores
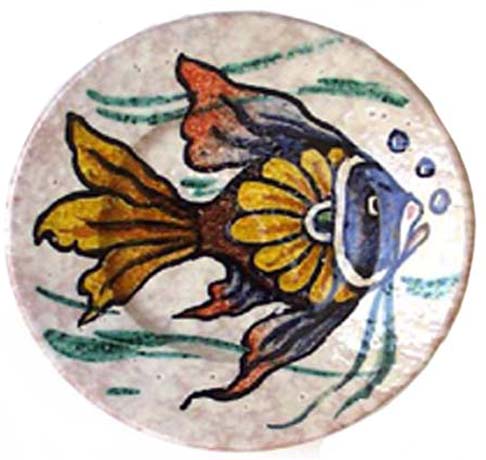
 The next five designs have had the glaze-base shaken on to them, as previously explained. The photos are to show different effects made by applying colors, in different ways, on to textures.
The method of working:
1) The plates are dipped into a thin glaze-base and it is poured over the tiles.
2) The tiles and plates are then spattered with a thick glaze base using a palm-brush or something similar, to form the texture you want.
3) For “a” & “b” the tiles are laid on to a board and the board is put on to a wheel so it can be turned. The shape of the design is cut out of paper and laid on top of the tiles and weighed down, it is then sprayed with the color. Hold the spray at the side, at the height of the tiles. Spray the top part lightly so as to give the idea of sky and let it thicken as it gets to the bottom, to give the idea of ground. Do not spray it straight on top as it would even out the color, losing the contrast of textures and uneven colors that are accentuated by the surface. This can be seen very clearly in the first two photos. Take the paper off, mark on the outerlines of the design and paint them. Clean off any of the color left and level off any parts inside the outlines if needed, then mark on the whole design and paint it.
4) Plate; mark on the design and paint it. Then with a large soft brush, using green copper, paint the background.
5) The rooster is done the same way as in 4 but for the yellow background use a thick color with a very soft brush so as not to flatten the texture.
6) This plate is done in the same way as in 4 & 5 but the background is not painted so when fired the color of the red bisque accentuates the different textures of the base.
Click on the image to enlarge it