MAJOLICA: 5i - Painting lids
ca: MAJÒLICA: 5i – Pintada tapes
es: MAYÓLICA: 5i - Pintando tapas
PAINTING LIDS: First lid
To see a close-up of the two lids in this section; click on the title. To see more photos of lids, go to: Majolica: 5j – Lids – to see 12 different ones.
Working process of the first lid:
1) Put the lid on top of a tile on the wheel and center it.
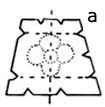
2) Turn the wheel and with a soft lead pencil draw the banding lines, then mark the four vertical lines to make four sections of the same size.
3) Round the lid paint two wide lines with watered down blue that will be under the main design, leaving a space between them and the penciled banding lines.
4) The only part of the design that has been drawn and pounced to mark is the flower. Place the center of it on top of the vertical pencil lines and mark it with charcoal powder.
5) Mark the design nearest you, then turn the wheel and mark the opposite, then the ones at the side.
6) Next, paint the knob and the banding lines.
7) Paint the flowers following the charcoal powder lines, then add all the rest of the decoration by hand.
8) The lid painted and fired.
PAINTING LIDS: Second lid

1) Place the lid on the wheel as explained.
2) On the lid’s circumference, mark the correct measurements on the lid’s circumference of all the 4 vertical lines, equally spaced, with a pencil. This is where the center of the small arch will fall.
3) Draw the outlines of the design and the horizontal and vertical lines onto tracing paper so as to make the placing easy. Remember that lids bend, so the design must be narrow at the top and the tracing paper must be darted.
4) Mark the design on with charcoal powder, making sure that the vertical lines drawn onto the tracing paper coincide with the ones on the lid.
5) To paint the band use three colors, starting at the top; blue, blue, yellow, ochre, blue, blue and the last one round the edge blue. Usually the yellow is painted and then the ochre put on top.
6) Dark blue – Use it for the four sections of the blue flowers, mark the inside edge with a blue line, then paint the vertical lines with a thick brush, starting at the top and center and making the strokes narrower as they go down.
7) Dark brown – paint the line of the arches between the blue flowers.
8) Ochre – Paint the spot at the top of the blue flowers and its center and a flower in the middle of the arch.
9) Red – Use it for the spots in the center of the flowers and the three petals between the blue flowers.
10) Brown-red – the spots in the center of the red and ochre.
11) Green – 3 green strokes on each side of the petal.
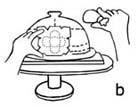
PACKING LIDS INTO THE KILN
 Once the lid has been decorated, it has to be moved to be put into the kiln. This is difficult to do without touching the colors, especially if the knob and edge are painted. Some lids are designed so that the flange is high enough to put your fingers under the lip, which enables you to pick it up. If picked up by the knob, the glaze might have to be repaired once it has been put into the kiln. If it has been decorated on top of a tile that is bisque, it can be moved using the tile like a tray and put into the kiln as a shelf, this is why it is called a tile-shelf. To do this, you must be quite sure that there was no glaze on the part of the flange touching the tile.
Once decorated, move and touch as the lids as little as possible and take great care when putting them into the kiln. It is easier to build up the first floors in the kiln with small objects, leaving enough space on the top shelf for large objects like jars so they can be put in directly without the need for props and other furniture. This is when you realize that kilns that open at the top are much more practical as the placing of all the pieces can be seen so they do not touch each other and every centimeter of space is saved.
The next section; Majolica: 5j – Twelve photos of painted lids
Click on the image to enlarge it
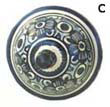
 Detail of a decorated lid.")
 Detail of a decorated lid.")
