BORDERS (2) In relief, how to make a mold.
ca: SANEFES (2) En relleu, com fer un motlle.
es: CENEFAS (2) En relieve,como hacer un molde.
The following shows you how to make and use a simple mold.
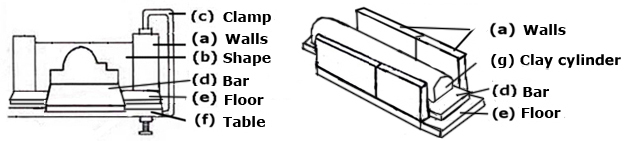
Shape b): a thin, strong piece of wood cut to the size needed with the shape of the border cut out. There must be sufficient wood at the sides and top and it should be strong enough for the clay to be scraped off.
Width: b) plus the two side walls a).
Length: it can be any length but is usually made to cut three borders.
Walls a): two pairs, the first should be the exact length of the border being made. They must be high enough to hold b) while scraping off the clay and must be wide enough for a metal clamp c) to hold them in place on top of the table f). The second pair should be the same height and width as the first one, but longer.
Floor e): it can be longer than the walls. Put the four walls parallel to each other along the edges of the floor and fix them firmly to it with glue or nails.
Bar of wood d): cut to the same width as the space but longer, which makes it easier to pick up and pull out the borders.
Working sequence
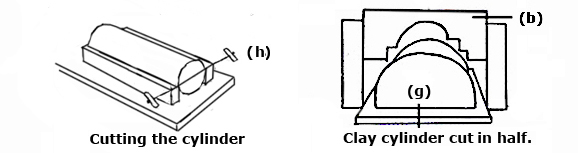
1) Roll the clay out into a large, solid cylinder, twice the height and slightly bigger than the border you are going to make. Lay it between two guide bars, half the height of the cylinder and cut it in half length-wise with a clay wire cutter. Open and separate the two halves and lay them flat side down on the bars of wood d) and put one between the two walls.
2) Put the piece of wood b) with the shape cut out at one end of it between the two walls and pull it along the top of the clay. You will have to do this several times until all the excess clay is cleaned off and the shape is formed.
3) Pull out the bar d) with the clay so it just juts out beyond the end of the walls. Hold a wire clay cutter against the outside end of the small walls and pull it down and through the clay. This will cut the border at 90º.
4) Do the same through the space where the walls are separated, which is the length of the border. Pull out the wood and continue cutting at the correct length.
5) Once cut, take out the bar of wood d) with the borders on it. If you have many bars of wood leave the clay on them until dry enough to be picked up without deforming the shape and then clean them.
6) On a wooden board covered with a cloth, lay the borders out to dry. Put a plank of wood on top to stop them from warping while drying.

Read more about: Skirting tiles
The next section; Borders (3) Plate structure
