EGYPTIAN PASTE
ca: PASTA EGÍPCIA
es: PASTA EGIPCIA
 Origin. Egyptian paste was developed in ancient Egypt between 2686-2181 BC., a period during which jewelers used casting and for this reason ceramic glazing is closely linked to the metallurgy of copper and bronze. (There is no link or relationship with Faience).
Definition. It is a self-glazeable mass with a sandy texture, its composition is related to glass and it is a very siliceous paste mixed with alkaline salts and has little or no plastic materials or oxides.
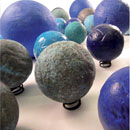
This paste has the property of self – glazing (auto-enameling) and is characterized by its final color, a bright blue. Sometimes it is decorated with manganese oxide (black).
Auto – enameling. This action is carried out by all the alkali metal salts and metal oxides during the drying process. These elements are stretched and drawn to the surface as it dries and form a glaze by creating efflorescence’s. These vitrify when fired due to the presence of silica (glass-forming) across the surface, giving brightness and color, all in a single firing. This is called “efflorescence glazing.”
Utility. In ancient Egypt it was mainly used for making very small pieces of jewelry, amulets, small funerary statues, due to the difficulty of working with it.
Composition. Today the raw materials to form the paste are made, but in the original era, the Egyptians were using base components that could be found locally (river, land, desert sand ….).
To start with it is a strongly alkaline paste with little plasticity, something very special, and its composition can vary greatly depending on its final use.
In the composition of the base: silica, feldspar, chalk, kaolin, sodium carbonate, sodium bicarbonate are usually involved, as well as fine sand and ash from firing, which gives the famous Egyptian blue shades. Other oxides can be added to develop different shades.
Base Egyptian paste glossy 850º C
Silica …………………. 75 gr.
Crete ………………… 3
K feldspar …………. 2
Ball Clay …………… 5
Na carbonate ……. 4
Bentonite …………. 3
Color
Blue – Cobalt Oxide 0.5% to 2%
Turquoise – Copper Oxide 1% to 3%
Purple – Manganese oxide 1% to 4%
Preparation. It is essential to have all materials and equipment ready before you start the process, since it is a very demanding paste and should be worked very quickly.
1) The base weighed
2) A large mortar
3) A rigid or semi-rigid plastic spatula
4) A plastic sheet
5) Distilled water or rainwater
6) A bottle or tube to measure the water
7) A sieve
8) Very important: dust mask and rubber gloves.
How to prepare it
a) Weigh the base, mix it thoroughly until you have a homogeneous dry mixture, then pass it through the sieve.
b) Put the distilled or rain water in a measuring bottle, you don´t need too much water and it should be added very gradually.
c) Put the base in a mortar, add the measured water and mix it with the spatula. Be careful not to add too much water, because it can easily become liquid.
Having prepared the paste in a lump, it can be worked and given its final shape, following the design chosen and the technique to be used.
d) Caution: the paste should be worked quickly and continuously without handling it excessively as it tends to get wet and softens easily. You should start and finish the piece without interruption, if left too long the final result will not be satisfactory.
e) If you want to work the paste with a press mold, it must be made of fired clay as otherwise the cast will be contaminated with salts which will make it unusable.
f) Another way to treat it is as a slip.
g) When handling this paste extra protective precautions must be taken: dust mask and rubber gloves to avoid contact of the paste with the skin.
Drying. This process lasts a minimum of two to three weeks.
It is important that during this period the whole piece is oxygenated, because the parts which are not will not be glazed.
During this process the piece should not be touched so as not to spoil the glaze and colors. The atmosphere of the place where you work determines the drying: cold, heat, humidity, etc., all directly influence the final result.
Decoration. Any type of decoration to be added must be finished before the drying process, as it is impossible to work on the piece once the efflorescence has appeared.
Firing. The ideal temperature is between 850º C and 1050° C depending on the composition of the base.The increase in temperature during firing should be very gradual over a minimum of 8 hours and cooling should be slow also.
When firing Egyptian paste, the interior of the kiln should be protected as small drops of enamel tend to detach themselves from the piece. It is very important to fire the piece as it has been dried, so as not to have to touch it when unfired.
Link to Author – Maria Teresa Capeta


