MAJOLICA: 5g - Painting jars
ca: Majòlica: 5g – Pintar Gerros.
es: Mayólica: 5g – Pintar jarros
 a) Tile-Shelf
b) Banding wheel
c) Banding bar
Working process
1) Place what you are decorating on the banding wheel what you are decorating and center it. To mark the banding lines put the wheel so it is at the correct distance from the banding bar. Turn the wheel with your, hold the bar with the little finger of your other hand and the pencil between your first finger and thumb so it touches the jar where you want the line drawn. If correct when turned, the two ends of the line should meet. Use a pencil with very soft lead, rub and flatten it on one side so you can mark the lines needed for colored bands and place the designs without damaging the base.
2) Calculate the spacing for the designs and mark them with a pencil line. Calipers can be used or a piece of paper cut or marked with the right size.
3) All the parts of the design are prepared on transparent paper and pounced. Hold them one by one in the correct place against the edge of the jar and rub it with the marking bag filled with charcoal powder. Do this until all the different parts of the design have been marked on.
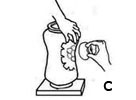 4) Jars can be straight or curved, the designs are difficult to mark and even more so if they curve vertically and horizontally, as shown in the illustration. The transparent paper has to be well darted on all sides to fit in and you need the assistance of a third hand, one to steady the jar, one to hold the prepared design and one to rub it with a marking bag. A design can be repeated around a jar, there can be different designs on each side or just the name of a medicinal plant.
5) Paint all the banding lines with the different colors and widths, work in the same way as when using a pencil. The neck of the jar slants, so the design has to be wider at the bottom than at the top. To avoid this, lines are banded around this part, which makes the neck to be painted straighter. The first photo shows this.
6) Sit down to paint with the table-trolley prepared with everything and a hand-pole to steady your hand while working.
7) First paint all the outlines, giving them shape and form and then add the colors.
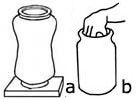
Moving a jar that has been decorated can be done in two ways;
a) Use a tile-shelf as a tray.
b) Put your hand inside the neck and with the pressure of your fingers against the walls you can pick it up. If it is heavy use one finger from your other hand to support it underneath. This is very practical for putting work into a kiln if it opens at the top, you can just slip your hand holding the jar inside the kiln and then see that it does not touch anything on any side.
The following photos go through the way of working.
Read more about: Bisque (4) Sounding plates, jars and lids / Bisque (5) Cleaning plates, jar and lids / Glaze-base (g) Applying by dipping plates, jar and lids / Glaze-base (h) Cleaning the glaze-base on plates, jars and lids. / Band / Banding (1) Working Process / Centering – Banding
The next section; Majolica: 5h – Twelve photos of Albarellos – Chemist jars
Click on the image to enlarge it
 Chemist jars decorated and finished.")
 A jar prepared to decorate .")
 Drawing the lines for banding.")
 Marking on the design through pounced transparent paper with charcoal powder.")
 The outlines of the design marked on with charcoal powder.")
 Detail of the marked design.")
