Ceramic - Pottery Dictionary

by Susan Mussi

ca: IMPRESSIÓ - Argila

es: IMPRESIÓN -Arcilla

Click on the title to see more images

Impressing is to indent a design or textures into soft clay by pressing different shaped objects into it. Materials with strong textures, such as canvas, or objects like rings, coins, crosses, etc. can be used.

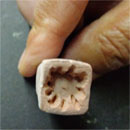
IMPRESSING TOOLS: Roulette wheel and stamps are the most popular and both can be bought or you can make them. They can be in wood, clay left to dry and clay fired and be with or without a handle. The design can protrude outwards or inwards and when pressed into the clay, the indent will be the reverse. Read more about: Impressing stamp

STAMPS: If you are going to use a design continuously, make it in wood or bisque. Whatever size or shape you make your stamp, the handle must be big enough to hold comfortably while pressing face downwards into the clay. If large, make it with a handle attached to the back, like a T upside down.Read more about: Stamp – To work with clay

ROULETTE WHEEL: the design goes round the outside of a tube that can be clay or wood and can be rolled by hand or can have a handle attached to it. To do this, a hole must be made through the center of the tube, a piece of metal passed through it and attached to a handle.Read more about: Roulette Wheel

Working sequence:
a) Work out the texture or design you want to reproduce, taking into account that it is going to be used several times on the same piece of clay to form a repeated pattern.
b) Roll out a solid tube of clay of the required size in width and length for your design.
c) For a stamp, carve out a design at one or both ends of the tube.
d) If it is a tube that is going to be rolled, carve out the pattern and calculate that the pattern fits exactly into the circumference, so it repeats correctly. If a handle is needed, cut a hole through the center.
e) Leave the clay to dry. It can be used when it is dry but for large quantizes and continuous use, fire it.
f) Roll or stamp the pattern over soft clay to indent it.

Photos lent by: a) by Josep Matés / b) – h) Núria Pié.

Link to the viedo where photos b) to d) have been taken – Núria Pié
Link to the viedo de Sukothai

ca: IMPRESSIÓ AMB SEGELLS

es: IMPRESIÓN CON SELLOS

Click on the title to see more images

Impressing stamps; you can use anything to mark or make a texture in clay. It could be a leaf, the flat end of a pencil or a sole of a shoe. The clay should be flat and you must work on a surface where it can be left, like a modeling board or a mold.
Here we are going to explain small ones, they can be brought industrially made or you can make them yourself to the sizes, shape and with indented patten of your choice. The material can be wood, dry clay and fired clay and they are made as stamp or roulette wheel.

Fired clay is the best as it is permanent, the design can protrude outwards or inwards and when pressed into the clay, the indent will be the reverse there are three different types –

1) Roll out a tube of clay, cut to the length required, long enough to hold comfortable when being used and with the diameter you need for your design, it can have a stamp at one or both.

2) It can be made without a handle and when fired a small wooden one is glued on to its underside, it looks like a mushroom. The handle is a thin pole of wood like a pencil.

3) Roulette wheel; it has a handle that has two metal arms that fit into a hold on each side of the stamp, this allows the stamp to be pushed and as it turns it covers large spaces quickly. It is mainly used for large pieces of clay that have to be covered with the same texture.

ca: SOBRE COBERTA

es: SOBRE CUBIERTA

In-glaze: you work on bisque, which is clay that has been fired, covered it with and opaque base, then it is decorated with colors that are mixed with a transparent glaze and both are fired together at 980º C. In the following sections the ways of handling the base and colors might slightly alter, but the basic method is the same.

What is so important about this method is the firing of both together, because it integrates the colors that overlap, to form other colors and shades and shows the movement and intensity of the brush strokes. Colors can overlap to form another, a light one under a dark one and the contrary, the same colors are used with different intensities. The white of the base at the left will be the lightest part, accentuating the dimensions and one of the most important things will be the movements of the paint brush, because it accentuates shapes and forms. There is great difficulty in correcting, for instance; if you scrape off a mistake when fired the different strengths of the base or color will be seen. It is easier to correct dark colors than light ones.

Note: Each of the methods, are defined under their name, for example; Screen Printing has 9 sections and below will take you to the first one. If you are interested in seeing the rest, at the bottom of it is a link to the next section or you can click onto the letter “S” and move down to see them all together.

a) Dry cord; refers to the outlines or parts of the base that are scraped off and are left to show the bisque, painted with a transparent glaze or filled with another color. Read more about: Dry cord

b) Glaze-base textures; the base can be given different textures. Read more about: Glaze-base (m) Textures / Glaze-base (n) Textures with added substances / Glaze-base ° Textures with colors / Spattering

c) Majolica decorating: it has many sections which cover the method of decorating tiles, plates, jars and lids. Read more about: Majolica: 5b – Preparing to paint tiles / MAJOLICA: 5e – Preparing to paint plates / MAJOLICA: 5g – Painting jars / MAJOLICA: 5i – painting lids

d) Relief molding; can be flat or in three dimensions. Modeled in stoneware, bisque fired at 1280º C and then decorated using different methods. Always starting with the ones that have to be fired at the highest temperature and using the Majolica method at 980º C for the illustrated parts of the decoration. Read more about: Majolica: 4f – Colors fired at two temperatures / Majolica: 4g – Relief in four different thicknesses.

e) Repeated designs; are tiles of one design, repeated to form a pattern. Read more about: Repeated tiles

f) Screen printing of outlines with in-glaze decorating. Read more about: Screen printing

g) Stenciling: using shapes cut out of paper to mark on designs. Read more about: Stencil: (1)

Read more about: On-Glaze / Underglaze

ca: INCISIÓ - Argila

es: INCISIÓN - Arcilla.

Click on the title to see more images

Incising is to engrave a design by cutting or scraping into the clay surface at any stage of drying, from soft to bone dry. With hard bone-dry clay you will obtain more precise lines, but you have to be very careful that it does not break. After incising, clean off the loose bits with a strong brush, then smooth the edges with a soft damp brush. Incising is useful for making textures.
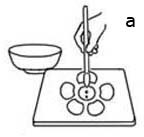
Note: Incising becomes sprigging when it goes through the clay, leaving a hole.

Incising soft clay:
a) Using tools with pointed heads of different sizes you can free-handedly indent a design into the clay as shown in the above illustration.
b) To mark a design onto soft clay, first draw the design on thin paper, lay it on top of the clay and with a very thin piece of wood with a slightly rounded head, go over the design, slightly forcing it, so that it leaves the outlines indented into the clay. You can also pounce with a needle, going straight through the paper into the clay. Then, following the lines, incise your design into the clay.

Incising dry clay:
a) To mark your design onto dry clay, place a carbon paper on top of the clay, then your design on top of it and draw over the outline so it is marked onto the clay. Alternatively, pounce the design and mark it on to clay with coal dust or industrial talcum powder.
b) When the outlines are marked on, scratch and scrape off the parts needed for your design, brush off all the small bits of clay, then pass a damp, soft brush over it to smooth off the edges.

Decorating incising: The clay can be covered with transparent glaze, which when fired accentuates the incisions, or the incisions can be filled with glaze colors or colored clays. When full, the surface is then leveled out and cleaned using a flexible tool, like a kidney, so only the incisions have color.

ca: INCRUSTACIÓ – Argila de colors i barbutina

es: INCRUSTACIÓN – Arcilla de colores y barbotina

Inlay is to force different colored clays or slips into clay of another color. Clay can be pressed in and slips added to fill up spaces which have been incised into clay. There are different colored clays that can be bought or you can make them up by adding stains. With colored clays, always use the same make and with slips make them up using the same clay. In both methods, the design is prepared on a flat surface and then the shape is usually formed using a mold.

INLAYING CLAY OR SLIP:
1) Roll out the clay that is going to be the background for the design and then leave it until it is leather hard.
2) Incise or dig out your design, clean and smooth off any loose clay on the outside, then score and dampen the parts of the design.
3) (a) Fill the spaces up with the different colored clays or the slip.
4) When dry enough, scrape off the surplus colors to the height of the background and you can see your inlaid design.

INLAYING CLAYS, CUT OUT DESIGNS:

1) (b) Roll out different colored clays all to the same height and cut out the required shapes.
2) Lay them on to a flat porous surface to form your design
3) (c) Roll out the clay for the background and lay it over them.
4) (d) With a rolling pin, gently roll over the clay until it flattens and is completely integrated with the design.
5) (e) To turn it the right way up, lay another piece of wood on top, like a sandwich, and turn it over.
6) The imbedded sides will have to be sponged to leave a smooth surface.
7) If it is a flat design, the outer edges will have to be cut to the shape required.
8) (f) There are many instruments that can be used with this method, the following are three of them biscuit cutters, press molds,hand tile cutters and they are made in different shapes and sizes.

ca: AÏLLAR

es: AISLAR

Insulate is to install materials that prevent or reduce the transference of electricity, heat, or sound.

ca: ÒXID DE FERRO

es: ÓXIDO DE HIERRO

Iron oxides are chemical compounds composed of iron and oxygen.

Iron oxides and oxide-hydroxides are widespread in nature, play an important role in many geological and biological processes, and are widely utilized by humans.

Some iron oxides are widely used in ceramics applications, particularly in glazing Many metal oxides provide the colors in glazes after being fired at high temperatures.
Iron oxides yield pigments (see iron oxide pigment). Natural iron oxides pigments are
called ochres. Many classic paint colors, such as raw and burnt siennas and umbers, are iron-oxide pigments. These pigments have been used in art since the earliest prehistoric art known, the cave paintings at Lascaux and nearby sites. Iron (III) oxide is typically used.
Link to Wikipedia Iron oxides